How to Design a House Floor Plan in AutoCAD
AutoCAD is a powerful computer-aided design (CAD) software that is commonly used for creating architectural drawings, including house floor plans. Designing a house floor plan in AutoCAD can be a complex process, but it can be made easier by following a few essential steps. ### 1. Create a New Drawing The first step is to create a new drawing file in AutoCAD. To do this, click on the "File" menu and select "New." In the "New Drawing" dialog box, select the "Architectural" template and click "OK." ### 2. Set Up the Drawing Units Once you have created a new drawing, you need to set up the drawing units. The drawing units determine the accuracy and scale of your drawing. To set up the drawing units, click on the "Format" menu and select "Units." In the "Units" dialog box, select the desired units of measurement and click "OK." ### 3. Draw the Walls The next step is to draw the walls of your house. To do this, click on the "Draw" menu and select "Line." In the "Line" dialog box, select the "Wall" object type and click "OK." To draw a wall, click on the starting point of the wall and drag the cursor to the end point of the wall. Release the mouse button to create the wall. ### 4. Add Doors and Windows Once you have drawn the walls, you can add doors and windows. To do this, click on the "Insert" menu and select the "Door" or "Window" command. In the "Insert Door" or "Insert Window" dialog box, select the desired door or window type and click "OK." To insert a door or window, click on the insertion point of the door or window and drag the cursor to the desired location. Release the mouse button to insert the door or window. ### 5. Add Other Features Once you have added the doors and windows, you can add other features to your house plan, such as furniture, appliances, and fixtures. To do this, click on the "Insert" menu and select the desired feature. In the "Insert" dialog box, select the desired feature type and click "OK." To insert a feature, click on the insertion point of the feature and drag the cursor to the desired location. Release the mouse button to insert the feature. ### 6. Save the Drawing Once you have completed your house floor plan, you need to save the drawing. To do this, click on the "File" menu and select "Save." In the "Save As" dialog box, enter a name for the drawing file and click "Save." ### 7. Export the Drawing Once you have saved the drawing, you can export it to a different file format, such as PDF or DWG. To do this, click on the "File" menu and select "Export." In the "Export" dialog box, select the desired file format and click "Save."
How To Draw Floor Plans In Autocad Edrawmax

How To Draw Floor Plans In Autocad Edrawmax

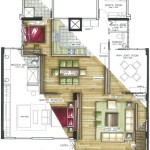
Floor Plan Create 2d 3d Plans Autodesk

Is Autocad The Best Floor Plan For Estate Agents Elements Property

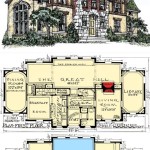
Architecture House Ground Floor And First Plan Autocad Drawing Dwg File

Autocad Tutorial Draw A House Floor Plan Free Cad Blocks In Dwg File Format

How To Draw Floor Plans In Autocad Edrawmax

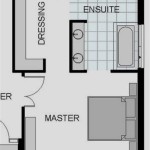
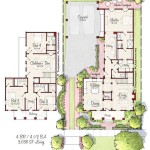
The Autocad Drawing Of Small House Ground Floor Plan 33 X21 Plot Size Includes 2 Bedrooms Living Room To Layout Plans

Floor Plan Free Cads

An Architectural House Plan 2d Floor Plans In Autocad Upwork