How to Make Floor Plans in AutoCAD: A Comprehensive Guide for Architects and Designers
AutoCAD is a powerful computer-aided design (CAD) software used by architects, engineers, and designers to create precise and detailed drawings. It offers a wide range of tools and features to help users create various types of drawings, including floor plans. Floor plans are essential for architects and designers as they provide a visual representation of the layout of a building or space. They are used to convey design concepts, communicate ideas, and obtain approval from clients. Creating floor plans in AutoCAD is a relatively straightforward process, but it requires some understanding of the software and its tools. ### 1. Set Up Your Drawing Environment Before you begin creating your floor plan, you need to set up your drawing environment. This includes creating a new drawing file, selecting the appropriate units of measurement, and setting up the drawing scale. To create a new drawing file, click on the "Start New" button in the AutoCAD ribbon. This will open a dialog box where you can select the template you want to use for your drawing. Once you have selected a template, click on the "OK" button to create a new drawing file. Next, you need to select the appropriate units of measurement. AutoCAD supports a variety of units, including inches, feet, meters, and centimeters. You can change the units of measurement by clicking on the "Units" drop-down menu in the status bar. Finally, you need to set the drawing scale. The drawing scale determines the size of the objects in your drawing relative to the actual size of the objects in the real world. You can set the drawing scale by clicking on the "Scale" drop-down menu in the status bar. ### 2. Draw the Walls The first step in creating a floor plan is to draw the walls. You can use the "Line" tool to draw straight walls and the "Polyline" tool to draw curved walls. To draw a wall, click on the "Line" or "Polyline" tool in the "Draw" panel of the ribbon. Then, move the cursor to the starting point of the wall and click to set the first point. Move the cursor to the end point of the wall and click again to set the second point. Continue drawing the walls until you have completed the perimeter of the building. ### 3. Add Doors and Windows Once you have drawn the walls, you need to add doors and windows to the floor plan. You can use the "Door" and "Window" tools in the "Insert" panel of the ribbon. To insert a door, click on the "Door" tool in the "Insert" panel. Then, move the cursor to the location where you want to insert the door and click to place it. You can then select the type of door you want to insert from the "Properties" palette. To insert a window, click on the "Window" tool in the "Insert" panel. Then, move the cursor to the location where you want to insert the window and click to place it. You can then select the type of window you want to insert from the "Properties" palette. ### 4. Add Other Features In addition to walls, doors, and windows, you can also add other features to your floor plan, such as furniture, appliances, and fixtures. You can use the "Insert" menu to insert blocks into your drawing. Blocks are predefined symbols that can be used to represent various objects. To insert a block, click on the "Insert" menu and select the "Block" command. Then, browse to the location of the block file you want to insert and select the block you want to insert. Click on the "OK" button to insert the block into your drawing. ### 5. Dimension the Floor Plan Once you have added all the necessary features to your floor plan, you need to dimension it. Dimensioning a floor plan means adding dimensions to the drawing that indicate the size and location of the various objects in the drawing. To dimension a floor plan, click on the "Dimension" panel of the ribbon. Then, select the type of dimension you want to use, such as linear dimension, angular dimension, or radius dimension. Click on the starting point of the dimension and then click on the end point of the dimension. The dimension will then be added to the drawing. ### 6. Save and Export the Floor Plan Once you have completed your floor plan, you need to save it. To save your drawing, click on the "File" menu and select the "Save" command. You can then save your drawing in the desired format. You can also export your floor plan to other formats, such as PDF, JPG, or DWG. To export your drawing, click on the "File" menu and select the "Export" command. Then, select the desired export format and click on the "OK" button. ### Conclusion Creating floor plans in AutoCAD is a relatively straightforward process, but it requires some understanding of the software and its tools. By following the steps outlined in this article, you can easily create accurate and detailed floor plans that will help you convey your design ideas and communicate with clients.
Making A Simple Floor Plan In Autocad Part 1 Of 3

Basic Floor Plan Drafting In Autocad 7 Steps Instructables

How To Draw Floor Plans In Autocad Edrawmax

How To Draw Autocad Floor Plan Cad Cam Blog

Is Autocad The Best Floor Plan For Estate Agents Elements Property

How To Draw Floor Plans In Autocad Edrawmax

Autocad Drawing And Coohom Design 3d Fast Rendering Blog

Autocad 2d Bathroom Floor Plans Graphic Design Courses

Autocad 2d Basics Tutorial To Draw A Simple Floor Plan Fast And Efective Part 1

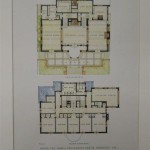
First Floor Plan Of Residence Detail Presented In This Autocad Drawing File 2d Auto Cad Ca Layout