How to Make a Floor Plan on a Computer
Creating a floor plan on a computer has become an increasingly efficient and accurate method for architects, interior designers, and homeowners alike. The digital approach offers numerous advantages over traditional hand-drawn plans, including ease of editing, precise measurements, and the ability to visualize the space in 3D. This article provides a comprehensive guide on how to make a floor plan on a computer, covering software options, essential considerations, and practical steps.
Choosing the Right Software
The first step in creating a floor plan on a computer involves selecting the appropriate software. The market offers a range of options, from free and user-friendly programs to professional-grade applications with advanced features. The choice depends on the user's skill level, project complexity, and budget.
Several popular software choices exist, each with its own strengths and weaknesses. SketchUp is a widely used option known for its intuitive interface and extensive library of pre-designed components. It is a good choice for beginners and those who need to quickly create visual representations of their plans. The free version offers ample functionality for basic floor plan creation, while the paid version provides access to advanced features such as 3D modeling and rendering.
AutoCAD, on the other hand, is a more professional-grade software commonly used by architects and engineers. It offers a comprehensive suite of tools for creating precise and detailed floor plans. AutoCAD is known for its accuracy and ability to handle complex projects, but it has a steeper learning curve compared to SketchUp. It is a suitable choice for projects requiring precise measurements and adherence to industry standards.
Another option is Sweet Home 3D, a free and open-source software designed specifically for interior design and floor planning. It features a simple interface and a catalog of furniture and other objects that can be easily inserted into the plan. Sweet Home 3D is a good choice for homeowners and renters who want to visualize their space and experiment with different layouts.
Lastly, many online floor plan creation tools exist. These typically offer a subscription-based model and are often easier to learn than desktop software. Many provide pre-designed templates and drag-and-drop functionality, making them suitable for users who need to quickly create a basic floor plan.
Before committing to a specific software, it is advisable to try out the free trials or versions offered by different vendors. This allows users to assess the software's usability, features, and suitability for their specific needs. Consider factors such as the availability of tutorials and support documentation, as well as the software's compatibility with other programs or file formats.
Essential Considerations Before Starting
Before diving into the actual creation of the floor plan, several essential considerations must be addressed. These considerations will ensure that the floor plan is accurate, functional, and meets the user's specific requirements.
First, accurate measurements of the space are crucial. This involves measuring the length and width of each room, as well as the dimensions of walls, doors, windows, and other architectural features. Use a reliable measuring tape or laser measuring device to obtain precise readings. Document all measurements carefully, creating a detailed sketch of the space with annotated dimensions. It is important to measure at multiple points to account for any irregularities in the walls or floor.
Second, identify the location of all fixed elements within the space. This includes doors, windows, plumbing fixtures, electrical outlets, and HVAC vents. Accurately representing these elements in the floor plan is essential for ensuring that furniture placement and spatial planning are feasible. Note the dimensions of these elements and their distance from adjacent walls or corners.
Third, consider the intended use of each room. This will influence the layout and placement of furniture and other objects. Think about the flow of traffic between rooms and ensure that there is adequate space for movement and activities. Consider the placement of furniture in relation to windows, doors, and other architectural elements. For example, a bed should not be placed directly in front of a window or door, and a desk should be placed near an electrical outlet.
Fourth, determine the scale of the floor plan. A common scale for residential floor plans is 1/4 inch equals 1 foot (1:48). This means that every 1/4 inch on the floor plan represents 1 foot in the actual space. Using a consistent scale is essential for ensuring that the floor plan is accurate and proportional. Some software automatically sets the scale, while others require manual adjustment.
Lastly, think about the level of detail required in the floor plan. For basic space planning, a simple floor plan showing the layout of rooms and the placement of furniture may suffice. For more detailed projects, such as renovations or construction, a more comprehensive floor plan is needed, including information about wall thicknesses, door and window sizes, and the location of electrical and plumbing systems.
Step-by-Step Guide to Creating the Floor Plan
Once the software is selected and the essential considerations are addressed, the actual creation of the floor plan can begin. The following steps provide a general guide to the process, although the specific steps may vary depending on the software used.
First, set up the drawing environment. This involves selecting the appropriate units of measurement (e.g., feet and inches or meters) and setting the scale of the floor plan. Most software allows users to customize the drawing grid and snap settings to aid in precise drawing. Turn on the grid to help keep lines straight and aligned. Ensure the scale is set correctly so that measurements are accurate.
Second, draw the exterior walls of the building or space. Use the line or wall tool in the software to draw the outline of the building, using the measured dimensions. Ensure that the walls are drawn to the correct thickness, as this can affect the overall dimensions of the interior space. Double-check the measurements throughout the process to avoid errors accumulating.
Third, add interior walls to define the individual rooms within the space. Again, use the line or wall tool to draw the interior walls, ensuring that they are connected to the exterior walls and that they are drawn to the correct thickness. Pay attention to the placement of doorways and hallways, ensuring that they are wide enough to allow for comfortable movement. Consider traffic flow when placing walls.
Fourth, insert doors and windows into the walls. Most software programs have a library of pre-designed doors and windows that can be easily inserted into the floor plan. Select the appropriate door and window sizes and styles, and place them in the correct locations. Ensure that the doors swing in the correct direction. Consider the placement of windows for natural light and ventilation.
Fifth, add architectural features and fixtures. This includes items such as stairs, fireplaces, columns, and built-in cabinets. Use the software's library of pre-designed components or create custom shapes as needed. Ensure that these features are placed in the correct locations and that they are drawn to the correct scale. Include details such as outlets, switches and plumbing fixtures.
Sixth, add furniture and other objects to the floor plan. This is where the intended use of each room becomes important. Choose furniture pieces that are appropriate for the size and function of each room, and arrange them in a way that is both functional and aesthetically pleasing. Most software provides a library of furniture models that can be easily inserted and resized. This step helps to visualize the space and ensure that furniture fits comfortably.
Seventh, add dimensions and annotations to the floor plan. This is essential for providing accurate information about the size and layout of the space. Use the software's dimensioning tools to add dimensions to walls, rooms, doors, and windows. Add text annotations to label rooms, features, and other important elements. Use clear and concise language.
Eighth, review and refine the floor plan. Once the floor plan is complete, take a step back and review it carefully. Check for any errors or omissions, and make any necessary adjustments. Ensure that all measurements are accurate, that all features are correctly placed, and that the overall layout is functional and aesthetically pleasing. It is helpful to have someone else review the plan for a fresh perspective.
Ninth, save and export the floor plan. Once the floor plan is finalized, save it in a suitable file format. Most software programs offer a variety of export options, such as PDF, DWG, and JPG. Choose the file format that is most appropriate for the intended use of the floor plan. Saving a backup is always a good practice.
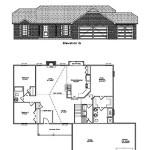
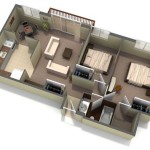
The process detailed here focuses on creating a 2D floor plan. However, many software programs also allow for the creation of 3D models. This involves adding height to the walls and other features, and applying textures and materials to create a more realistic representation of the space. 3D modeling can be a valuable tool for visualizing design options and communicating ideas to clients or collaborators.
Creating a floor plan on a computer is a skill that can be learned and refined over time. With practice and experimentation, users can become proficient in using floor plan software and creating accurate and visually appealing representations of their spaces. Using the appropriate software and meticulous planning, designers and homeowners can create floor plans that are professional and practical.

How To Draw House Plans On Your Pc 5 Simple Steps

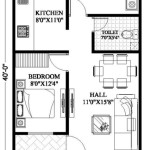
2d Floor Plans

How To Draw Floor Plans On Computer And In Free First Plan House Designs

How To Create A Network Layout Floor Plan Plans Office Location

Conceptdraw Samples Computer And Networks Network Layout Floor Plan

Creating A Network Layout Floor Plan Conceptdraw Helpdesk

Floor Plan Creator Create Detailed And Precise Plans App For Android

Network Layout Floor Plans Solution Conceptdraw Com

Floor Plan Create Easily From Templates And Exmamples Home Design Free Plans

Floor Plan Creator Powerful And Design App