Making House Plans in SketchUp: Mastering the Essentials
Sketchup is a powerful 3D modeling software that enables architects, designers, and hobbyists to create realistic and detailed house plans. Mastering the essential aspects of making house plans in SketchUp empowers you to visualize your dream home, plan its layout, and communicate your design effectively.
1. Understanding the User Interface
Before delving into the intricacies of house planning, familiarize yourself with SketchUp's user interface. The main workspace is divided into three main panels: the model window, the toolbar, and the inspector. The model window displays your model, the toolbar provides tools and commands, and the inspector allows you to modify object properties.
2. Creating the Foundation
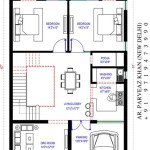
The foundation is the blueprint for your house. Use SketchUp's line and rectangle tools to outline the perimeter of your house. Adjust the width, length, and height of the walls using the Tape Measure tool. Add doors and windows by selecting the corresponding shapes from the toolbar and dragging them into place.
3. Framing the Walls
To frame the walls, draw two parallel lines for each outer wall. Connect these lines with perpendicular lines at the corners. Use the Push/Pull tool to extrude the walls to the desired height. Add windows and doors by creating holes in the wall faces.
4. Adding a Roof
The roof protects your house from the elements. Draw the outline of the roof using SketchUp's polygon or roof plane tools. Adjust the pitch, length, and width of the roof by modifying the vertices and edges.
5. Creating Interior Spaces
Partition the interior space by drawing walls to create rooms. Use doors and windows to connect different areas. Add furniture, appliances, and other objects to visualize the layout and functionality of your house.
6. Setting Up Lighting
Proper lighting enhances the realism of your house plans. Add natural lighting by creating windows and skylights. Include artificial lighting by inserting light fixtures into the ceilings and walls.
7. Adding Textures and Materials
Assigning textures and materials to surfaces adds depth and character to your model. Access the Materials library within SketchUp to apply textures to walls, floors, and roofs. Create custom materials to match specific materials.
8. Finalizing the Model
Once all the details are in place, finalize your model by cleaning up any unnecessary or redundant lines and surfaces. Check for errors and ensure that all measurements are accurate. Save your file in a suitable format, such as .skp or .dwg, for easy sharing and collaboration.
Conclusion
Mastering the essential aspects of making house plans in SketchUp empowers you to design and visualize your dream home accurately and efficiently. By following these steps, you can create comprehensive house plans that convey your vision and specifications clearly.

Sketchup Floor Plan Tutorial For Beginners

Layout Floor Plan Pro Sketchup Community

2d Floor Plans Without Drawing The 3d Object Pro Sketchup Community

Making Unique Floor Plans Skill Builder

Sketchup Tutorial How To Create A Quick Floor Plan

Expert Tips On How To Create A Professional Floor Plan Sketchup Hub

Sketchup 8 Lessons Advanced House Building

Free Floor Plan Sketchup Review

Free Floor Plan Sketchup Review

How To Automatically Convert Sketchup Model Into 2d Floorplan With Measurement Requests Discussion Community


