Drawing Your Own House Floor Plans: A Guide for Beginners
Creating a house floor plan is a fundamental step in the design and construction process. It allows you to visualize your home's layout, optimize space usage, and ensure functionality. While professional architects and designers can create intricate and detailed floor plans, it is also possible for individuals to draw their own house floor plans using readily available tools and resources. This article will provide a comprehensive guide for beginners on drawing their own house floor plans, outlining key steps, essential software, and valuable tips.
1. Gather Inspiration and Define Requirements
Before embarking on the drawing process, it is crucial to gather inspiration and define your specific needs. Explore existing house floor plans online or in architectural magazines to gain a sense of different layouts and design elements. Consider your family's lifestyle, the number of bedrooms and bathrooms required, living spaces, and any other specific requirements, such as accessibility features or a home office.
Create a list of essential rooms and their desired sizes. Research average room dimensions for reference, but remember that these are just guidelines. Take into account the number of people living in the house, their activities, and furniture placement. For example, a large kitchen may be ideal for someone who enjoys cooking, while a spacious living room might suit someone who loves to entertain.
2. Choose a Floor Plan Software
Numerous software options are available for creating house floor plans, ranging from free online tools to professional design programs. The choice depends on your budget, level of experience, and desired features. Some popular software options include:
- Free Online Tools: Floorplanner, RoomSketcher, and Sweet Home 3D are user-friendly online platforms that offer basic features for drawing simple floor plans. They often provide pre-built furniture and other elements for quick design.
- Paid Software: Chief Architect, AutoCAD, and SketchUp are professional-grade software programs with advanced features for creating detailed and complex floor plans. These programs offer a wide range of customization options, including 3D rendering and material selections.
3. Draw the Basic Layout
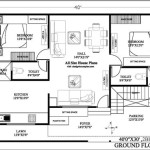
Once you have chosen your software, start by drawing the basic layout of your house. This includes the exterior walls, doors, and windows. If you have a specific lot size or existing structure, incorporate those dimensions into your plan. Use gridlines or measurements provided by the software to ensure accurate sizing and proportions.
Think about the flow of your house and how different rooms connect. Consider creating a central hallway for easy movement, a separate dining area for formal gatherings, or a private zone for bedrooms. Avoid placing doors in corners as this can limit accessibility and create awkward spaces.
4. Add Interior Features
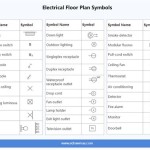
Once the basic layout is complete, you can start adding detail to your floor plan. This includes furniture, appliances, fixtures, and other interior elements. Most software programs offer pre-built objects and symbols that can be easily dragged and dropped onto your plan.
When adding furniture, consider the scale and placement of each item. Ensure there is adequate space for movement and ease of access. Kitchen appliances should be placed with careful consideration for workflow and efficiency. For bathrooms, ensure adequate space for fixtures, a shower, and a vanity.
5. Customize and Refine
After adding basic interior features, you can further customize and refine your floor plan. Use different colors, patterns, textures, and material selections to enhance the design and reflect your personal preferences. Experiment with different furniture arrangements and lighting fixtures to create a desired ambiance.
Pay attention to details such as window placements, stair design, and wall thicknesses. These elements can significantly influence the overall look and feel of your house. Consider adding specific features like a fireplace, built-in shelves, or a pantry to enhance functionality and aesthetics.
6. Review and Evaluate
Once you have completed your house floor plan, it is essential to review and evaluate it thoroughly. Walk through the plan virtually, imagining how you would move through the house and interact with different spaces. Consider factors such as natural light, airflow, and overall comfort.
Ask yourself if the layout meets your initial requirements and if there are any potential issues or areas for improvement. If necessary, revise the plan by rearranging walls, adding or removing features, or adjusting dimensions. The goal is to create a floor plan that is both functional and aesthetically pleasing.
7. Share and Get Feedback
Once you are satisfied with your floor plan, consider sharing it with friends, family, or a professional architect or designer for feedback. They can offer fresh perspectives and insights that you may have overlooked.
Sharing your floor plan can also help you visualize the design more clearly and gain a sense of how others might perceive your home. Valuable feedback can help you refine your plan further and create a truly unique and functional home.

Draw Floor Plans With The Roomsketcher App

Designing My Own House

Make Your Own Blueprint How To Draw Floor Plans

Floor Plans Learn How To Design And Plan

Make Your Own Blueprint How To Draw Floor Plans

Floor Plans Learn How To Design And Plan

Design Your Own House Floor Plans Must See This Acha Homes

Floor Plan Creator Planner 5d

House Plans How To Design Your Home Plan

Make Your Own Blueprint How To Draw Floor Plans