How To Draw Plans For A House By Hand
Creating house plans by hand is a foundational skill for aspiring architects, designers, and even homeowners looking to visualize and develop their dream spaces. While computer-aided design (CAD) software is prevalent, understanding the manual drafting process provides a deeper appreciation for spatial relationships, scale, and the intricacies of building design. This article outlines the essential steps and considerations involved in drawing house plans by hand, enabling you to produce detailed and accurate representations of your architectural vision.
Before commencing any drawing, thorough preparation is crucial. This initial phase involves gathering necessary information, understanding applicable building codes, and selecting appropriate drafting tools. Accurate measurements of the existing site or the intended building footprint are indispensable. Furthermore, defining the specific requirements of the house, such as the number of rooms, their sizes, and desired layouts, will guide the entire design process.
Gathering Essential Information and Defining Requirements
The initial step involves a comprehensive site analysis. If the house is to be built on an existing lot, accurate measurements of the property lines, existing structures (if any), topography, and any easements or setbacks are vital. This information is typically obtained from property surveys. For new construction on vacant land, a detailed site analysis will determine the optimal placement of the house, considering factors such as sun exposure, prevailing winds, and drainage patterns. Understanding local zoning regulations and building codes is also paramount. These regulations dictate aspects such as minimum setbacks, allowable building heights, and permitted uses of the property. Failing to adhere to these regulations can result in costly revisions and delays during the permitting process.
Defining the requirements for the house involves a detailed needs assessment. This includes determining the number of bedrooms and bathrooms, the size and function of living areas, the kitchen layout, and any specific features such as a home office, a garage, or a deck. Consider the lifestyle of the occupants and how they intend to use the space. This information will inform the overall layout and the size of each room. Create a detailed list of desired features and prioritize them based on budget and feasibility. This list will serve as a guide throughout the design process.
Once the information gathering and needs assessment are complete, a preliminary conceptual design can be developed. This involves sketching out different layout options and exploring various spatial arrangements. At this stage, it's helpful to create bubble diagrams, which are simplified representations of rooms and their relationships to each other. These diagrams help to visualize the flow of movement within the house and to identify potential conflicts in the layout. Experiment with different configurations and refine the design based on feedback and further consideration of the requirements.
Selecting the appropriate drafting tools is essential for producing accurate and professional-looking house plans. A drafting table or a flat, stable surface is crucial for creating precise lines and angles. A set of drafting pencils with varying lead hardnesses (e.g., 2H, HB, 2B) will allow you to create different line weights for different purposes. A set of architectural scales is indispensable for drawing plans to a specific scale (e.g., 1/4 inch = 1 foot). Other essential tools include a T-square, triangles (30-60-90 and 45-degree), a compass, an eraser, and drafting tape.
Establishing the Floor Plan and Elevations
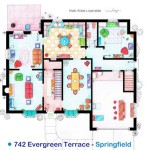
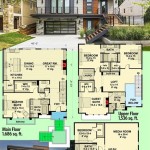
The floor plan is a horizontal cross-section of the house, showing the layout of rooms, walls, doors, windows, and other features. To begin, establish the outer dimensions of the house based on the site constraints and the desired size of the building. Using the architectural scale, draw the exterior walls to the correct thickness. Typically, exterior walls are drawn thicker than interior walls to represent their greater structural capacity. Next, draw the interior walls, dividing the house into rooms according to the conceptual design. Pay attention to the placement of doors and windows, ensuring that they are strategically located to maximize natural light and ventilation. Indicate the swing direction of doors and the type of windows being used (e.g., casement, double-hung, sliding). Include details such as closets, fireplaces, and built-in furniture.
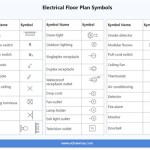
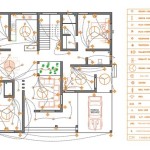
Label each room with its name (e.g., living room, bedroom, kitchen) and indicate its dimensions. Show the location of plumbing fixtures such as toilets, sinks, and showers. Also, indicate the location of electrical outlets, switches, and lighting fixtures. A legend should be included on the plan to explain the symbols used to represent different features. Use different line weights to distinguish between different elements, such as walls, doors, and windows. Thicker lines are typically used for exterior walls, while thinner lines are used for interior walls and details.
Elevations are orthographic projections that show the exterior appearance of the house from different viewpoints (e.g., front, rear, left, and right). Elevations provide information about the height of the building, the roof slope, the window and door sizes and placement, and the exterior finishes. Start by drawing a horizontal line to represent the ground level. Then, draw the vertical lines representing the corners of the building. Use the architectural scale to accurately represent the height of the walls, the roof, and other features. Indicate the roof slope as a ratio (e.g., 6/12). Show the location of windows and doors, and indicate their sizes and styles. Include details such as siding, brickwork, trim, and other exterior finishes. Use shading and hatching to create a sense of depth and to highlight different features. Label each elevation with its direction (e.g., front elevation, rear elevation).
The floor plan and elevations should be drawn to the same scale to ensure consistency and accuracy. This allows you to easily visualize the relationship between the interior layout and the exterior appearance of the house. Regularly check the dimensions and proportions to ensure that they are accurate and consistent. Use a T-square and triangles to ensure that all lines are straight and perpendicular. Erase and redraw any lines that are not accurate or clear. Take your time and pay attention to detail. A well-drawn floor plan and elevations are essential for communicating your design ideas to builders, contractors, and other stakeholders.
Adding Details and Annotations
Once the floor plan and elevations are complete, it is time to add additional details and annotations to fully communicate the design intent. This includes adding information about the materials to be used, the dimensions of various features, and any specific construction details. A foundation plan, which shows the layout of the foundation walls and footings, is also essential. A roof plan, which shows the shape and slope of the roof, is also required. Include details such as the location of downspouts and gutters. Sections are vertical cuts through the house that show the internal construction details, such as wall assemblies, floor joists, and roof rafters. Sections are especially useful for communicating complex construction details to builders and contractors.
Annotations are notes and labels that provide additional information about the design. These annotations should be clear and concise, and they should be placed strategically on the drawings to avoid clutter. Include information about the materials to be used, such as the type of siding, the type of roofing, and the type of flooring. Indicate the dimensions of various features, such as the thickness of the walls, the size of the windows, and the height of the ceilings. Provide details about the construction methods to be used, such as the type of framing, the type of insulation, and the type of foundation. Use standard architectural symbols and abbreviations to communicate information efficiently. A legend should be included on the drawings to explain the symbols and abbreviations used.
Review the drawings carefully and make any necessary revisions. Check for accuracy and consistency. Ensure that all dimensions are correct and that all features are properly labeled. Ask someone else to review the drawings to catch any errors or omissions. Once you are satisfied with the drawings, make a final copy. The final copy should be clear, accurate, and complete. It is recommended to have the drawings professionally reproduced to ensure that they are of high quality and that they will last for a long time.
Creating house plans by hand is a time-consuming and demanding process, but it is also a rewarding one. By understanding the basic principles of architectural drafting and by following the steps outlined in this article, you can create detailed and accurate representations of your architectural vision. These plans can then be used to communicate your design ideas to builders, contractors, and other stakeholders, ultimately bringing your dream home to life.

How To Draw A Floor Plan The Simple 7 Step Guide For 2024

How To Draw A Floor Plan The Simple 7 Step Guide For 2024

Interactive Floor Plans Are Easy To Setup Even If You Don T Have Plan Graphics Tourvista

Make Your Own Blueprint How To Draw Floor Plans

5 Tips On How To Draw A Blueprint By Hand

Floor Plan Creator And Designer Free Easy App

Efloorplan New Plan Measure Rooms And Draw Floor

Create A Hand Sketch Of Your House Plan By Homeplans Fiverr

Floor Plans Learn How To Design And Plan

Discover The Layout Of This Charming Home