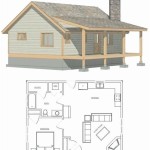
How to Draw a Floor Plan to Scale in Excel
Creating a floor plan to scale in Excel is a simple and convenient way to visualize and plan your space. By following these step-by-step instructions, you can easily create an accurate floor plan that meets your specific needs.
Step 1: Prepare Your Excel Worksheet
Open a new Excel worksheet and set up your page orientation to "Landscape" in the Page Setup menu. This will provide you with a wider working area.
Step 2: Determine the Scale
Decide on the scale of your floor plan. This will determine how large or small the objects in your plan will be. A common scale for floor plans is 1:50, which means that 1 unit in your plan represents 50 units in the real world. For example, if a room is 10 feet wide in real life, it would be 0.2 feet (or 2.4 inches) wide in your Excel floor plan.
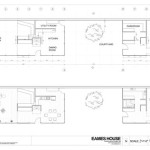
Step 3: Draw the Outer Walls
Using the "Line" tool in Excel, draw the outer walls of your floor plan. Make sure to draw them to scale, using the appropriate units for your chosen scale. For example, if your scale is 1:50 and your room is 10 feet wide, you would draw a line 0.2 feet wide.
Step 4: Add Interior Walls, Doors, and Windows
Continue adding interior walls, doors, and windows to your floor plan using the "Line" tool. Remember to maintain the scale and use the appropriate measurements.
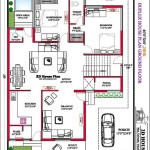
Step 5: Add Furniture and Fixtures
Once the basic structure of your floor plan is complete, you can add furniture and fixtures using shapes or images. To insert shapes, use the "Insert" menu and select "Shapes." To insert images, use the "Insert" menu and select "Pictures." Resize and position the shapes or images to represent the furniture and fixtures in your plan.
Step 6: Add Annotations and Dimensions
Add any necessary annotations or dimensions to your floor plan using the "Text Box" tool in Excel. This will help clarify the layout and provide additional information about the space.
Step 7: Save and Print Your Floor Plan
Once you are satisfied with your floor plan, save it as an Excel file or print it out for reference. You can also export your floor plan to PDF or other formats if needed.
Tips for Drawing a Floor Plan to Scale in Excel
- Use a consistent scale throughout your floor plan to ensure accuracy.
- Draw the walls and objects using precise measurements and shapes.
- Use different colors or line styles to differentiate between different types of walls or objects.
- Add annotations and dimensions for clarity.
- Proofread your floor plan carefully before saving or printing it.
By following these steps and tips, you can create a detailed and accurate floor plan to scale in Excel. This can be a valuable tool for planning renovations, designing new spaces, or simply visualizing the layout of your home or office.

3 Ways To Draw And Create A Floorplan In Excel Like Cad With Examples

How To Create House Plans Elevations In Microsoft Excel Using Verbal Scale

How To Draw A Floorplan Scale In Excel House Design Ideas C75 Create Floor Plan Free Plans Warehouse

How To Make Create A Floor Plan On Microsoft Excel Templates Examples 2024

How To Create A Floor Plan Using Excel

How To Create A Floor Plan Using Excel

How To Make A Floorplan In Excel Microsoft Tips

How To Draw And Create A Floor Plan In Excel Like Cad Part 2 Live Examples With Addin Link

How To Make Create A Floor Plan On Microsoft Excel Templates Examples 2024

How To Make A Floorplan In Excel Microsoft Tips