Create a House Plan in AutoCAD: A Comprehensive Guide
AutoCAD, a powerful computer-aided design (CAD) software, is widely used by architects, engineers, and designers for creating detailed drawings and plans. When it comes to designing a house, AutoCAD offers a comprehensive set of tools and features that can help you bring your vision to life. This guide provides a step-by-step process for creating a house plan in AutoCAD, outlining the key steps and essential features you need to know.
1. Setting Up the Drawing Environment
Before diving into the design process, it's crucial to set up your drawing environment in AutoCAD. This involves defining the units of measurement, establishing the necessary drawing layers, and configuring other settings to optimize your workflow.
Start by selecting the appropriate units for your project, such as feet or meters. This ensures that all dimensions and measurements are consistent throughout the plan. Next, create separate layers for different elements of your house plan, such as walls, doors, windows, furniture, and landscaping. Layers help you organize your drawing, make it easier to manage different components, and control the visibility of different objects.
Additionally, you may want to consider using a template or starting with a pre-designed floor plan to save time. AutoCAD offers a wide range of templates that can provide a basic framework for your house plan, which you can then customize according to your requirements. These templates can include default settings and specific drawings like walls, doors, and windows, providing a solid foundation for your design.
2. Drawing the Floor Plan
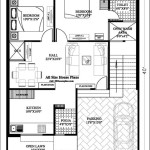
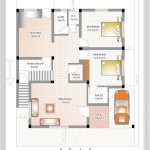
Once you've set up the drawing environment, you can begin creating the floor plan. This involves outlining the basic shape of your house, defining the dimensions of each room, and creating walls, doors, and windows.
Use the line command ("L") or the rectangular command ("RECTANG") to draw the outer walls of your house. Adjust the dimensions using the "DIMLINEAR" command or simply type in the desired dimensions. Remember to consider the placement of walls and any structural supports needed for the design. Once the outer walls are established, you can use the "WALL" command to create internal walls, dividing the house into different rooms.
The "DOOR" and "WINDOW" commands allow you to insert these elements onto your floor plan. You can choose from a variety of pre-defined styles or customize them to match your preferences. Make sure to specify the size, placement, and direction of each door and window.
3. Adding Details and Annotations
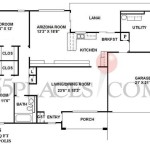
With the basic floor plan in place, it's time to add details and annotations to enhance the clarity and functionality of your design. This might include adding furniture, appliances, fixtures, and other important elements that define the space.
Utilize the "BLOCK" command to insert pre-defined symbols or create your own custom blocks for frequently used objects like furniture, appliances, or plumbing fixtures. This helps streamline the process and maintain consistency throughout the plan. You can also use the "TEXT" command to add text annotations, including room names, dimensions, and notes. These annotations provide essential information about the space and ensure clarity for all stakeholders involved in the project.
Additionally, you can use the "HATCH" command to create patterns for different surfaces, such as flooring, tiling, or walls. This visually enhances the floor plan and provides a better representation of the intended materials and finishes.
4. Creating Elevations and Sections
Once you have a detailed floor plan, you can create elevations and sections to visualize your house from different perspectives. These views provide a better understanding of the building's exterior and interior design, helping you to refine the overall aesthetic and functionality.
The "ELEVATION" command helps you create a frontal view of your house, showcasing the exterior facade, roofline, and other design elements. You can also define the elevation's perspective, such as a front elevation, side elevation, or back elevation. The "SECTION" command enables you to create a cross-sectional view, exposing the internal structure of the house. This allows you to see the layout of different floors, the heights of walls and ceilings, and the placement of stairs or other structural elements within the design.
Both elevations and sections provide valuable visual aids for understanding the entire structure of the house. By carefully considering the perspectives and details you choose to represent, you can create comprehensive and informative drawings that communicate your design intentions effectively.
5. Reviewing and Modifying Your Design
Creating a house plan in AutoCAD is an iterative process that requires careful planning and adjustments. It's important to review and modify your design throughout the process to ensure it meets your requirements and preferences.
Take advantage of AutoCAD's powerful editing tools to modify existing elements, add new features, or correct any errors. The "MOVE" command allows you to reposition objects, while the "COPY" command replicates elements within your plan. The "SCALE" command helps you resize objects to fit the appropriate dimensions. You can also use the "TRIM" or "EXTEND" commands to create cleaner lines and eliminate unnecessary objects, enhancing the overall aesthetic and functionality of your design.
By repeatedly reviewing and refining your design, you can ensure that your AutoCAD house plan accurately reflects your vision and meets all the necessary requirements for construction or presentation.

Making A Simple Floor Plan In Autocad Part 1 Of 3

How To Draw Floor Plans In Autocad Edrawmax

Basic Floor Plan Drafting In Autocad 7 Steps Instructables

Is Autocad The Best Floor Plan For Estate Agents Elements Property

Autocad Drawing And Coohom Design 3d Fast Rendering Blog

32 Autocad Small House Plans Drawings Free Design Home Floor Modern Plan

How To Draw Floor Plans In Autocad Edrawmax

Floor Plan Tools For 2d 3d Plans Autodesk

How To Make House Floor Plan In Autocad Fantasticeng

Create Floor Plans With Autocad Lt Acad Systems Autodesk Gold Partner Training Certification Center
Related Posts