How to Create a Detailed Floor Plan in 3ds Max
3ds Max, a powerful 3D modeling and rendering software, offers versatile tools for creating architectural floor plans. Whether you're a seasoned designer or just starting out, this step-by-step guide will equip you with the essential knowledge to produce accurate and visually stunning floor plans in 3ds Max.
1. Setting Up the Project
Begin by launching 3ds Max and creating a new scene. Select the "Create" tab and choose "Standard - Units Setup." Define the units, grid spacing, and other project settings as per your requirements.
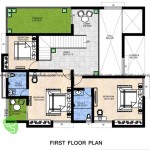
2. Creating the Floor Plan
Use the "Polyline" tool from the "Create" tab to draw the perimeter of your floor plan. Ensure precision by aligning the vertices with your project's scale. Select the "Extrude" tool to give the floor plan a thickness.
3. Adding Walls
To create walls, switch to the "Create" tab and select the "Wall" tool. Specify the wall's height and thickness. Draw the wall along the edges of the floor plan, snapping it to the vertices for accuracy.
4. Inserting Doors and Windows
From the "Create" tab, select the "Door" or "Window" tools to insert openings into the walls. Adjust the size and position of the openings as needed. Use the "Pick" tool to move and rotate the objects precisely.
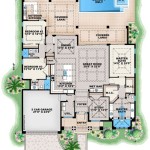
5. Adding Furniture and Fixtures
Import or create 3D models of furniture and fixtures to populate the floor plan. Position and rotate the objects using the "Move" and "Rotate" tools. Adjust the scale and orientation to fit the dimensions of your room.
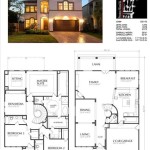
6. Lighting and Rendering
To enhance the realism of your floor plan, add lighting to the scene. Select the "Light" tab and choose appropriate light sources, such as daylight or artificial lights. Use the "Render" tab to adjust the render settings and generate a high-quality image of your floor plan.
7. Dimensioning and Annotation
Dimensions and annotations provide valuable information on the floor plan. Use the "Dimension" tool from the "Create" tab to add measurements. Insert text labels using the "Text" tool to annotate important details, such as room names or furniture descriptions.
Tips for Enhanced Floor Plans
- Use layers to organize different elements of the floor plan for easy editing.
- Emphasize important features using textures, materials, and lighting.
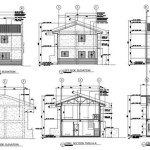
- Create multiple views and elevations to provide a comprehensive representation of the floor plan.
- Collaborate with architects or interior designers to ensure accuracy and adherence to industry standards.
Following these steps and tips will empower you to create detailed and professional floor plans in 3ds Max. Remember, practice and experimentation are key to mastering the software's capabilities.

Create 3d Floor Plan Rendering In 3ds Max Architecture Tutorial

Easy Steps How To Make 3d Floor Plan In 3ds Max Part 01

How To Make 3d Floor Plan 3ds Max Part I

Tutorial 3ds Max How To Create Floor Plan Part 4

Make 3d Floor Plan In 3ds Max

Create 3d Floor Plan Rendering In 3ds Max Architecture Tutorial

Create 3d Floor Plan In 3ds Max

How To Make 3d Floor Plan 3ds Max Part I

Easy Steps To Floor Plan Design In 3ds Max Hindi Tutorial Education Interior

How To Make A House In 3ds Max 10 Steps Instructables