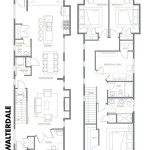
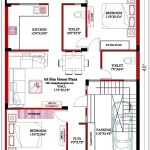
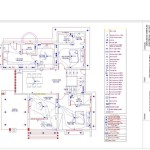
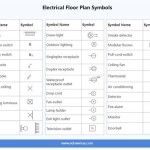
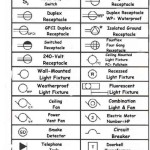
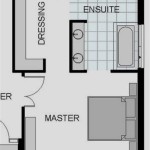
AutoCAD 2017 Floor Plan Tutorial: Create Detailed Architectural Drawings Introduction: AutoCAD 2017, a powerful computer-aided design (CAD) software, offers a comprehensive set of tools and features for creating accurate and detailed floor plans. This tutorial will guide you through the process of creating a floor plan in AutoCAD 2017, step by step. Whether you're a beginner or an experienced CAD user, this tutorial will help you produce professional-quality floor plans. Step 1: Setting Up the Drawing Environment 1. Open AutoCAD 2017 and start a new drawing file. 2. Set the appropriate units and precision for your project. 3. Create layers to organize different elements of the floor plan, such as walls, doors, and windows. Step 2: Drawing the Walls 1. Use the "Line" tool to draw the exterior walls of the floor plan. 2. Specify the wall thickness by using the "Offset" command. 3. Continue drawing interior walls, partitions, and room dividers. 4. Trim and extend walls to create accurate intersections and corners. Step 3: Adding Doors and Windows 1. Insert doors and windows using the "Door" and "Window" tools. 2. Specify the size, style, and location of each door and window. 3. Use the "Trim" command to trim walls where doors and windows are placed. Step 4: Drawing Room Layouts 1. Use the "Rectangle" or "Polyline" tools to draw room outlines. 2. Add furniture and fixtures using blocks or by drawing custom shapes. 3. Position furniture and fixtures according to the intended room layout. Step 5: Adding Dimensions and Annotations 1. Use the "Dimension" tool to add linear, radial, and angular dimensions. 2. Insert text annotations, notes, and labels using the "Text" tool. 3. Adjust the font, size, and placement of dimensions and annotations. Step 6: Adding Details and Finishes 1. Use hatch patterns to represent different materials, such as wood, tile, or carpet. 2. Add textures and colors to surfaces to enhance the visual appeal of the floor plan. 3. Insert symbols and callouts to indicate specific features or elements. Step 7: Creating a Title Block and Border 1. Design a title block that includes project information, such as the project name, date, and scale. 2. Create a border around the floor plan to define the drawing area. Step 8: Saving and Exporting the Floor Plan 1. Save the floor plan in the desired file format, such as DWG, DXF, or PDF. 2. Export the floor plan to other CAD programs or image formats for sharing or further editing. Conclusion: This AutoCAD 2017 Floor Plan Tutorial provided a step-by-step guide to creating a detailed and accurate floor plan. By following these steps, you can produce professional-quality floor plans that effectively communicate design concepts and construction requirements. Practice and experimentation will help you master the software's features and create increasingly complex and sophisticated floor plans.

Autocad 2024 Tutorial Making A Simple Floor Plan In 2d Drawing

Autocad 2024 Basic 2d Floor Plan For Beginner Complete

Autocad 2024 Basic 2d Floor Plan For Beginner Complete

Basic Floor Plan Drafting In Autocad 7 Steps Instructables

Making A Simple Floor Plan In Autocad Part 1 Of 3

How To Draw Floor Plans In Autocad Edrawmax

Autocad 2024 Basic 2d Floor Plan For Beginner Complete

How To Draw Floor Plans In Autocad Edrawmax

Make Simple Floor Plan In Autocad From A To Z Tutorial

Making A Simple Floor Plan With S In Autocad 2024 Part 7