How to Draw a Floorplan in AutoCAD 2009
AutoCAD 2009 is a powerful drafting and design software that can be used to create a variety of technical drawings, including floorplans. Floorplans are essential for planning and building any type of structure, and they can be created easily and accurately in AutoCAD 2009.
1. Start a New Drawing
To start a new drawing in AutoCAD 2009, click on the "File" menu and select "New". A new drawing window will open, and you will be prompted to select a template. For a floorplan, you can use the "Architectural" template.
2. Set Up the Drawing Units
Before you start drawing, you need to set up the drawing units. The default units in AutoCAD 2009 are inches, but you can change them to any unit you want. To change the units, click on the "Format" menu and select "Units". In the "Units" dialog box, you can select the desired units from the drop-down menu.
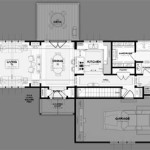
3. Draw the Walls
The first step in drawing a floorplan is to draw the walls. To do this, click on the "Line" tool on the "Draw" toolbar. Then, click on the starting point of the wall and drag the cursor to the end point. Repeat this process for all of the walls in the floorplan.
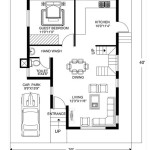
4. Add Doors and Windows
Once the walls are drawn, you can add doors and windows. To add a door, click on the "Insert" menu and select "Block". In the "Insert Block" dialog box, browse to the door block that you want to insert. To add a window, follow the same steps, but select a window block instead.
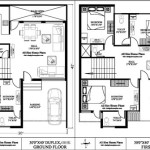
5. Add Furniture and Fixtures
The next step is to add furniture and fixtures to the floorplan. To do this, you can use the "Insert" menu to insert blocks of furniture and fixtures. You can also create your own blocks by drawing them in AutoCAD 2009.
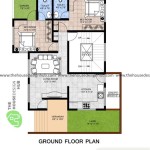
6. Dimension the Floorplan
Once the floorplan is complete, you need to dimension it. To do this, click on the "Dimension" tool on the "Annotate" toolbar. Then, click on the first point of the dimension line and drag the cursor to the second point. Repeat this process for all of the dimensions in the floorplan.
7. Save the Floorplan
Once the floorplan is complete, you need to save it. To do this, click on the "File" menu and select "Save". In the "Save As" dialog box, enter a name for the file and select a location to save it. You can also save the floorplan in a different format, such as DWG or DXF.

Full Building Plan Drawing In Autocad Part 1 Ground Floor

Residential Design Using Autocad 2009 Book 9781585034376 Sdc Publications

How To Draw Floor Plan In Autocad 2d Simple Easy 5 Steps Part 1 A Tutorials 45

Making A Simple Floor Plan In Autocad Part 1 Of 3

Autocad 2009 Tutorial Dimensions

Autocad Simple Floor Plan For Beginners 1 Of 5

It Office Layout Plan Drawing In Dwg Autocad File

Detailed Floor Plan Of Hotel In Autocad 2d Dwg File Cad Cadbull

Making A Simple Floor Plan In Autocad Part 1 Of 3

Chapter 1 Introduction Of Autocad Tutorials Visual Graphic Communication Programs For Interior Design