Making Simple Floor Plan in AutoCAD: Essential Aspects
Creating a floor plan in AutoCAD requires precision and attention to detail. Here are the essential aspects to consider to ensure an accurate and effective floor plan:
Define Scale and Units
Before starting, establish the scale and units of your drawing. The scale determines the ratio between the drawing and real-life dimensions. Units can be inches, feet, millimeters, or any other appropriate unit of measurement.
Create Layers
Organize your drawing by creating layers for different elements, such as walls, doors, windows, and furniture. This makes it easier to manage and modify specific components.
Draw Walls
Use the "Line" command to draw walls. Ensure that the thickness of the lines matches the actual wall thickness. Closed polylines can be used to create complex wall shapes.
Insert Doors and Windows
Use blocks or predefined shapes to insert doors and windows into the walls. Align them properly and adjust their size and orientation to match the actual dimensions.
Add Furniture and Fixtures
Create blocks for furniture and fixtures. Insert them into the floor plan using the "Insert" command. Scale and rotate them as necessary to fit the space.
Annotate the Plan
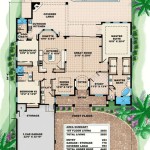
Include dimensions, notes, and other annotations to enhance the clarity and accuracy of the floor plan. Use the "Dimension" and "Text" commands for this purpose.
Review and Modify
Once you have completed the basic floor plan, take some time to review it for errors and any necessary modifications. Use the "Zoom" and "Pan" commands to check for alignment and scale.
Additional Tips
For efficiency, use shortcuts and commands to automate certain tasks. For example, the "Ortho" command can restrict line drawing to either horizontal or vertical directions.
Consider using dynamic blocks, which allow you to manipulate and resize objects parametrically.
Import architectural details or templates from online resources to save time and ensure accuracy.
Collaborate with others using AutoCAD's collaboration tools to share and review floor plans.
By following these essential aspects, you can create accurate and professional-quality floor plans in AutoCAD. Remember to practice regularly and explore advanced features to expand your skills and efficiency.

Making A Simple Floor Plan In Autocad Part 1 Of 3

Basic Floor Plan Drafting In Autocad 7 Steps Instructables

How To Draw Floor Plans In Autocad Edrawmax

Making A Simple Floor Plan In Autocad Part 1 Of 3

Autocad Simple Floor Plan For Beginners 1 Of 5

How To Make House Floor Plan In Autocad Fantasticeng

How To Draw Floor Plans In Autocad Edrawmax

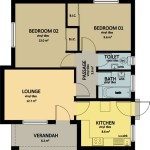
Making A Simple Floor Plan In Autocad 2 Bedroom Part 1

Simple Floor Plan Design Autocad File Free Cadbull

Autocad 2024 Making A Simple Floor Plan In Part 1 Of 3 2d Drawing 2025