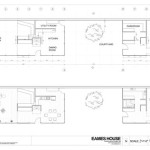
How to Draw a Floorplan in AutoCAD 2010
AutoCAD is a powerful software program that can be used for a variety of purposes, including drawing floorplans. In this article, we will show you how to create a simple floorplan using AutoCAD 2010.
1. Start by creating a new drawing
To create a new drawing, click the "File" menu and select "New." In the "New Drawing" dialog box, select the "ACAD" template and click "OK."
2. Set up the units
Before you start drawing, it is important to set up the units that you will be using. To do this, click the "Format" menu and select "Units." In the "Drawing Units" dialog box, select the desired units from the "Type" drop-down menu. For example, if you are drawing a floorplan in feet and inches, you would select "Architectural" from the "Type" drop-down menu.
3. Create the walls
To create the walls, click the "Line" tool on the "Draw" toolbar. Then, click on the starting point of the wall and drag the cursor to the end point. Repeat this process for each wall in the floorplan. To close off the walls, click on the starting point of the first wall again.
4. Add the doors and windows
To add the doors and windows, click the "Insert" menu and select "Block." In the "Insert Block" dialog box, browse to the desired block and click "OK." Then, click on the insertion point of the block and drag the cursor to the desired size. Repeat this process for each door and window in the floorplan.
5. Add the furniture
To add the furniture, click the "Insert" menu and select "Block." In the "Insert Block" dialog box, browse to the desired block and click "OK." Then, click on the insertion point of the block and drag the cursor to the desired size. Repeat this process for each piece of furniture in the floorplan.
6. Dimension the floorplan
To dimension the floorplan, click the "Dimension" tool on the "Annotate" toolbar. Then, click on the starting point of the dimension line and drag the cursor to the end point. Repeat this process for each dimension in the floorplan.
7. Save the drawing
Once you have finished drawing the floorplan, click the "File" menu and select "Save." In the "Save As" dialog box, enter a name for the drawing and click "Save."

Autocad 2010 Tutorial Series Drawing A Floor Plan By Tod Stephens Ebook Barnes Noble

Autocad Tutorials Introduction To Plotting Scale With Layouts In 2010

Autocad Floor Plan Tutorial For Beginners 1

Autocad Floor Plan Tutorial For Beginners 1

Autocad Tutorial Working With Layouts Part 1

Making A Simple Floor Plan In Autocad Part 1 Of 3

Autocad Tutorials Introduction To Drawing A Floorplan In 2010

Here We Are Writing About Autocad Tutorial 2010 What Is Auto Cad Learn Dra

Create Floor Plans With Autocad Lt Acad Systems Autodesk Gold Partner Training Certification Center

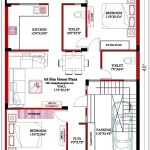
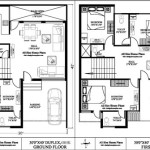
House Drawing Autocad 5bhk Plan Free Built Archi