How to Create 3D House Plans: A Step-by-Step Guide
3D house plans offer an immersive and realistic way to visualize your dream home before construction begins. With 3D modeling software, you can create detailed models of your house, including the exterior, interior, and even the surrounding landscape. This can be incredibly helpful in making design decisions and ensuring that your home meets your exact specifications. ### Step 1: Choose 3D Modeling Software The first step to creating 3D house plans is choosing the right software. There are many different options available, both free and paid. Some popular choices include: *SketchUp
: A free and user-friendly option that is perfect for beginners. *AutoCAD
: A powerful and professional option that is used by architects and engineers. *Blender
: A free and open-source option that is known for its powerful features and flexibility. *Revit
: A popular option for BIM (Building Information Modeling) projects. ### Step 2: Gather Your Reference Materials Once you have chosen a software program, you need to gather your reference materials. This includes: *Floor plans
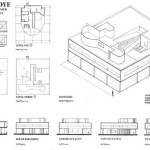
: These can be found in your building permit or from your architect. *Elevation drawings
: These show the exterior of your house from different angles. *Section drawings
: These show the interior of your house from different angles. *Material samples
: This can help you choose the right textures and colors for your 3D model. ### Step 3: Create a Basic 3D Model The next step is to create a basic 3D model of your house. This can be done using the floor plans and elevation drawings as a guide. Start by creating the walls, roof, and windows. Then, add in the doors, stairs, and other features. ### Step 4: Add Detail to Your Model Once you have a basic model, you can start adding detail. This includes adding furniture, appliances, and other objects to the interior of your house. You can also add landscaping to the exterior, such as trees, shrubs, and flowers. ### Step 5: Apply Textures and Materials The next step is to apply textures and materials to your model. This will help to make your model look more realistic. You can find a variety of textures and materials online or in 3D modeling software libraries. ### Step 6: Render Your Model Once you are finished with your model, you can render it. This process creates a photorealistic image of your model. You can use the rendered images to share your design with others or to print them out for construction purposes. ### Step 7: Make Changes and Adjustments As you work on your 3D house plans, you may want to make changes and adjustments. This is easy to do with 3D modeling software. Simply select the object you want to change and move, rotate, or scale it as needed. ### Conclusion Creating 3D house plans is a great way to visualize your dream home and make sure that it meets your exact specifications. With the right software and a little bit of practice, you can create stunning 3D models that will help you bring your dream home to life.
3d Floor Plans

3d Floor Plans

3d Home Design All You Need To Know

How Much Do 3d House Plans Cost Faqs Answered Cedreo

3d Floor Plans

3d Floor Plans

3d Floor Plans

How Architectural Companies Design 3d Floor Plans For Residential Home Cad Crowd

3d Floor Plans

Floor Plan Create 2d 3d Plans Autodesk