AutoCAD 2017: A Comprehensive Guide to Drawing House Plans
AutoCAD 2017 is a powerful software solution for architectural design, allowing users to create precise and detailed house plans. This article provides a comprehensive guide to the essential aspects of drawing house plans in AutoCAD 2017, empowering you to create professional-quality designs with ease.
1. Setting Up the Drawing Template:
Start by creating a new drawing from the "Architectural" template. This template sets up the drawing with appropriate layers, units, and dimensions for architectural drawings. It also includes a pre-defined title block for project information and scales.
2. Creating Walls and Openings:
Use the "Wall" command to create exterior and interior walls. Set the wall thickness and height as required. To create doors and windows, use the respective "Door" and "Window" commands. Insert these openings into the walls using the "Snap" function for precision.
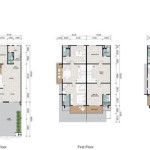
3. Defining Spaces and Rooms:
Draw polylines to outline the boundaries of different spaces within the house, such as living rooms, bedrooms, and kitchens. Use the "Hatch" command to fill these spaces with appropriate patterns or colors to visually differentiate them.
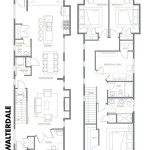
4. Inserting Doors and Windows:
Select the "Door" or "Window" command and specify the desired size and style. Click on the wall location where you want to insert the opening. Use the "Properties" palette to customize the door or window parameters, including its material, finish, and hardware.
5. Adding Electrical and Plumbing Fixtures:
Insert electrical outlets, light switches, and plumbing fixtures by using the appropriate blocks or symbols. To ensure accuracy, reference manufacturer specifications for fixture dimensions and placement.
6. Creating Layers:
Utilize layers to organize and manage different elements of the drawing. Create separate layers for walls, doors, windows, electrical, and plumbing to facilitate editing and visibility control.
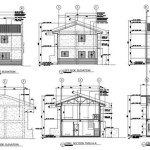
7. Dimensioning the Plan:
Accurately dimension the house plan using the "Dimension" command. Create linear dimensions for walls, doors, and windows, and angular dimensions to indicate the angles between walls. Dimensioning provides essential information for construction.
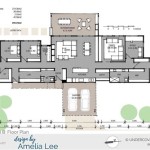
8. Adding Text and Annotations:
Insert text notes to provide additional information on the drawing, such as room names, material specifications, or construction details. Use the "Annotate" tab to add dimensions, leaders, and other annotations to enhance the clarity of your plan.
9. Plotting the Plan:
Plot the house plan to scale on a printer or plotter. Set the plot area, scale, and paper size to create a high-quality printed copy. Use plot styles to control the appearance of different elements on the printed plan.
10. Saving and Sharing the Plan:
Save the AutoCAD drawing in a secure location. Use the "DWG" file format for maximum compatibility. Share the drawing with collaborators via email or cloud storage platforms for review and feedback.

Autocad 2024 Tutorial Making A Simple Floor Plan In 2d Drawing

Autocad 2024 Basic 2d Floor Plan For Beginner Complete

Floor Plan Tools For 2d 3d Plans Autodesk

Autocad 2024 Making A Simple Floor Plan In Part 1 Of 3 2d Drawing 2025

Autocad Drawing And Coohom Design 3d Fast Rendering Blog

How To Draw Floor Plans In Autocad Edrawmax

House Design Plans In Autocad File 2024 Home

How To Make House Floor Plan In Autocad Fantasticeng

How To Draw Floor Plans In Autocad Edrawmax

Making A Simple Floor Plan In Autocad Part 1 Of 3