How to Create a Floor Plan Using AutoCAD
AutoCAD is a powerful computer-aided design (CAD) software program used by architects, engineers, and other professionals to create detailed drawings and plans. It is a versatile tool that can be used to design everything from simple floor plans to complex 3D models. If you're new to AutoCAD, creating a floor plan may seem like a daunting task. However, with a little practice, you'll be able to create professional-looking floor plans in no time. ### 1. Set Up Your Drawing The first step is to set up your drawing. This includes creating a new drawing file, setting the drawing units, and setting the scale. To create a new drawing file, click on the "File" menu and select "New." This will open a new, blank drawing file. Next, you need to set the drawing units. The drawing units are the units that will be used to measure the objects in your drawing. To set the drawing units, click on the "Format" menu and select "Drawing Units." In the "Drawing Units" dialog box, select the desired units from the drop-down list. Finally, you need to set the scale. The scale is the ratio between the size of an object in the drawing and the size of the object in real life. To set the scale, click on the "View" menu and select "Zoom > Scale." In the "Scale" dialog box, enter the desired scale. ### 2. Draw the Walls The next step is to draw the walls of your floor plan. To do this, you can use the "Line" tool or the "Polyline" tool. To use the "Line" tool, click on the "Line" button on the "Draw" toolbar. Then, click on the starting point of the wall and drag the mouse to the ending point. To use the "Polyline" tool, click on the "Polyline" button on the "Draw" toolbar. Then, click on the starting point of the wall and move the mouse to the next point. Continue clicking on points until you reach the ending point of the wall. Once you have drawn all of the walls, you can trim them to size using the "Trim" tool. To use the "Trim" tool, click on the "Trim" button on the "Modify" toolbar. Then, select the wall that you want to trim and click on the point where you want to trim it. ### 3. Add Windows and Doors Once you have drawn the walls, you can add windows and doors to your floor plan. To add a window, click on the "Window" button on the "Insert" toolbar. Then, select the desired window type from the drop-down list. Click on the location where you want to insert the window and click again to set the size of the window. To add a door, click on the "Door" button on the "Insert" toolbar. Then, select the desired door type from the drop-down list. Click on the location where you want to insert the door and click again to set the size of the door. ### 4. Add Furniture and Fixtures The next step is to add furniture and fixtures to your floor plan. To add furniture, click on the "Furniture" button on the "Insert" toolbar. Then, select the desired furniture item from the drop-down list. Click on the location where you want to insert the furniture item and click again to set the size of the furniture item. To add fixtures, click on the "Fixtures" button on the "Insert" toolbar. Then, select the desired fixture from the drop-down list. Click on the location where you want to insert the fixture and click again to set the size of the fixture. ### 5. Add Dimensions Once you have added all of the furniture and fixtures, you can add dimensions to your floor plan. To add a dimension, click on the "Dimension" button on the "Annotate" toolbar. Then, select the desired dimension type from the drop-down list. Click on the first point of the dimension and then click on the second point of the dimension. ### 6. Save Your Drawing Once you have completed your floor plan, you need to save it. To do this, click on the "File" menu and select "Save." In the "Save As" dialog box, enter a name for your drawing and click on the "Save" button. ### Conclusion Creating a floor plan in AutoCAD is a relatively simple process. With a little practice, you'll be able to create professional-looking floor plans in no time.
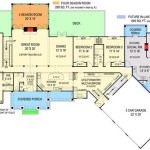
Making A Simple Floor Plan In Autocad Part 1 Of 3

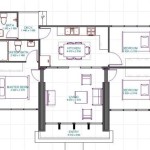
Basic Floor Plan Drafting In Autocad 7 Steps Instructables

How To Draw Floor Plans In Autocad Edrawmax

Is Autocad The Best Floor Plan For Estate Agents Elements Property

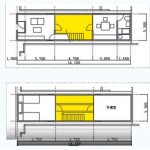
Autocad Simple Floor Plan For Beginners 1 Of 5

Autocad Drawing And Coohom Design 3d Fast Rendering Blog

How To Draw Floor Plans In Autocad Edrawmax

Floor Plan Tools For 2d 3d Plans Autodesk

Autocad 2d Bathroom Floor Plans Graphic Design Courses

Making A Simple Floor Plan In Autocad Part 1 Of 3