Draw Your House Plans: A Comprehensive Guide to Creating Your Dream Home
Designing and building a house is an exciting but complex endeavor. One crucial step in this process is creating house plans, which serve as a blueprint for your dream home. Whether you're an architect or a homeowner planning to build or renovate, understanding the essential aspects of drawing house plans is fundamental.
1. Site Analysis and Planning
Before you start drawing, it's essential to analyze the building site. Consider factors such as the topography, soil conditions, sunlight exposure, and access to utilities. Determine the optimal location for the house, taking into account the views, privacy, and orientation. This analysis will inform the design of the house and ensure it complements the surrounding environment.
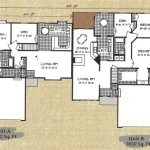
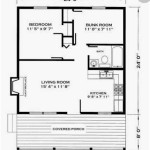
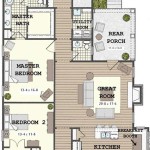
2. Space Planning and Layout
The floor plan is the foundation of your house design. It defines the arrangement and size of rooms, hallways, and other spaces. When planning the layout, consider the flow of foot traffic, natural light, and the intended use of each room. Create a space that is both functional and aesthetically pleasing, meeting your specific needs and lifestyle.
3. Architectural Style and Design
The architectural style of your house will greatly influence its overall appearance. Choose a style that reflects your personal preferences and complements the surrounding architecture. Consider the exterior materials, roof lines, window styles, and other design elements. The architectural design should also be congruent with the space planning and layout, creating a harmonious whole.
4. Structural Considerations
The structural integrity of your house is paramount. House plans must incorporate the necessary structural components, such as foundations, walls, beams, and roof trusses. These elements ensure the stability and safety of the building. Work with a qualified structural engineer to determine the appropriate structural system based on the design and site conditions.
5. Building Systems and Specifications
House plans also include detailed specifications for building systems, including plumbing, electrical, HVAC, and insulation. These systems ensure the proper functioning and comfort of the house. The plans should clearly indicate the locations of plumbing fixtures, electrical outlets, lighting fixtures, and other components. The specifications define the materials and standards used for each system.
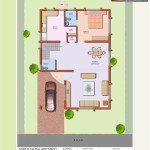
6. Site Plan and Landscaping
In addition to the house itself, house plans should include a site plan that outlines the location of the house on the property, as well as any additional structures, driveways, walkways, and landscaping elements. The site plan ensures that the house is properly integrated into the landscape and meets any zoning requirements.
7. Construction Documents
Once the house plans are complete, they form the basis for construction documents. These documents provide detailed instructions for the construction crew, including technical drawings, specifications, material lists, and construction schedules. Professional architects or engineers typically prepare construction documents to ensure that the house is built according to the approved plans.
Conclusion
Drawing house plans is a complex process that requires careful planning and attention to detail. By understanding the essential aspects outlined in this article, you can create a blueprint that will guide the creation of your dream home. Whether you choose to work with an architect or tackle the task yourself, investing in well-designed house plans will ensure a smooth and successful construction process and a home that meets your unique needs and aspirations.

Floor Plan Creator And Designer Free Easy App

House Plans How To Design Your Home Plan

Draw Floor Plans With The Roomsketcher App

Floor Plans Learn How To Design And Plan

Draw Floor Plans In Half The Time Cedreo

Make Your Own Blueprint How To Draw Floor Plans

Draw Floor Plans With The Roomsketcher App

How To Draw A Floor Plan Live Home 3d

Draw Floor Plans In Half The Time Cedreo

Make Your Own Blueprint How To Draw Floor Plans Drawing House Sketch Plan Blueprints