How To Put Dimensions On A Floor Plan
Floor plans are essential tools for architects, designers, builders, and homeowners. They provide a visual representation of a space, showing the layout, size, and relationship of its elements. Dimensions are crucial components of floor plans, as they convey the precise measurements of walls, rooms, and other features. Adding dimensions accurately and clearly ensures that the plan is understandable and can be used effectively for construction, renovation, or design purposes. This article outlines the essential steps involved in adding dimensions to a floor plan effectively.
1. Choose a Dimensioning Style
The first step is to decide on a dimensioning style. There are two main styles:
- Linear Dimensioning: This style uses horizontal and vertical lines to indicate measurements. It is commonly used for basic floor plan layouts.
- Ordinate Dimensioning: This style utilizes a grid system with horizontal and vertical lines labeled with numbers. It is more complex but more accurate and versatile for large or detailed plans.
The choice of dimensioning style depends on the complexity of the plan, the level of precision required, and personal preference. For beginner users, linear dimensioning is generally easier to understand and use.
2. Identify Key Dimensions
Before adding dimensions, it is important to identify all the essential measurements. This includes the overall dimensions of the space, as well as the measurements of individual rooms, doors, windows, and other features.
It is recommended to start with the exterior walls and work inwards, adding dimensions for each room, hallway, and other spaces. Pay close attention to any curves, irregular angles, and recessed or protruding features that require specific measurements.
3. Add Dimensions to the Floor Plan
Once the key dimensions have been identified, they can be added to the floor plan using a drawing software or by hand. If using software, it is important to ensure that the dimensions are accurate and clearly labeled.
When adding dimensions, follow these guidelines:
- Use consistent units: Whether using inches, feet, or meters, ensure that all dimensions are expressed in the same units.
- Place dimensions clearly: Dimensions should be placed in a way that does not obscure other elements of the plan.
- Use appropriate dimension lines: Dimension lines should be thin, solid lines that extend slightly beyond the measurement points.
- Add dimension arrows: Dimension arrows should be placed at the ends of the dimension lines, indicating the direction of the measurement.
- Include dimension text: Dimension text should be clearly legible and placed near the dimension line, preferably above it.
- Align dimension lines: For consistency, align dimension lines horizontally or vertically, avoiding diagonal placement except for special cases.
- Avoid crossing lines: Ensure dimension lines do not intersect with other lines on the plan.
- Use leader lines: Leader lines can be used to connect dimensions to specific points on the plan, especially when dealing with complex or irregular shapes.
4. Review and Refine the Dimensions
Once the dimensions are added, it is important to review them carefully to ensure accuracy and clarity. This may involve checking the measurements against the original sources, ensuring that all dimensions are consistent, and verifying that they accurately represent the space.
If any errors are found, they should be corrected immediately. It is also a good practice to have another person review the floor plan to ensure that the dimensions are clear and easy to understand.
5. Finalize the Floor Plan
After reviewing the dimensions, the floor plan is ready for finalization. This involves making any necessary adjustments, adding any additional details, and saving the plan in a suitable format.
It is essential to have a final review of the floor plan, including the dimensions, before presenting it to clients, contractors, or other stakeholders.
By following these steps, it is possible to add dimensions to a floor plan effectively, ensuring that the plan is accurate, clear, and easy to understand. This will allow for efficient communication and facilitate smooth construction, renovation, or design processes.

Add Measurements

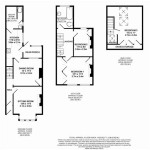
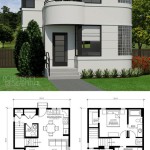
12 Examples Of Floor Plans With Dimensions

Floor Plans With Dimensions Including Examples Cedreo

Add Measurements

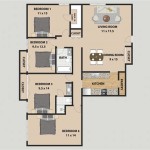
How To Read A Floor Plan With Dimensions Houseplans Blog Com

How To Read A Floor Plan With Dimensions Houseplans Blog Com

Display Outside Wall Measurements On 2d Floor Plans Roomsketcher Help Center

Floor Plans With Dimensions Including Examples Cedreo

12 Examples Of Floor Plans With Dimensions

How To Read A Floor Plan With Dimensions Houseplans Blog Com