How To Make Your Own Floor Plan
Creating a floor plan is a valuable skill that can be beneficial for various purposes, whether you're planning a home renovation, designing a new furniture layout, or simply visualizing a space. Fortunately, you don't need expensive software or professional assistance to achieve this. With a few basic tools and some creativity, you can easily draft your own floor plan, capturing the essence of any room or building.
Gathering Essential Tools and Resources
The first step in crafting your floor plan is assembling the necessary tools and resources. Start by acquiring a measuring tape, preferably a long one that can reach the corners of your space. You'll also need a notebook or notepad to record the dimensions, a pencil or pen, and graph paper or a blank white sheet of paper. If you're aiming for a digital floor plan, consider using a free online floor plan software, such as Floorplanner or Roomstyler, or a basic drawing program like Microsoft Paint or Google Drawings. Some drawing programs offer free trial periods, allowing you to explore their features before committing to a purchase.
Measuring the Room or Building
Once you have your tools, the next step is to meticulously measure the room or building you plan to map. Begin by measuring the length and width of the walls. For rectangular rooms, you only need to measure two sides to determine the remaining sides. However, for rooms with unusual shapes, like L-shapes or irregular angles, you'll need to take multiple measurements. Don't forget to measure the length of any hallways, doorways, and windows. Also, record the height of the ceilings and note any existing features like fireplaces, built-in shelves, or stairs. Remember to measure the depth and width of any existing furniture you wish to include in your floor plan. You can use a tape measure or a ruler, depending on the size of the area you are measuring.
Creating the Basic Floor Plan
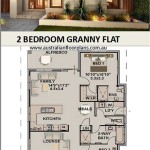
With the measurements in hand, you can start creating the basic framework of your floor plan. Depending on your chosen method, you can use a standard ruler and pencil on graph paper or create a digital floor plan using a software program. Begin by drawing the outer perimeter of the room or building according to your measurements. Use a clear, consistent scale to ensure that the dimensions are accurately represented. For example, you could use 1 inch to represent 1 foot or 1 centimeter to represent 1 meter. Next, mark the locations of doors, windows, and other features. Indicate the direction of opening for doorways and windows, and label them clearly. For digital floor plans, most software programs offer built-in symbols for doors, windows, and other architectural features, simplifying the process.
Adding Furniture and Details
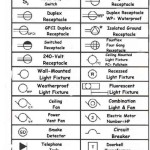
Once you have the basic floor plan complete, you can start placing furniture and adding other details. There are various ways to represent furniture. You can draw simple shapes representing each piece of furniture, use pre-made symbols from software programs, or even cut out squares or rectangles from paper and move them around to visualize different arrangements. Consider representing the size and orientation of each piece of furniture accurately. When placing furniture, remember to leave sufficient walking space around each piece and ensure that traffic flow is smooth. For additional details, you can add symbols for electrical outlets, light switches, and heating vents. You can also incorporate labels to identify specific areas, like the kitchen, living room, or bedroom.
Ensuring Accuracy and Clarity
As you progress through the floor plan creation process, it's crucial to prioritize accuracy and clarity. Double-check all measurements and make sure they are consistently applied throughout the plan. Use clear lines and symbols to represent different features, and label them appropriately. If you are using a digital program, take advantage of its features to enhance your floor plan. Many programs allow you to adjust line thickness, color, and text size, making your plan easier to read and understand. You can also use different colors to differentiate between walls, furniture, and other elements. Keep the layout of your floor plan clean and uncluttered, ensuring that all essential information is readily visible.
Tips for Enhanced Visualization
To enhance the visualization of your floor plan, consider incorporating additional elements. For example, you can add a color scheme to represent the walls, flooring, and other elements. This can help you to visualize the overall aesthetic of the space. You can also use different textures to represent different materials, such as wood, carpet, or tile. If you have a specific vision for the space, you can even create a 3D model using specialized software. While creating a 3D model requires additional skills and software, it can provide a more realistic representation of the space and its features. Additionally, consider creating multiple versions of your floor plan, experimenting with different furniture layouts and design ideas. This can help you to explore various possibilities and select the most suitable option for your needs.

Designing My Own House

Floor Plan Creator And Designer Free Easy App

Floor Plan Creator And Designer Free Easy App

House Plans How To Design Your Home Plan

Floor Plan Creator And Designer Free Easy App

House Plans How To Design Your Home Plan

House Plans How To Design Your Home Plan

House Plans How To Design Your Home Plan

House Plans How To Design Your Home Plan

Floor Plan Creator Planner 5d