How To Build Your Own Floor Plan: A Comprehensive Guide
Creating a floor plan is a fundamental step in any construction or renovation project. It provides a visual representation of the layout of a building, showing the dimensions and relationships between rooms, walls, doors, windows, and other architectural features. Building a floor plan, whether for a new home, an office space, or a simple room redesign, involves careful planning, measurement, and execution. There are various methods and tools available to accomplish this task, ranging from traditional hand-drawn techniques to sophisticated computer-aided design (CAD) software. This article outlines a comprehensive guide for constructing a floor plan, covering essential steps and considerations.
1. Gathering Information and Defining Needs
The initial phase of building a floor plan necessitates gathering all relevant information and defining the specific requirements of the space. This process ensures that the resulting floor plan accurately reflects the intended use and maximizes functionality. It begins with a thorough understanding of the project scope, including the purpose of the building or space, the number of occupants, and any specific needs or preferences.
Accurate measurements are the cornerstone of any floor plan. Begin by measuring the existing space with a tape measure. Record the length and width of each room, as well as the positions and dimensions of windows, doors, and any fixed elements like fireplaces or plumbing fixtures. For complex spaces, consider using a laser distance meter, which provides more accurate and efficient measurements, particularly over longer distances.
Documenting existing utilities is crucial, especially for renovation projects. Identify the location of electrical outlets, light switches, plumbing lines, and HVAC vents. This information will influence the placement of new fixtures and appliances and ensures that the new design integrates seamlessly with the existing infrastructure. Ignoring these elements can lead to costly and time-consuming modifications later in the construction process.
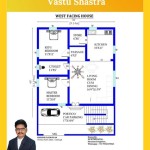
Consider the building codes and regulations applicable to the project. Local authorities often have specific requirements regarding room sizes, ceiling heights, fire safety, and accessibility. Researching and adhering to these regulations from the outset prevents potential delays and ensures compliance with legal requirements. Failing to obtain necessary permits or adhering to codes can result in fines or even project shutdowns.
Finally, develop a clear concept of the desired layout and functionality of the space. Think about the flow of traffic, the relationships between different rooms, and the desired aesthetic. Create a list of essential features, such as the number of bedrooms and bathrooms, the size of the kitchen, and the need for a home office or entertainment area. This conceptual framework will guide the design process and ensure that the floor plan meets the specific needs of the occupants.
2. Choosing a Method and Creating a Rough Sketch
After gathering the necessary information, the next step involves selecting a method for creating the floor plan and developing a rough sketch. The choice of method depends on factors such as budget, technical skills, and the complexity of the project. Options range from traditional hand-drawn techniques to sophisticated digital tools. Regardless of the method chosen, a rough sketch serves as a preliminary outline, allowing for experimentation and refinement before committing to a final design.
Hand-drawn floor plans offer simplicity and flexibility. They require basic tools such as graph paper, pencils, erasers, and a ruler. This method is suitable for smaller projects or for individuals who prefer a tactile approach. Begin by sketching the exterior walls of the building, ensuring that the dimensions accurately reflect the measurements taken earlier. Then, add interior walls, doors, and windows, using a consistent scale to maintain proportionality. While hand-drawn plans are readily accessible, they may lack the precision and scalability of digital methods.
CAD software provides advanced features for creating detailed and accurate floor plans. Programs like AutoCAD, Revit, and SketchUp offer a wide range of tools for drawing walls, inserting doors and windows, adding furniture, and annotating dimensions. CAD software allows for precise control over every aspect of the design, making it suitable for complex projects requiring high levels of accuracy. However, these programs often require specialized training and may involve significant upfront costs.
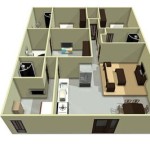
Online floor plan tools offer a user-friendly alternative to CAD software. Platforms like RoomSketcher, Floorplanner, and SmartDraw provide intuitive interfaces and pre-designed templates that simplify the floor plan creation process. These tools typically offer features such as drag-and-drop functionality, automated dimensioning, and 3D visualization. Online floor plan tools are often more affordable than CAD software and are suitable for individuals with limited technical skills.
Regardless of the method chosen, a rough sketch is an essential first step. Use the measurements and concept developed earlier to create a preliminary layout of the space. Experiment with different arrangements of rooms and features, considering factors such as traffic flow, natural light, and views. Do not be afraid to make mistakes and revise the sketch as needed. The purpose of the rough sketch is to explore possibilities and identify potential challenges before committing to a final design.
3. Refining the Floor Plan and Adding Details
Once a rough sketch is completed, the next phase involves refining the floor plan and adding specific details. This process ensures that the final floor plan is accurate, functional, and aesthetically pleasing. It includes specifying dimensions, adding architectural details, and incorporating furniture and fixtures.
Accurate dimensioning is crucial for ensuring that the floor plan can be accurately implemented during construction or renovation. Use a consistent scale to represent the dimensions of rooms, walls, doors, and windows. Clearly label each dimension, using standard architectural notation. Double-check all measurements to ensure accuracy and consistency. Errors in dimensioning can lead to costly mistakes during the construction process.
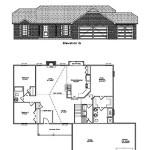
Adding architectural details enhances the realism and usefulness of the floor plan. Include details such as wall thicknesses, door swings, window types, and ceiling heights. Indicate the location of electrical outlets, light switches, plumbing fixtures, and HVAC vents. Consider adding details such as built-in cabinets, fireplaces, and staircases. These details provide a more complete picture of the space and facilitate communication with contractors and other stakeholders.
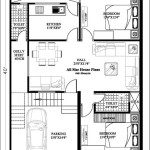
Incorporating furniture and fixtures helps visualize the functionality of the space and ensures that the layout accommodates the intended use. Use standard furniture sizes and shapes to represent sofas, beds, tables, chairs, and other essential items. Consider the placement of appliances in the kitchen and bathroom fixtures in the bathrooms. Adding furniture and fixtures allows for a more realistic assessment of the space's usability and helps identify potential layout issues.
Reviewing and revising the floor plan is an iterative process. Solicit feedback from family members, friends, or design professionals to identify potential areas for improvement. Consider the flow of traffic through the space, the placement of furniture, and the amount of natural light. Make revisions as needed to optimize the layout and functionality of the floor plan. This iterative process ensures that the final floor plan meets the specific needs of the occupants and maximizes the potential of the space.
The final floor plan should be clear, concise, and easy to understand. Use consistent symbols and notation throughout the plan. Clearly label each room and feature. Provide a legend explaining any symbols or abbreviations used. The goal is to create a floor plan that can be readily interpreted by contractors, builders, and other stakeholders, ensuring that the project is executed according to the intended design.
By systematically following these steps, individuals can successfully create their own floor plans, whether for new construction, renovation, or simply re-imagining an existing space. The key lies in careful planning, accurate measurements, and attention to detail.

Floor Plans Learn How To Design And Plan

Create Floor Plan

Easy To Build Houses And Floor Plans Houseplans Blog Com

Make Your Own Blueprint How To Draw Floor Plans

Create House Plans All In One Roomsketcher

Create House Plans All In One Roomsketcher

Floor Plans Learn How To Design And Plan

Draw Floor Plans In Minutes Create 2d And 3d

How To Draw Floor Plans With Floorplanner Com Young House Love

Easy To Build Houses And Floor Plans Houseplans Blog Com