How to Create a 3D House Plan in AutoCAD
Creating a 3D house plan in AutoCAD is an essential skill for architects and engineers. It allows you to visualize and modify your design in a realistic way, making it easier to identify and resolve any potential issues before construction begins.
In this article, we will provide you with a step-by-step guide on how to create a 3D house plan in AutoCAD. We will cover the following topics:
- Creating a 2D floor plan
- Extruding walls and other objects
- Adding windows, doors, and other features
- Creating a roof
- Rendering your 3D model
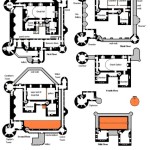
Step 1: Create a 2D Floor Plan
The first step is to create a 2D floor plan of your house. This will serve as the basis for your 3D model. To create a 2D floor plan, you will need to use the following tools:
- Line command (LINE)
- Rectangle command (RECTANG)
- Circle command (CIRCLE)
- Trim command (TRIM)
- Extend command (EXTEND)
Once you have created your 2D floor plan, you can save it as a DWG file.
Step 2: Extrude Walls and Other Objects
Once you have your 2D floor plan, you can start extruding walls and other objects to create your 3D model. To extrude an object, you will need to use the following steps:
1. Select the object that you want to extrude. 2. Click on the "Extrude" tool on the "Solids" panel. 3. Enter the extrusion height in the "Height" field. 4. Click on the "OK" button.You can also use the "Push/Pull" tool to extrude objects. To use the "Push/Pull" tool, you will need to:
1. Select the object that you want to extrude. 2. Click on the "Push/Pull" tool on the "Solids" panel. 3. Click on the face of the object that you want to extrude. 4. Drag the cursor to the desired extrusion height.Step 3: Adding Windows, Doors, and Other Features
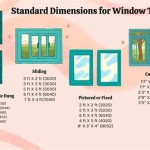
Once you have extruded your walls and other objects, you can start adding windows, doors, and other features to your 3D model. To add a window, you will need to use the following steps:
1. Click on the "Window" tool on the "Insert" panel. 2. Select the type of window that you want to add. 3. Click on the location where you want to place the window. 4. Enter the window dimensions in the "Width" and "Height" fields. 5. Click on the "OK" button.You can also use the "Door" tool to add doors to your 3D model. The steps for adding a door are similar to the steps for adding a window.
Step 4: Creating a Roof
Once you have added all of the windows and doors to your 3D model, you can start creating a roof. To create a roof, you will need to use the following steps:
1. Click on the "Roof" tool on the "Insert" panel. 2. Select the type of roof that you want to create. 3. Click on the location where you want to place the roof. 4. Enter the roof dimensions in the "Width" and "Height" fields. 5. Click on the "OK" button.You can also use the "Slab" tool to create a flat roof. The steps for creating a flat roof are similar to the steps for creating a pitched roof.
Step 5: Rendering Your 3D Model
Once you have created your 3D model, you can render it to create a realistic image. To render your 3D model, you will need to use the following steps:
1. Click on the "Render" tab. 2. Select the type of rendering that you want to use. 3. Click on the "Render" button.The rendering process can take some time, depending on the complexity of your 3D model.
Conclusion
Creating a 3D house plan in AutoCAD is a relatively simple process. By following the steps outlined in this article, you can create realistic and accurate 3D models of your house designs.

Autocad 2d To 3d House Modeling Simple Floor Plan 2024

Create 3d House Using Autocad In Easy Steps 1

Autocad 3d House Modeling Tutorial 1

Floor Plan Create 2d 3d Plans Autodesk

Autocad 3d House Modeling Tutorial 1

Autocad 2d Plans And 3d House Modeling Tutorials

Create A Building In 3d Autocad Tutorial And S

Create A Building In 3d Autocad Tutorial And S

Autocad 3d House Design

3d Autocad House Building Design Free Dwg File
Related Posts