Small Wood Duck House Plans: A Guide to Building Your Own
Wood ducks, with their vibrant plumage and unique nesting habits, are a welcome sight for any bird enthusiast. Providing suitable nesting sites is crucial for their continued prosperity. Building a small wood duck house is a rewarding project that can significantly contribute to local wood duck populations. This article offers a comprehensive guide to designing and building a successful wood duck house.
Understanding Wood Duck Nesting Habits
Wood ducks are cavity-nesting birds, meaning they rely on pre-existing tree holes for nesting. Due to habitat loss and competition with other cavity nesters, suitable natural cavities can be scarce. A well-placed and constructed wood duck house can provide a safe and secure alternative.
Choosing the Right Location
Placement is critical for attracting wood ducks to your house. Ideal locations are near quiet, slow-moving water sources such as marshes, ponds, or secluded streams. Placing the house over water offers protection from predators. A minimum of 15 feet above the waterline is recommended, and the entrance hole should face open water. Avoid areas with heavy human activity or close proximity to other birdhouses, which can lead to competition and stress for the nesting ducks.
Essential Design Features for a Successful Wood Duck House
Effective wood duck houses incorporate specific design features to mimic natural cavities and ensure the safety and comfort of the nesting ducks:
Material Selection
Cedar or cypress are excellent choices due to their natural resistance to rot and insect infestation. Avoid using treated lumber, as the chemicals can be harmful to ducklings. Interior walls should be rough to aid ducklings in climbing out of the box.
Dimensions and Construction
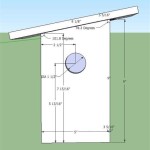
A floor size of 10" x 12" provides ample space for a hen and her eggs. A height of 24" is recommended. Proper ventilation is essential. Drill several small drainage holes in the floor and incorporate ventilation slots near the top of the box to prevent overheating and moisture buildup.
Entrance Hole
An oval entrance hole, approximately 3" x 4", is ideal for wood ducks and discourages larger predators. Position the hole approximately 4" below the roofline. A predator guard, a piece of metal flashing around the entrance hole, can further deter predators from enlarging the opening.
Nesting Material
Providing 3-4 inches of wood shavings within the box creates a suitable nesting environment. Avoid using sawdust, straw, or hay, as these materials can retain moisture and become moldy.
Maintenance and Monitoring
Regular maintenance is crucial to the long-term success of your wood duck house.
Cleaning
Clean the house annually after the nesting season concludes, typically in late summer or early fall. Remove old nesting material and debris. Check for and repair any damage to the box.
Predator Control
Inspect the area around the house for signs of predator activity. Maintain proper clearance around the pole or tree to prevent access by raccoons or other climbing predators. Consider adding a cone-shaped predator guard below the house if predators become a persistent problem.
Monitoring Success
Observe the house from a safe distance during the nesting season to check for occupancy. Avoid disturbing the nest if you suspect a hen is present. Keeping records of nesting activity can help you understand the effectiveness of your wood duck house placement and design.
Placement Options for Your Wood Duck House
While a post over water is the most common method, several placement options are suitable for wood duck houses:
Post Mounting
A 4"x4" wooden post sunk securely into the ground or the bottom of a shallow body of water is a reliable and stable option. Ensure the post extends at least 4 feet above the waterline.
Tree Mounting
Mounting the house on a tree trunk in a suitable location is another option. Use sturdy metal straps to secure the box without damaging the tree.
Building Plans and Resources
Numerous online resources and organizations offer detailed wood duck house plans and building instructions. Consulting these resources can provide valuable guidance throughout the construction process.

Scdnr Wood Duck Box Construction

Wood Duck Nc State Extension Publications

Coveside Small Wood Duck House

37 Free Diy Duck House Coop Plans Ideas That You Can Easily Build Backyard Farming

19 Diy Duck House Plans Insteading

19 Diy Duck House Plans Insteading

How To Build A Floating Duck House Home Design Garden Architecture Blog

37 Free Diy Duck House Coop Plans Ideas That You Can Easily Build

19 Diy Duck House Plans Insteading

Converting A Dog House For Ducks Fresh Eggs Daily With Lisa Steele


