DIY Playhouse With Slide Plans: A Comprehensive Guide
Constructing a DIY playhouse with a slide offers children a dedicated space for imaginative play and physical activity directly within their backyard. This project can be tailored to specific space constraints, budget limitations, and design preferences, providing a customized play area that encourages outdoor engagement. Careful planning and execution are critical to ensure a safe and durable structure that withstands weather conditions and active use.
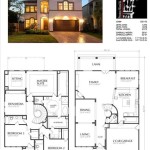
The preliminary step involves selecting appropriate playhouse with slide plans. Numerous resources, including online platforms, woodworking books, and DIY websites, offer varying designs ranging from simple A-frame structures to elaborate multi-level configurations. When choosing plans, consider the skill level of the builder, the available tools, and the desired features. Ensure the selected plans provide clear instructions, accurate measurements, and detailed material lists. Purchasing professionally drafted plans, while an additional cost, can reduce errors and streamline the construction process.
Budgeting is another essential aspect of planning. Accurately estimating material costs, including lumber, hardware, paint, and the slide itself, prevents unexpected financial burdens during construction. Comparing prices from different suppliers and considering alternative materials can help optimize the budget. Prioritizing safety and durability over solely cost-saving measures is paramount. Investing in high-quality materials and adhering to building codes ensures the longevity and safety of the playhouse.
Key Point 1: Selecting the Right Plans and Materials
The selection of playhouse plans is the foundation of a successful DIY project. Plans should be chosen based on several factors, including the available space, the age range of the children who will be using the playhouse, and the builder's experience level. Simpler plans are suitable for novice builders, while more complex designs incorporating multiple levels, windows, and themed elements require advanced woodworking skills.
Material selection necessitates a balance between cost, durability, and safety. Pressure-treated lumber is a common choice for the structural framework due to its resistance to rot, decay, and insect infestation. However, the specific type of pressure treatment and its chemical composition should be carefully reviewed to ensure it complies with safety standards for children's play equipment. Alternatives to pressure-treated lumber include naturally rot-resistant woods such as cedar or redwood, although these options are often more expensive.
For the playhouse siding, various materials can be used, including plywood, cedar shingles, or vinyl siding. Plywood is a cost-effective option but requires proper sealing and painting to protect it from the elements. Cedar shingles offer a more aesthetically pleasing appearance and natural resistance to moisture. Vinyl siding is a low-maintenance option but may not be as durable as other materials.
The slide itself can be purchased as a pre-fabricated unit from a variety of retailers. When selecting a slide, consider its length, width, and material. Longer slides provide a more thrilling experience, while wider slides allow for multiple children to slide simultaneously. Common slide materials include polyethylene plastic and metal. Plastic slides are generally more affordable and resistant to rust, while metal slides tend to be more durable but can become hot in direct sunlight.
Hardware, including screws, nails, bolts, and brackets, should be galvanized or stainless steel to prevent rust and corrosion. The quantity and size of the hardware should be specified in the chosen playhouse plans. Safety features, such as handrails, guardrails, and non-slip surfaces, require additional hardware and materials.
Key Point 2: Construction Process and Safety Considerations
The construction process typically begins with preparing the site where the playhouse will be located. This involves clearing the area of vegetation, leveling the ground, and ensuring proper drainage. A solid foundation is crucial for the stability and longevity of the playhouse. Options for the foundation include a concrete slab, gravel base, or wooden posts set in concrete footings.
Following the foundation, the structural framework is constructed according to the plans. This usually involves assembling the walls, floor, and roof using the chosen lumber and hardware. Accurate measurements and precise cuts are essential to ensure the structural integrity of the playhouse. Using a level and square throughout the construction process is critical to prevent uneven surfaces and structural weaknesses.
Once the framework is complete, the siding is installed, followed by the roof. Roofing materials can range from asphalt shingles to cedar shakes, depending on the desired aesthetic and budget. Proper weatherproofing and sealing are crucial to prevent water damage and extend the lifespan of the playhouse.
The installation of the slide requires careful attention to safety. The slide should be securely attached to the playhouse using appropriate hardware and support structures. The landing area at the bottom of the slide should be covered with a soft, impact-absorbing material, such as wood chips, shredded rubber, or playground mulch. The area around the slide should be free of obstacles and hazards.
Safety considerations are paramount throughout the entire construction process. Wearing appropriate safety gear, including eye protection, gloves, and a dust mask, is essential when working with power tools and materials. Following all safety guidelines and instructions provided by the tool manufacturers is crucial to prevent accidents. Regularly inspect the playhouse for any signs of damage or wear and make necessary repairs promptly.
When constructing a playhouse with a slide, building codes and regulations should be consulted. Local authorities may have specific requirements for the size, height, and location of play structures. Adhering to these codes ensures compliance and prevents potential legal issues.
Key Point 3: Customization and Enhancements
One of the advantages of building a DIY playhouse is the ability to customize it to suit specific preferences and needs. Customization options include adding windows, doors, porches, and other architectural details. Incorporating themed elements, such as a pirate ship, castle, or fairy tale cottage, can further enhance the play experience.
Windows can be made from plexiglass or polycarbonate sheets, which are shatter-resistant and safer than glass. Doors can be constructed from wood or purchased as pre-fabricated units. A porch provides a shaded area for children to relax and play. Adding a sandbox beneath the playhouse or incorporating a climbing wall on one side can further expand the play possibilities.
Painting and decorating the playhouse offer another opportunity for customization. Use non-toxic, child-safe paints and sealants to protect the wood and create a vibrant and inviting space. Consider involving children in the painting and decorating process to foster a sense of ownership and creativity. Stencils, murals, and colorful accents can add personality and charm to the playhouse.
Landscaping around the playhouse can further enhance its appeal and functionality. Planting trees and shrubs can provide shade and create a natural barrier. Laying down a layer of mulch or gravel can help prevent weeds and create a clean and safe play area. Consider adding a small garden or flower bed to encourage children to engage with nature.
Adding lighting to the playhouse allows for extended playtime in the evenings. Solar-powered lights are a sustainable and energy-efficient option. String lights or fairy lights can create a whimsical and magical atmosphere. Ensure all electrical components are properly installed and grounded to prevent electrical hazards.
Regular maintenance is essential to keep the playhouse in good condition and ensure its safety. Inspect the structure regularly for any signs of damage or wear, such as cracks, splinters, or loose hardware. Repair any damage promptly to prevent further deterioration. Reapply paint or sealant as needed to protect the wood from the elements. Clean the slide regularly to remove dirt and debris. Trim any overhanging branches or vegetation that could pose a hazard.
Constructing a DIY playhouse with a slide is a rewarding project that provides children with a dedicated space for imaginative play and physical activity. By carefully selecting plans and materials, following safe construction practices, and incorporating personalized customizations, a durable, safe, and enjoyable play area can be created that will provide years of enjoyment.

Diy Outdoor Wooden Playhouse For Kids

Playhouse Woodworking Plans Houseful Of Handmade

Randy S Ranch Playhouse Plan Elevated Play Home Diy Project For Kids Paul Playhouses

Playground Playhouse Plan 3 Sizes Backyard For Kids Play Area

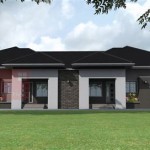
Modern Playhouse Diy Plans

Amazing Kids Playhouse Plans Free Woodwork City Woodworking

Operation Clubhouse Diy Playhouse With Slide

A Raise Playhouse With Slide And Climbing Wall Kids Plans Diy Outdoor

Randy S Ranch Playhouse Plan Elevated Play Home Diy Project For Kids Paul Playhouses

Diy Playhouse For Kids Plans