Dog House With Hinged Roof Plans: A Detailed Guide for Dog Owners
Providing your furry friend with a comfortable and weather-resistant shelter is essential for their well-being. Building a dog house with a hinged roof is a great way to achieve this, allowing for easy access for cleaning and maintenance.
In this comprehensive guide, we will walk you through the essential aspects of dog house with hinged roof plans, including:
- Choosing the right materials
- Determining the appropriate size
- Creating detailed plans
- Building the frame
- Installing the siding and roof
- Adding a hinged roof
- Tips for decoration and customization
1. Choosing the Right Materials
The choice of materials for your dog house will depend on factors such as durability, weather resistance, and insulation. Some popular options include:
- Wood: Cedar and redwood are naturally weather-resistant and durable, but they can be more expensive.
- Plastic: Polyethylene and polypropylene are lightweight, waterproof, and easy to clean, but they may not be as durable as wood.
- Metal: Galvanized steel or aluminum are highly durable and weather-resistant, but they can be more expensive and may get hot in the sun.
2. Determining the Appropriate Size
The size of the dog house should be appropriate for your dog's size and breed. A general rule is to allow for about 3 feet of height, 2 feet of width, and 2.5 feet of length for a small dog. For medium-sized dogs, add about 6 inches to each dimension, and for large dogs, add another 6 inches.
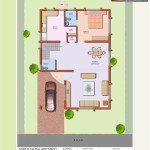
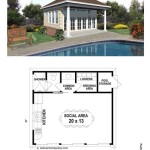
3. Creating Detailed Plans
Before you start building, it's important to create detailed plans that include dimensions, materials, and a step-by-step guide. This will help you avoid mistakes and ensure that your dog house is constructed properly.
4. Building the Frame
The frame of the dog house forms the foundation and support structure. Use sturdy materials such as 2x4s or 2x6s for the base, walls, and roof. Secure all joints with nails or screws.
5. Installing the Siding and Roof
The siding and roof should provide protection from the elements. For siding, you can use plywood, vinyl, or corrugated plastic. For the roof, consider asphalt shingles, metal roofing, or polycarbonate panels.
6. Adding a Hinged Roof
To make it easy to clean and maintain the dog house, consider adding a hinged roof. Install a hinge along the back of the roof and attach it to the frame. Use a latch to keep the roof closed.
7. Tips for Decoration and Customization
Once the basic structure is complete, you can decorate and customize the dog house to match your dog's personality and your backyard style. Add a paint job, stencils, or other decorative elements.
Building a dog house with a hinged roof is a rewarding and practical project that will provide your dog with a comfortable and protected space. By following these essential aspects, you can create a cozy home for your furry friend that will last for years to come.

Image Result For Insulated Dog House Plans

Image Result For Dog House Plans With Hinged Roof Insulated

Ideal Doghouse For Outdoor Use In Saskatchewan Saskspca

Dog House Plans For Large Myoutdoorplans

Dog House Plans Free Diy Projects Construct101

Free 3x4 Dog House Plan

Help We Re Planning On Making A Dog House For Our Two Dogs What Are Things Should Consider R

Large Dog House Plans Free Construct101

How To Build A Dog House Roof Howtospecialist Step By Diy Plans

Insulated Dog House Plans Our Complete Set Of