Essential Aspects of Drafting House Plans for iPad
With the advancement of technology, home design and architecture have become more accessible than ever before. Thanks to specialized apps, individuals can now create detailed house plans using their iPads, making the process convenient and efficient.
Drafting house plans on an iPad offers numerous benefits, including mobility, precision, and ease of sharing. However, to achieve optimal results, it's crucial to grasp the following essential aspects:
1. Choosing the Right App
The first step is to select an app that meets your specific needs. Various apps are available in the App Store, each with its own features and capabilities. Consider your experience level, budget, and the complexity of your project when making your choice.
2. Understanding the Interface
Once you have chosen an app, take some time to familiarize yourself with its user interface. Understand the layout, tools, and menus to navigate the app efficiently and effectively. Most apps provide tutorials or documentation to guide beginners.
3. Setting Up Units and Scale
Before starting your plan, set the appropriate units and scale. The app should allow you to choose between metric or imperial units and specify the scale for your drawing. This ensures accuracy and consistency throughout your design.
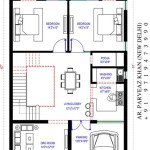
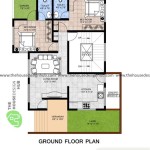
4. Drawing Walls and Rooms
The foundation of any house plan is its walls and rooms. Using the app's drawing tools, you can create walls by setting their length, width, and height. Arrange the walls to define the spaces and rooms of your home.
5. Adding Doors and Windows
Doors and windows provide access and natural light to your home. Select the appropriate door and window types from the app's library and insert them into the walls. Specify their dimensions, style, and location for a realistic representation.
6. Laying Out Fixtures and Furniture
To bring your home to life, add fixtures and furniture to the plan. The app may have a library of common objects, such as cabinets, appliances, beds, and sofas. These elements help you visualize the space and plan the layout.
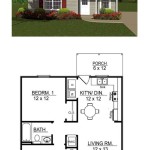
7. Creating Elevations and Sections
Elevations and sections provide different perspectives of your home. Elevations show the exterior walls, windows, and doors from the side, while sections reveal the interior structure and heights of each level.
8. Sharing and Exporting Plans
Once your plan is complete, you can share it with others or export it to different formats. Most apps allow you to email, print, or export your plans in formats such as PDF, DWG, or JPEG.
9. Collaboration and Feedback
If you're working on a collaborative project, consider using apps that support cloud-based storage and real-time collaboration. This allows multiple users to view, edit, and provide feedback on the plan simultaneously.
10. Seeking Professional Help When Needed
While drafting house plans on an iPad is accessible, it's important to recognize when professional assistance is necessary. Complex projects or structural designs should be undertaken by licensed architects or engineers to ensure safety and adherence to building codes.
By following these essential aspects, you can harness the power of your iPad to create accurate and detailed house plans. Whether you're an experienced designer or a first-time homeowner, these guidelines will empower you to visualize and plan your dream home with confidence and ease.

How To Draw An Interior Floor Plan On The Ipad

Draw Floor Plans With The Roomsketcher App

Draw Floor Plans With The Roomsketcher App

Draw Floor Plans With The Roomsketcher App

What S The Best Or App On Pc Ipad For Floor Planning Renovation Residential Houses Why Quora

8 Best Floor Plan For Android And Ios Techwiser

10 Best House Design For 2024 Cedreo

Where You Can Buy House Plans Live Home 3d

House Design App 10 Best Home Architecture

House Design App 10 Best Home Architecture