Essential Aspects of Drawing Home Floor Plans
Creating accurate and detailed home floor plans is a crucial step in the design and construction process. Whether you're a professional architect, a home renovator, or simply want to plan your dream home, understanding the essential aspects of drawing floor plans is paramount.
Scale and Accuracy
Floor plans should be drawn to scale, which means they accurately represent the actual size and proportions of the home. Using a scale ruler or a digital software tool will help ensure precision. Accuracy is essential for calculating materials, space planning, and ensuring that the finished home matches the design.
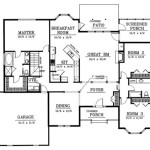
Layout and Functionality
The layout of the home, including the arrangement of rooms, hallways, and staircases, should be carefully considered. Functional floor plans maximize space utilization, provide for smooth traffic flow, and create comfortable and logical living spaces.
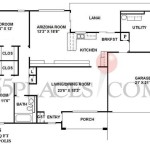
Symbols and Conventions
Architects and designers use standardized symbols to represent different elements of a floor plan, such as walls, doors, windows, and furniture. Understanding these conventions is crucial for both drawing and interpreting floor plans.
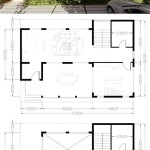
Dimensions and Annotations
Dimensions are essential for accurate construction. Floor plans should include measurements for walls, rooms, and key features, such as appliances and cabinetry. Annotations can provide additional information, such as material specifications, electrical outlets, and plumbing fixtures.
Digital Tools
Computer-aided design (CAD) software offers powerful tools for creating floor plans. These tools allow for precision, ease of editing, and integration with other design disciplines. However, a basic understanding of drafting principles and conventions is still necessary.
Building Codes and Regulations
Floor plans must adhere to local building codes and regulations. These codes ensure safety, accessibility, and energy efficiency. Familiarizing yourself with the applicable codes is essential before drawing floor plans.
Professional Help
If you lack the necessary expertise or time to draw floor plans yourself, consider seeking professional help from an architect or a certified plan designer. They can provide specialized knowledge, ensure accuracy, and navigate the building approval process.
Additional Tips
* Use graph paper or CAD software to maintain accuracy. * Keep the floor plan simple and uncluttered. * Include notes for any special features or design considerations. * Consider using different line weights and colors for walls, furniture, and annotations. * Double-check dimensions and measurements before finalizing the plan.
Floor Plans Types Symbols Examples

House Plans How To Design Your Home Plan

Home Floor Plans House Plan Drawings

Floor Plan Creator And Designer Free Easy App

House Plans How To Design Your Home Plan

Easy Home Building Floor Plan Cad Pro

Floor Plan Creator And Designer Free Easy App

House Plans How To Design Your Home Plan

House Plans How To Design Your Home Plan

Use Your Own Floor Plan Diyanni Homes