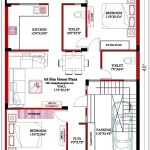
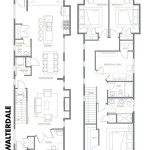
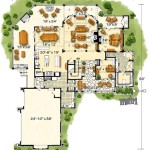
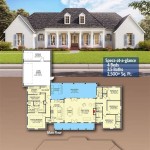
Floor Plan Design Drawing Easy
Creating a floor plan may seem daunting, but with the right approach and tools, it can be a straightforward process. A well-designed floor plan is crucial for visualizing space, planning renovations, and communicating design ideas effectively. This article provides a step-by-step guide to simplify floor plan design drawing.
Key Measurements and Tools
Accurate measurements are the foundation of a successful floor plan. Gathering the necessary measurements and utilizing appropriate tools ensures a precise representation of the space.
* Measuring tape: Use a long, retractable measuring tape for accurate room dimensions. * Laser measure: A laser measure offers quick and precise measurements, especially for larger areas. * Graph paper: Graph paper helps maintain scale and proportions. * Pencil and eraser: For initial sketching and adjustments. * Digital tools: Consider software like CAD programs or online floor plan creators for digital drawing.Choosing a Scale
Selecting an appropriate scale is essential for representing the space accurately on paper or digitally. Common scales include 1/4 inch = 1 foot and 1/8 inch = 1 foot. The scale should be chosen based on the size of the space and the size of the paper or digital canvas.
Sketching the Initial Layout
Begin by sketching the exterior walls of the space. Focus on the overall shape and the placement of doors and windows. This initial sketch serves as a framework for adding interior details. Consider traffic flow and the placement of furniture.
* Outline exterior walls. * Mark door and window placements. * Consider room adjacencies.Adding Interior Walls and Features
Once the exterior walls are defined, add interior walls to create individual rooms. Indicate the placement of fixed features like fireplaces, built-in shelves, and staircases. Maintain accuracy in measurements and scale to ensure the floor plan is a realistic representation.
* Draw interior walls. * Position fixed elements. * Ensure correct scaling.Incorporating Doors and Windows
Accurately represent the location and swing direction of doors and windows. Use standard symbols to denote different types of doors and windows. This information is crucial for understanding the flow of space and natural light.
* Mark door swing direction. * Use standard window symbols. * Consider window types (e.g., sliding, casement).Adding Furniture and Fixtures
Place furniture and fixtures within each room using scaled representations. This helps visualize how the space will be furnished and identifies potential space constraints. Consider the size and placement of furniture for optimal functionality and aesthetics.
* Use scaled furniture symbols. * Evaluate furniture placement for functionality. * Visualize traffic flow.Labeling and Dimensions
Clear labeling and dimensions are crucial for understanding the floor plan. Label each room and provide accurate dimensions for walls, doors, and windows. This allows for precise communication of the design and facilitates future modifications.
* Label all rooms. * Include wall dimensions. * Indicate door and window dimensions.Utilizing Digital Tools
Numerous digital tools simplify the floor plan creation process. Software options range from basic online floor plan creators to professional CAD programs. These tools offer features like automatic scaling, furniture libraries, and 3D visualization.
* Explore online floor plan creators. * Consider CAD software for advanced features. * Utilize 3D visualization options.Reviewing and Refining
Once the initial floor plan is complete, review it carefully for accuracy and functionality. Consider traffic flow, furniture placement, and the overall layout. Refine the plan as needed to optimize the space and meet the desired design goals.
* Check for measurement accuracy. * Evaluate traffic flow and furniture placement. * Make necessary revisions.Adding Electrical and Plumbing Plans
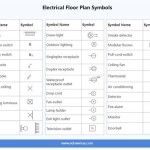
For comprehensive planning, consider incorporating electrical and plumbing plans into the floor plan or creating separate drawings. This includes indicating the location of outlets, light fixtures, plumbing fixtures, and vents. These details are essential for construction and renovation projects.
* Indicate outlet and fixture placements. * Mark plumbing fixture locations. * Show vent placements.Understanding Building Codes and Regulations
Before finalizing the floor plan, ensure it complies with local building codes and regulations. Research specific requirements regarding room sizes, egress windows, and other safety regulations. Adhering to these codes is essential for obtaining building permits and ensuring a safe and compliant design.
* Research local building codes. * Check room size requirements. * Ensure compliance with egress window regulations.Working with Professionals
For complex projects or if seeking expert guidance, consider working with an architect or interior designer. These professionals possess the expertise to create detailed and functional floor plans that meet specific needs and preferences. They can also assist with navigating building codes and regulations.
* Consult with an architect or interior designer. * Benefit from professional expertise. * Ensure code compliance.
Easy Blue Print

Create Professional 2d Floor Plans Roomsketcher

How To Make Floor Plans For Free In Sketchup

Floor Plans Learn How To Design And Plan

Draw Floor Plans Try Smartdraw Free And Easily More

Create Floor Plans And Home Designs

How To Draw A Floor Plan Live Home 3d

Simple House 2nd Floor Plan Template

How To Draw A Floor Plan Live Home 3d

Draw Floor Plans In Half The Time Cedreo