Google SketchUp 2D Floor Plan Components: A Comprehensive Guide
Google SketchUp, formerly known as SketchUp Make and now available in different versions including a web-based free version, has become a widely used tool for creating 3D models. However, its capabilities extend beyond three-dimensional design, making it versatile for 2D floor plan creation as well. Understanding the key components involved in generating accurate and visually informative 2D floor plans is essential for architects, interior designers, and even homeowners undertaking renovation projects.
This article will delve into the essential elements that constitute a well-constructed 2D floor plan within the SketchUp environment. It will focus on specific components, outlining their importance and how they contribute to the overall clarity and usability of the plan. While SketchUp is primarily 3D, adopting a 2D workflow involves strategically using its tools and understanding projection techniques to create technically sound drawings.
1. Walls: The Foundation of the Floor Plan
Walls are the fundamental component of any floor plan, defining the boundaries and spatial organization of a building. In SketchUp, creating walls typically involves using the Line tool to draw the perimeter and internal divisions. The accuracy of these lines is paramount, and utilizing specific dimensions during the drawing process is crucial. SketchUp's measurement box allows users to input exact lengths for each wall segment, ensuring dimensional accuracy.
Once the basic lines are drawn, the Push/Pull tool can be employed to extrude these lines into 3D, representing the wall thickness. However, for a 2D floor plan, it is generally recommended to maintain a flat, two-dimensional representation of the walls. This can be achieved by simply drawing parallel lines representing the wall thickness and then connecting the ends to form a closed shape. This shape will then be filled with a solid color or a hatch pattern to visually differentiate it from other components in the plan.
Layer management is also vital when dealing with walls. Creating a dedicated layer specifically for walls allows for easy visibility control and modification without affecting other elements of the plan. Furthermore, the use of different line weights for walls can enhance the clarity of the floor plan. Thicker lines are generally used for exterior walls to emphasize their structural importance, while thinner lines can represent interior partitions.
Consider the use of a consistent wall thickness throughout the plan (unless specified otherwise by structural considerations). This standardization contributes to the overall professional appearance and readability of the drawing. Furthermore, pay attention to the junctions where walls meet. Clean and accurate connections are essential for a visually pleasing and technically sound floor plan. SketchUp's endpoint inference can be leveraged to ensure precise connections between wall segments.
2. Doors and Windows: Defining Access and Light
Doors and windows are critical components that define access points and natural light sources within a building. In a 2D floor plan, doors and windows are typically represented symbolically, using specific conventions to indicate their type, size, and swing direction. These symbols are important for understanding the functionality and spatial relationships within the building.
Doors are usually represented as an arc indicating the swing path, along with a line connecting the door jamb to the wall. The direction of the arc indicates the direction in which the door opens. Different door types, such as single doors, double doors, and sliding doors, can be represented using variations of this basic symbol. The size of the door can also be indicated by the length of the line representing the door itself.
Windows are typically represented as two parallel lines within the wall, indicating the window frame. The spacing between these lines represents the window thickness. The addition of crosshairs or other geometric patterns within the window frame can further enhance its visual representation. Different window types, such as casement windows, sliding windows, and fixed windows, can be represented using different symbols or variations in the basic window representation.
Similar to walls, doors and windows should be placed on dedicated layers to facilitate easy editing and visibility control. It is also important to ensure that doors and windows are accurately positioned within the walls, relative to architectural drawings or specifications. Precise placement is crucial for accurate spatial representation.
Creating custom components for doors and windows can streamline the floor plan creation process. These components can be saved and reused throughout the drawing, ensuring consistency and saving time. Pre-made door and window components are also readily available in SketchUp's 3D Warehouse, although care should be taken to ensure that these components are properly scaled and adapted for 2D floor plan representation.
3. Furniture and Fixtures: Populating the Space
Furniture and fixtures are essential for conveying the functionality and intended use of each space within the floor plan. While SketchUp is primarily a 3D modeling tool, representing furniture and fixtures in a 2D floor plan requires a simplified approach. The goal is to depict the footprint and approximate size of these elements without creating overly detailed models.
Furniture can be represented using basic geometric shapes, such as rectangles, squares, and circles, to indicate the size and placement of beds, sofas, tables, and chairs. The dimensions of these shapes should be proportionate to the actual size of the furniture being represented. It is recommended to use a consistent scale throughout the floor plan to maintain accuracy.
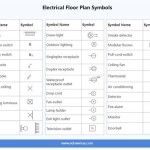
Fixtures, such as sinks, toilets, bathtubs, and kitchen appliances, can be represented using simplified symbols or outlines. These symbols should be recognizable and easily distinguishable from other elements in the floor plan. Standard symbols for fixtures are often used in architectural drawings to ensure clarity and consistency.
The arrangement of furniture and fixtures within the floor plan should reflect the intended layout and functionality of the space. Consideration should be given to circulation patterns, access points, and the overall flow of movement within the room. The placement of furniture can significantly impact the usability and perceived size of a space.
Using a dedicated layer for furniture and fixtures allows for easy modification and visibility control. This is particularly useful when experimenting with different layout options. It is also important to consider the impact of furniture placement on the overall clarity of the floor plan. Avoid overcrowding the plan with too many details, and prioritize essential elements that contribute to the understanding of the space.
4. Dimensions and Annotations: Providing Clarity and Information
Dimensions and annotations are crucial for conveying precise measurements and essential information about the floor plan. These elements provide the necessary details for construction, renovation, and space planning purposes. Accurate and clear dimensions are essential for ensuring that the floor plan is correctly interpreted and implemented.
Dimensions should be used to indicate the overall size of the building, the length of walls, the width of doorways, and the size of rooms. Dimensions should be placed strategically to avoid cluttering the floor plan, and should be aligned and organized in a logical manner. It is recommended to use a consistent dimensioning style throughout the plan.
SketchUp's Dimension tool allows users to easily create and place dimensions within the drawing. The tool automatically detects the endpoints and midpoints of lines, making it easy to accurately measure distances. The appearance of dimensions, including the font, size, and arrow style, can be customized to suit the specific needs of the project.
Annotations can be used to provide additional information about the floor plan, such as room names, material specifications, and notes about specific features. Annotations should be clear, concise, and easy to read. They should be placed close to the elements they refer to, without obstructing other important details.
The Text tool in SketchUp allows users to create and place annotations within the drawing. The font, size, and color of the text can be customized to ensure readability. It is recommended to use a consistent annotation style throughout the floor plan.
Layer management is also important for dimensions and annotations. Placing these elements on a dedicated layer allows for easy visibility control and modification. This is particularly useful when printing the floor plan at different scales, as the size and appearance of dimensions and annotations can be adjusted to maintain readability.
Consider using leader lines to connect annotations to specific elements in the floor plan. Leader lines help to avoid ambiguity and ensure that the annotations are clearly associated with the intended features. The style of the leader lines can also be customized to suit the overall aesthetic of the floor plan.
5. Utilizing Layers and Scenes for Organization and Presentation
Effective utilization of layers and scenes within SketchUp is paramount for creating organized and easily navigable 2D floor plans. Layers enable users to group related elements together, allowing for selective visibility and modification. Scenes allow users to save specific viewpoints and layer visibility settings, facilitating efficient navigation and presentation of different aspects of the floor plan.
As previously mentioned, walls, doors and windows, furniture and fixtures, and dimensions and annotations should each be placed on dedicated layers. This facilitates easy editing and visibility control. For example, the furniture layer can be turned off to focus on the architectural elements of the plan, or the dimensions layer can be turned off for a cleaner presentation.
Beyond these basic layers, additional layers can be created to represent different aspects of the building, such as electrical layouts, plumbing layouts, or HVAC systems. This allows for a comprehensive representation of the building's infrastructure, without cluttering the main floor plan.
Scenes can be used to save different viewpoints of the floor plan. For example, a scene can be created to show the entire floor plan at a specific scale, while another scene can be created to zoom in on a particular area of interest. Scenes can also be used to save different layer visibility settings. For example, a scene can be created to show the floor plan with all layers visible, while another scene can be created to show only the architectural elements.
By combining layers and scenes, users can create a highly organized and easily navigable 2D floor plan. This is particularly useful for large and complex projects, where the ability to quickly switch between different viewpoints and layer visibility settings is essential for efficient workflow.
The judicious use of layers and scenes not only enhances the user's ability to work with the floor plan but also improves its clarity and presentation for clients, contractors, and other stakeholders.

2d Interior Symbols For Floor Plans 3d Warehouse

2d Floor Plans Without Drawing The 3d Object Pro Sketchup Community

Layout Floor Plan Pro Sketchup Community

Plan View 2d Sketchup For Web Community

Technique Or Add In To Project Furniture And Fittings For 2d Plan Sketchup Community

Creating A 2d Plan Of Your Sketchup Model In Layout Blog

Sketchup Interior Design Tutorial How To Create A Floor Plan In 7 Easy Steps

Sketchup Tutorial How To Create A Floor Plan In

Creating A 2d Plan Of Your Sketchup Model In Layout Blog

Sketchup Layout For Architectural And Tf Design Timber Frame Forums