Essential Aspects of House Floor Plan Sketch
A house floor plan sketch is a diagrammatic representation of the layout of a house. It shows the arrangement of rooms, doors, windows, and other structural features. A well-drawn floor plan sketch is an essential tool for any homeowner, as it can help with a variety of tasks, such as:
- Planning renovations or additions
- Arranging furniture
- Visualizing the flow of traffic through the house
- Troubleshooting electrical or plumbing problems
- Creating an inventory of your belongings
- Estimating the value of your home
If you're not sure how to draw a house floor plan sketch, there are a few resources available to help you. You can find online tutorials, books, or even hire a professional to create a sketch for you. Once you have a floor plan sketch, you can use it to make informed decisions about your home.
Here are some of the essential aspects of a house floor plan sketch:
- Scale: The scale of the sketch should be accurate so that you can accurately measure distances and dimensions.
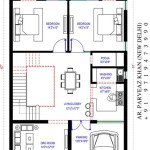
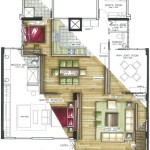
- Layout: The layout of the sketch should be clear and easy to understand. It should show the arrangement of rooms, doors, windows, and other structural features.
- Dimensions: The dimensions of each room and other structural features should be accurately labeled on the sketch.
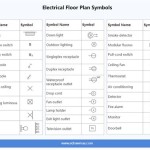
- Symbols: Standard symbols should be used to represent different features, such as doors, windows, and electrical outlets.
- Legend: A legend should be included on the sketch to explain the symbols used.
By following these guidelines, you can create a house floor plan sketch that is accurate, informative, and easy to use.
Tips for Drawing a House Floor Plan Sketch
Here are a few tips for drawing a house floor plan sketch:
- Start by measuring the perimeter of the house and marking the location of all doors and windows.
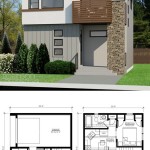
- Draw the exterior walls of the house, making sure to include the correct dimensions.
- Divide the house into rooms, and draw the interior walls.
- Label each room with its name.
- Add furniture and other features to the sketch, as desired.
Once you have completed the sketch, check it for accuracy and make any necessary corrections. A well-drawn floor plan sketch can be a valuable tool for any homeowner.

Floor Plan House Sketch Stock Vector Ilration Of Building 52483697 Plans

Floor Plans Types Symbols Examples

Floor Plan Creator And Designer Free Easy App

Easy Home Building Floor Plan Cad Pro

Draw Floor Plans In Half The Time Cedreo

Floor Plan House Sketch Vector Ilration Plans

Floor Plans Types Symbols Examples

Floor Plan Creator And Designer Free Easy App

Home Floor Plans House Plan Drawings

How To Draw Floor Plans With Floorplanner Com Young House Love