```html
How to Create a Floor Plan in Excel
While Excel is primarily known for its spreadsheet capabilities, it can surprisingly be used to create basic floor plans. It's important to acknowledge that dedicated CAD (Computer-Aided Design) software or specialized floor planning applications offer significantly more advanced features and precision. However, for simple, conceptual floor plans or for users already familiar with Excel, it can provide a workable solution.
This article outlines the steps involved in creating a floor plan using Excel, focusing on how to leverage its grid structure, shapes, and formatting options to represent rooms, walls, and basic elements. It will cover the preliminary setup, drawing the walls, adding basic elements, and refining the appearance of the floor plan.
Preparing the Excel Worksheet
The first step involves preparing the Excel worksheet to function as a drawing canvas. This requires adjusting the row heights and column widths to create a more visually balanced grid. The objective is to make each cell approximately square, allowing for easier scaling and drawing of objects.
Begin by selecting the entire worksheet. This can be accomplished by clicking the small triangle at the intersection of the row and column headers. Next, right-click on any column header and select "Column Width." Enter a small value, such as 2 or 3. Repeat this process for the row headers, right-clicking on a row header and selecting "Row Height." Enter a similar small value. Experimentation might be needed to achieve a visually appealing and practical grid.
After adjusting the cell dimensions, consider setting a scale for the floor plan. Decide what real-world dimension each cell will represent. For example, each cell could represent 1 foot or 0.5 meters. Note this scale clearly on the worksheet for future reference. This scale will be important when determining the number of cells needed to represent the dimensions of rooms and other elements.
Freezing the top row and leftmost column can be a helpful organizational step. This keeps the row and column headers visible even when scrolling, facilitating orientation and measurement within the floor plan. To freeze panes, navigate to the "View" tab on the Excel ribbon and select "Freeze Panes." Choose "Freeze Top Row" and "Freeze First Column" to lock these headers in place.
Drawing Walls and Room Boundaries
With the grid established, the next step is to draw the walls and define the room boundaries. Excel doesn't have dedicated wall drawing tools, so this involves utilizing cell borders and drawing shapes.
One approach is to use cell borders to represent walls. Select a range of cells that corresponds to the desired length and width of a wall based on the established scale. Then, use the "Format Cells" option (right-click and select "Format Cells" or use the "Format" button in the "Home" tab) to apply a border to the selected cells. Choose a thick border style for visual clarity. Repeat this process to create all the walls of the floor plan.
Another method involves using Excel's shape tools. Navigate to the "Insert" tab and select "Shapes." Choose a rectangle shape. Draw the rectangle on the worksheet, then adjust its size and position to represent a wall. Format the shape's fill color to "No Fill" and adjust the outline color and weight to resemble a wall. Utilize the "Copy" and "Paste" functions to quickly create multiple walls of the same type. Subsequently, rotate and resize these duplicated walls as needed.
The shape method offers greater flexibility in terms of wall thickness and appearance. Furthermore, shapes can be layered on top of cell borders, offering a combined approach. For example, cell borders can define the overall room shape, while shapes can be used to add wall details or create internal walls. The choice between cell borders and shapes depends on the desired level of detail and visual style.
Ensure that walls connect properly at corners. Use the "Zoom" function to inspect connections closely and make minor adjustments to cell selections or shape positions. Overlapping walls or gaps between walls can detract from the clarity of the floor plan.
Adding Basic Elements and Annotations
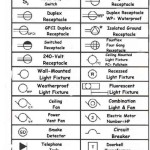
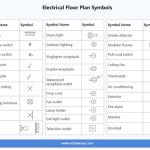
After defining the walls, the next step is to add basic elements such as doors, windows, furniture, and appliances. This involves continuing to use Excel's shape tools and text boxes.
Doors can be represented using rectangular shapes. Create a narrow rectangle to represent the door itself, and then add an arc shape to indicate the swing direction. Group these shapes together for easier movement and manipulation. Copy and paste these grouped door symbols to represent multiple doorways. Ensure that doors are placed within wall openings and swing in a realistic direction.
Windows can be represented using rectangular shapes with dashed or thinner borders. Consider using different fill colors to distinguish windows from walls. Place windows along exterior walls, taking into account their size and position based on the established scale.
Furniture and appliances can also be represented using shapes. Use rectangles, circles, and other basic shapes to create simplified representations of beds, tables, sofas, chairs, stoves, refrigerators, and other common household items. Consider using different fill colors or patterns to distinguish these elements from the walls and floors. Label each element using text boxes to indicate its function.
Text boxes can be added to label rooms, indicate dimensions, and provide other relevant information. Navigate to the "Insert" tab and select "Text Box." Draw a text box on the worksheet and enter the desired text. Adjust the font size, color, and alignment of the text to improve readability. Position text boxes strategically to avoid cluttering the floor plan.
Consider using Excel's data validation features to create dropdown lists for selecting furniture types or room names. This can help to standardize the labeling and reduce errors. To create a dropdown list, select a cell, navigate to the "Data" tab, and select "Data Validation." Choose "List" as the validation criteria and enter the desired list of values separated by commas.
Refining the Appearance and Printing
Once the basic floor plan is complete, the final step involves refining its appearance and preparing it for printing or sharing. This includes adjusting colors, adding patterns, and removing unnecessary gridlines.
Experiment with different color schemes to improve the visual appeal of the floor plan. Use different fill colors for walls, floors, and furniture. Consider using pastel colors or muted tones to create a more professional look. Avoid using overly bright or contrasting colors, as these can be distracting. Use the "Format Cells" option or the shape formatting tools to modify colors.
Consider adding patterns or textures to the floor plan to differentiate different areas. For example, use a tile pattern for bathrooms or a wood grain pattern for living rooms. These patterns can be added using the "Fill Effects" option in the "Format Cells" dialog box. However, exercise caution when using patterns, as too many patterns can make the floor plan look cluttered.
Hiding the gridlines can significantly improve the visual clarity of the floor plan. Navigate to the "View" tab and uncheck the "Gridlines" box. This will remove the gridlines from the worksheet, making it look more like a traditional drawing.
Before printing or sharing the floor plan, adjust the page layout settings to ensure that it fits properly on the page. Navigate to the "Page Layout" tab and adjust the margins, orientation, and scaling options as needed. Use the "Print Preview" feature to see how the floor plan will look when printed. Consider saving the floor plan as a PDF file for easier sharing and printing.
It is generally beneficial to add a title block to the floor plan. This block commonly includes information such as the project name, the date, the drafter's name, and the scale being used. This helps to provide context and clarity to the floor plan.
The process of creating a floor plan in Excel is not as streamline as specialized software, but with careful preparation and utilization of its features, functional and presentable results can be achieved.
```
3 Ways To Draw And Create A Floorplan In Excel Like Cad With Examples

How To Make Create A Floor Plan On Microsoft Excel Templates Examples 2024

How To Create A Floor Plan Using Excel

How To Create A Floor Plan Using Excel

How To Draw A Floorplan Scale In Excel House Design Ideas C75 Create Floor Plan Free Plans Warehouse

How To Make Create A Floor Plan On Microsoft Excel Templates Examples 2024

How To Draw And Create A Floor Plan In Excel Like Cad Part 2 Live Examples With Addin Link

How To Make A Floorplan In Excel Microsoft Tips Plan Floor Plans

Excel Tips And Tricks How To Draw A Floor Plan Tutorial

How To Create A Floor Plan Using Excel