How to Create a Simple Floor Plan in Excel
While Excel is predominantly known for its spreadsheet capabilities, its grid-based structure can also be utilized to create rudimentary floor plans. This approach offers a simple and accessible alternative for those without access to specialized architectural software. Creating a floor plan in Excel involves manipulating cell sizes, adding borders, and utilizing color fills to represent walls, doors, windows, and furniture. Although less precise than CAD software, Excel provides a basic visual representation suitable for preliminary planning, space organization, and conceptual design.
This article outlines the steps required to construct a simple floor plan using Microsoft Excel. These steps will cover preparing the worksheet, drawing walls, adding details such as doors and windows, labeling rooms, and incorporating basic furniture representations. The techniques described will provide a fundamental understanding of how to leverage Excel's functionalities for visual planning.
Preparing the Excel Worksheet for Floor Plan Creation
The initial step in creating a floor plan in Excel involves configuring the worksheet to provide a suitable drawing grid. This process involves adjusting cell sizes to create a more square-like appearance, which more accurately reflects spatial dimensions. This is accomplished by modifying both the column width and row height.
To adjust the column width, select all columns in the worksheet by clicking the triangle in the upper-left corner where the row and column headers intersect. Then, right-click on any column header (e.g., A, B, C) and select "Column Width." A dialog box will appear, prompting for a new width value. Inputting a value between 2 and 4 generally creates a visually balanced grid. The precise value will depend on personal preference and screen resolution.
Next, the row height needs adjustment. Similarly, right-click on any row header (e.g., 1, 2, 3) and select "Row Height." A dialog box will appear, prompting for a new height value. Enter a value close to, but not necessarily identical to, the column width value chosen earlier. Experimentation might be needed to achieve a visually square grid. Ideally, the height and width values should be proportionate to create near-square cells, offering a more accurate representation of spatial relationships. Different screen resolutions might require slightly adjusted values to get the desired output.
Once the cell sizes are adjusted, consider setting up a grid for easier alignment and measurement. This can be achieved by enabling the gridlines. Navigate to the "View" tab on the Excel ribbon and ensure the "Gridlines" checkbox is selected. This will display faint lines outlining each cell, assisting in drawing and positioning elements within the floor plan.
Finally, it's beneficial to establish a scale for the floor plan. Decide what measurement each cell will represent (e.g., one cell = one foot, one cell = half a meter). This scale should be noted clearly on the worksheet, typically in a prominent location like a header or a dedicated note cell. Maintaining a consistent scale is crucial for accurate estimations of room sizes and furniture placement. The chosen scale directly impacts the overall size and appearance of the floor plan within the Excel grid.
Drawing Walls and Adding Architectural Details
With the worksheet prepared, the next step involves drawing the walls of the floor plan. This is achieved by utilizing cell borders. Select a range of cells to represent the perimeter of the building or individual rooms. Then, navigate to the "Home" tab and locate the "Font" section. Click the dropdown arrow next to the "Borders" icon. From the dropdown menu, select "Outside Borders" to create a solid outline around the selected cells.
To create interior walls, repeat the process, selecting the appropriate cells to represent the wall's location and length. It is crucial to maintain consistent wall thickness throughout the floor plan. This can be achieved by consistently using the same number of cells to represent the wall's width. For instance, using a single cell width for all walls will create a cleaner and more visually consistent plan.
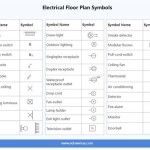
Incorporating doors and windows requires a slightly more nuanced approach. To represent a door, select a section of the wall where the door should be located. Apply "Outside Borders" to the rest of the wall segment, leaving a gap of approximately 2-3 cells to represent the doorway. To indicate the door swing, use the drawing tools within Excel (Insert > Shapes > Lines) to create an arc or curved line emanating from one side of the doorway. Position and size the arc to visually represent the door's swing radius.
To represent windows, select a section of wall and apply a thin border along the top and bottom edges of the selected cells. Alternatively, a solid color fill for the selected cells can be used to differentiate windows from solid walls. The choice of representation is largely aesthetic; consistency across all windows in the floor plan is key.
Another detail to consider is the inclusion of structural elements like columns. These can be represented by small, filled-in squares or circles within the floor plan using the "Insert > Shapes" function. Position these elements strategically within the floor plan to represent load-bearing columns or other structural features. The size and placement of these elements should reflect their relative scale and location within the actual building.
Labeling Rooms and Incorporating Furniture Representations
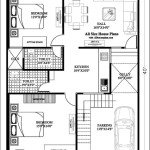
After defining the walls, doors, and windows, it’s essential to label the different rooms for clarity. Select the cell within each room and type the room's name directly into the cell (e.g., "Living Room," "Bedroom," "Kitchen"). Adjust the font size and alignment as necessary to ensure the labels are legible and centrally located within the room.
To visually enhance the floor plan, consider adding basic furniture representations. While Excel lacks dedicated furniture symbols, simple shapes can be used to represent various furniture items. For example, a rectangle can represent a bed, a square can represent a table, and a circle can represent a chair. Utilize the "Insert > Shapes" function to add these shapes to the floor plan.
Resize and position the furniture shapes within the rooms to reflect their approximate size and placement. It can be helpful to use different colors to distinguish different types of furniture. For instance, use blue for seating, brown for tables, and gray for appliances. This color coding aids in visually organizing the floor plan and understanding the spatial arrangement of furniture.
Consider including dimensions on the floor plan to provide a sense of scale and proportion. This can be achieved by adding text boxes or using the cell contents to display the dimensions of rooms or furniture. Accurate dimensions are crucial for planning and estimating the feasibility of furniture placement and determining overall space utilization. Clearly indicate the units of measurement (e.g., feet, meters) to avoid ambiguity.
Furthermore, legends and notes can be added to the floor plan to provide additional information. Use text boxes to explain the symbols used for doors, windows, and furniture. Include notes regarding specific features or design considerations. These additions enhance the floor plan's clarity and usability, particularly when sharing it with others.
The resulting Excel floor plan, while basic, serves as a useful visual aid for space planning and conceptual design. The techniques described above allow for the creation of a rudimentary representation of a floor plan using commonly available spreadsheet software. Remember that this method is not a substitute for professional architectural software, but it can be a valuable tool for initial planning and visualization.

3 Ways To Draw And Create A Floorplan In Excel Like Cad With Examples

How To Make Create A Floor Plan On Microsoft Excel Templates Examples 2024

How To Create A Floor Plan Using Excel

How To Create A Floor Plan Using Excel

How To Draw And Create A Floor Plan In Excel Like Cad Part 2 Live Examples With Addin Link

Excel Tips And Tricks How To Draw A Floor Plan Tutorial

How To Make A Floorplan In Excel Microsoft Tips

How To Create A Floor Plan Using Excel

How To Make Create A Floor Plan On Microsoft Excel Templates Examples 2024

How To Draw And Create A Floor Plan In Excel Like Cad Part 2 Live Examples With Addin Link