How to Build Your Own Floor Plan
Creating a floor plan is a valuable tool for various purposes, including home renovation, interior design, and property management. Building your own floor plan allows you to customize it to your specific needs, ensuring accuracy and detail. This guide provides comprehensive instructions on building your own floor plan, empowering you to visualize and plan your space effectively.
1. Gather Measurements and Resources
Before embarking on the floor plan creation process, gather essential measurements and resources. Carefully measure the length and width of each room, including any alcoves, doorways, and windows. Note the location of fixtures like sinks, toilets, and appliances. Utilize a tape measure and a notebook for accurate recording. Additionally, consider using a floor plan template or software for assistance. Numerous free and paid options are available online, offering pre-designed templates or blank canvases.
2. Choose a Method and Software
Select a method and software that align with your preferences and technical skills. Traditional methods involve drawing floor plans using graph paper, rulers, and pencils. This method offers manual control but requires precision and artistic skill. Alternatively, utilize specialized floor plan software programs that facilitate the creation process through user-friendly interfaces. Popular choices include RoomSketcher, SmartDraw, and Floorplanner. These programs offer drag-and-drop features, pre-built objects, and diverse customization options.
3. Create the Outline
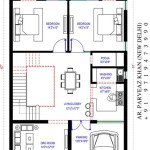
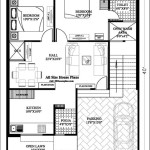
Begin by creating the outline of your floor plan. If using graph paper, draw the perimeter walls of your space to scale. For software programs, import the room dimensions or utilize pre-defined shapes to create the outline. Ensure the outline is accurate and reflects the true shape of your space. Label each room with its designated name, such as "Kitchen," "Living Room," or "Bedroom." Consider adding furniture and appliances to scale for a realistic representation.
4. Add Walls, Doors, and Windows
Once the outline is complete, add internal walls, doors, and windows. Use rulers and pencils to mark the location of walls and doorways on your graph paper. Alternatively, use the tools provided by the software program to insert and adjust these elements. Ensure the doors are correctly positioned and aligned with the walls. Place windows and doors according to their actual locations, ensuring proper scaling and proportions.
5. Incorporate Furniture and Appliances
Add furniture and appliances to your floor plan, carefully considering their size and placement. Utilize pre-designed furniture templates, allowing you to drag and drop objects into your plan. Alternatively, create custom furniture pieces using drawing tools or editing features. Position appliances strategically, ensuring they fit within the space and comply with safety regulations. You can use different colors, textures, or patterns to differentiate furniture and appliances for a more detailed visual representation.
6. Add Details and Annotations
Enhance the detail and clarity of your floor plan by adding annotations and specific features. Include labels for specific rooms, appliances, and fixtures. Utilize a legend to explain symbols or abbreviations used in your plan. Consider adding notes about electrical outlets, plumbing fixtures, or other essential information. Include dimensions, materials, or any other relevant data for future reference or construction purposes.
7. Review and Refine
Thoroughly review your floor plan for accuracy, completeness, and clarity before finalizing it. Ensure all measurements, dimensions, and details are correct. Check for any inconsistencies or omissions. Refine the layout, adjusting furniture placement or wall configurations for optimal space utilization. Utilize the editing tools provided by your software or manual adjustments on graph paper to make necessary corrections.
8. Save and Share
Save your floor plan in a suitable format and share it with others as needed. Most programs offer export options for various file types, including PDFs, JPGs, and DXFs. Use your floor plan for presentations, design discussions, or construction planning. Consider saving multiple versions of your plan for different purposes or revisions. Ensure you have a backup copy of your floor plan in case of accidental deletion or software issues.

Designing My Own House

How To Manually Draft A Basic Floor Plan 11 Steps Instructables

House Plans And Design

Design Your Own House Floor Plans Roomsketcher

How To Build Your Own Home Us With Pictures Wikihow

Designing My Own House

Can I Draw My Own Plans Fluid Building Approvals

House Plans And Design

Free Floor Plan Creator Edrawmax

Create Your Own House Plans For Free Plougonver Com 64eb213db389a Build My Home Onl