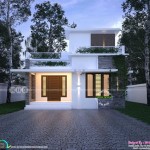
How To Create a 3D Home Plan
Creating a 3D home plan offers significant advantages over traditional 2D blueprints. 3D visualization allows for a more comprehensive understanding of the spatial relationships within a design, enabling homeowners and builders to identify potential issues and refine plans before construction begins. Several methods exist for 3D home plan creation, ranging from free online tools to professional software packages. This article will explore the key steps and tools available for generating a 3D home plan.
Understanding the Tools Available Several software options cater to varying levels of expertise and project complexity. Free online tools often provide basic 3D modeling capabilities suitable for simple projects or initial conceptualization. Mid-range software programs offer more advanced features, such as material customization and rendering options, while professional-grade software provides extensive toolsets for detailed design, walkthroughs, and even virtual reality integration. Selecting the appropriate tool depends on the specific project requirements and the user's technical proficiency.
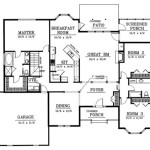
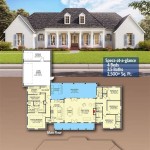
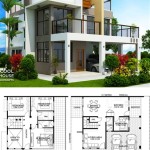
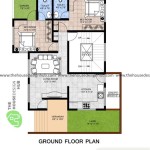
Starting with a 2D Floor Plan The foundation of a 3D home plan often begins with a 2D floor plan. This can be a hand-drawn sketch, a blueprint, or a digital drawing created using CAD software. This 2D plan serves as the framework for extruding walls and adding other architectural elements in the 3D modeling process. Accurate measurements are crucial at this stage to ensure the final 3D model reflects the intended dimensions.
Building the 3D Model Once the 2D floor plan is finalized, the process of building the 3D model begins. This typically involves importing the 2D plan into the chosen software and using its tools to extrude walls to the desired height. Software interfaces vary, but most offer intuitive drag-and-drop functionalities or input fields to specify dimensions. It's essential to maintain consistency in units of measurement throughout the modeling process.
Adding Architectural Elements After the basic structure is established, architectural elements such as doors, windows, and stairs are added. Most 3D modeling software includes pre-built libraries of standard architectural components, simplifying this process. Users can typically customize these elements, adjusting dimensions, materials, and styles to match their design vision. This stage allows for visualizing how different design choices impact the overall aesthetic and functionality of the space.
Incorporating Interior Design The next stage involves incorporating interior design elements. Furniture, fixtures, appliances, and other decorative elements can be added to the 3D model, allowing for a realistic representation of the finished space. Many software packages offer extensive libraries of 3D models for interior design elements, allowing users to easily drag and drop items into their plans. This allows for experimentation with different furniture arrangements and design styles.
Applying Materials and Textures Adding materials and textures significantly enhances the realism of the 3D model. Users can apply various materials, such as wood, brick, tile, and paint, to different surfaces within the model. Software tools allow for customization of texture properties, including color, reflectivity, and roughness. This step adds depth and visual interest to the model, making it easier to visualize the final appearance of the home.
Lighting and Rendering Proper lighting plays a crucial role in showcasing the 3D model effectively. Software tools offer various lighting options, including natural light, artificial light fixtures, and ambient lighting. Experimenting with different lighting scenarios allows users to understand how light interacts with the space throughout the day. Rendering the 3D model generates photorealistic images or animations, providing a high-quality visual representation of the design.
Navigation and Walkthroughs Many 3D modeling programs offer navigation tools that allow users to virtually explore the designed space. This can involve first-person walkthroughs, allowing users to move through the model as if they were physically present. This immersive experience provides a unique perspective on the design and helps identify potential design flaws or areas for improvement. Walkthroughs can also be recorded and shared with clients or stakeholders.
Exporting and Sharing Once the 3D model is complete, it can be exported in various formats, depending on the intended use. Common file formats include OBJ, FBX, and STL. These files can be used for 3D printing, virtual reality applications, or sharing with collaborators. Some software also offers direct sharing options to online platforms or cloud storage services, facilitating easy collaboration and distribution of the 3D home plan.
Continual Refinement Creating a 3D home plan is often an iterative process. As the design evolves, the 3D model can be updated and refined. This allows for flexibility in experimenting with different design options and making informed decisions throughout the planning process. The ability to visualize changes in 3D before construction begins saves time and resources, and contributes to a more successful outcome.

3d Home Design All You Need To Know

How To Make A 3 D Model Of Your Home Renovation Vision The New York Times

How Architectural Companies Design 3d Floor Plans For Residential Home Cad Crowd

How To Make A 3 D Model Of Your Home Renovation Vision The New York Times

3d Floor Plan In Architectural And Interior Design Foyr

Free 3d Home Design Floor Plan Creator

Your Home In 3d Plan And Visualize Space

Create A 3d Floor Plan Model From An Architectural Schematic In Blender Envato Tuts

9 Best Free Floor Plan Tools In 2024 Foyr

3d Floor Plan Skrenders Rendering Company