Floor Plan Creation in AutoCAD 2018: Step-by-Step Guide
Creating accurate and detailed floor plans is crucial in architecture and design. AutoCAD 2018 offers an array of powerful tools to facilitate the creation of professional-grade floor plans. This comprehensive guide will walk you through the essential steps involved in creating a floor plan in AutoCAD 2018.
1. Setting Up the Workspace
Begin by opening AutoCAD 2018 and creating a new project. Select the appropriate template for your project, such as "Architectural" or "Metric." Configure the units and drawing limits as required. It is recommended to use architectural units (feet and inches) for floor plans.
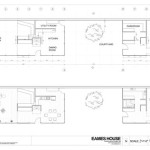
2. Defining Walls and Rooms
To draw the walls of your floor plan, use the "Polyline" tool. Click points to define the boundaries of your walls. For thicker walls, offset the second polyline slightly from the first. To create interior rooms, create closed polylines within the outer walls.
3. Incorporating Doors and Windows
Doors and windows can be added using the "Block" feature. Insert pre-defined blocks from the AutoCAD library or create custom blocks as needed. Insert blocks at the appropriate locations within the walls.
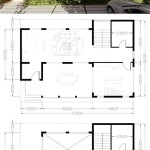
4. Adding Furniture and Fixtures
Furnish your floor plan by inserting blocks for furniture and fixtures. Scale and rotate the blocks to represent the actual dimensions and orientation of the objects. Use the "2D Furniture" library or create your own blocks.
5. Labeling and Dimensioning
Labeling and dimensioning the floor plan ensure clarity and accuracy. Use the "Text" tool to add labels for rooms, walls, and other features. Dimension the plan using the "Dimension" tool, specifying the appropriate units and style.
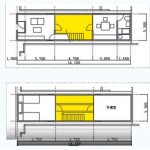
6. Creating Wall Elevations
To create wall elevations, use the "Section Line" tool to define a cutting plane through the walls. Select the "Elevation" tool to generate an elevation view at the specified cutting plane. Dimensions and labels can be added to the elevation.
7. Annotating the Plan
Annotate the floor plan with additional information, such as notes, symbols, and legends. Use the "Multileader" tool to create leaders and arrowheads. Insert symbols and legends from the AutoCAD library or create custom ones.
8. Exporting and Sharing
Once the floor plan is complete, you can export it in various formats. Choose the desired format (e.g., DWG, PDF, JPG) and export it for use in presentations, construction documents, or collaboration with other stakeholders.
Conclusion
Creating floor plans in AutoCAD 2018 involves a series of essential steps, including workspace setup, wall definition, insertion of doors and windows, furnishing, labeling, dimensioning, wall elevation creation, annotation, and exporting. By following these steps and utilizing the powerful tools of AutoCAD 2018, you can create accurate and professional-grade floor plans for your architectural and design projects.

Autocad 2024 Tutorial Making A Simple Floor Plan In 2d Drawing

Autocad 2024 Basic 2d Floor Plan For Beginner Complete

Autocad 2024 Basic 2d Floor Plan For Beginner Complete

Autocad 2024 Tutorial Making A Simple Floor Plan In 2d Drawing

Autocad 2024 Basic 2d Floor Plan For Beginner Complete

Autocad 2024 Help What S New In Map 3d Toolset Autodesk

Autocad 2024 Tutorial Making A Simple Floor Plan In 2d Drawing

How To Draw Floor Plans In Autocad Edrawmax

Basic Floor Plan Drafting In Autocad 7 Steps Instructables

Create Floor Plans With Autocad Lt Acad Systems Autodesk Gold Partner Training Certification Center