How To Design A Floor Plan On Excel Spreadsheet
Designing a floor plan is a crucial step in any construction or renovation project. While dedicated architectural software offers advanced features, utilizing Microsoft Excel can be a surprisingly effective and cost-efficient method for creating basic floor plans. Excel's grid-based structure, combined with its familiar interface and calculation capabilities, makes it a viable option for initial conceptualization, space planning, and generating basic schematics. This article provides a comprehensive guide on designing a floor plan using an Excel spreadsheet.
The primary advantage of using Excel lies in its accessibility. Most computer users are already familiar with the program, eliminating the learning curve associated with specialized design software. Furthermore, Excel’s numerical precision allows users to define dimensions accurately and ensures that the layout adheres to specific measurement requirements. While not suitable for generating highly detailed architectural drawings, Excel is ideal for visualizing spatial relationships, calculating area, and experimenting with different layout options.
Before beginning, it is important to understand the limitations of using Excel for floor plan design. Excel is not a CAD (Computer-Aided Design) program and lacks functionalities such as parametric modeling, automatic dimensioning, and rendering capabilities. Therefore, this method is best suited for creating schematic designs, initial space planning, or for users who require a basic representation of a floor plan without the complexity of professional architectural software. Accuracy is dependent on careful manual input and attention to detail.
Preparing the Excel Spreadsheet
The first step involves preparing the Excel spreadsheet to function as a drawing grid. By adjusting row height and column width, a visually square grid can be created, effectively simulating graph paper. This grid will serve as the foundation for the floor plan representation.
Begin by opening a new Excel workbook. To adjust the column width, select all columns by clicking the triangle in the upper-left corner of the worksheet. Right-click on any column header (e.g., A, B, C) and select "Column Width." Enter a value that will produce a near-square cell. A value of approximately 2.14 (or 20 pixels) is often suitable, but the ideal value may vary depending on screen resolution and Excel version. Observe the appearance of the cells; they should appear as close to square as possible.
Next, adjust the row height. Select all rows by clicking the same triangle in the upper-left corner. Right-click on any row number (e.g., 1, 2, 3) and select "Row Height." Enter a value roughly equivalent to the column width setting. A value of 15 is often suitable. It is crucial to experiment with these values until a visually square grid is achieved. The aim is to create a consistent and uniform grid that facilitates accurate representation of the floor plan.
Once the grid is established, consider setting up a scale for the drawing. This is essential for translating the grid units into real-world measurements. For instance, one grid unit could represent one foot or one meter. Choose a scale that is appropriate for the size of the floor plan. A larger scale might be necessary for expansive plans to maintain clarity.
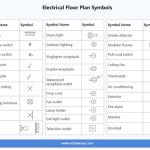
To manage the scale, dedicate specific cells within the spreadsheet to define the chosen scale. Label these cells clearly (e.g., "Scale: 1 unit = 1 foot"). This ensures that the floor plan remains dimensionally accurate and allows for easy adjustments to the scale if needed. Users can also add a legend to the spreadsheet, indicating the symbols and colors used in the plan.
Optionally, activate the gridlines to improve visibility. Go to the "View" tab on the Excel ribbon and ensure that the "Gridlines" checkbox is selected. Additionally, consider using the "Zoom" function to adjust the view for optimal clarity and ease of drawing. A zoom level of 100% often provides a good balance between detail and overall perspective.
Drawing the Floor Plan Elements
With the grid established, the process of drawing the floor plan elements can begin. This involves using Excel's cell formatting tools to represent walls, doors, windows, and other architectural features. The key is to utilize cell borders, shading, and text to create a visually informative representation.
Walls can be represented by applying thick borders to the appropriate cells. Select a range of cells that correspond to the length and width of a wall. Right-click on the selection and choose "Format Cells." Go to the "Border" tab and select a thick line style and a suitable color (e.g., black or gray). Apply the border to the top, bottom, left, and right sides of the selected cells to create a solid wall outline.
Doors can be represented by creating a gap in the wall outline. Select the cells that will represent the doorway. Remove the border from one side of these cells (usually the side facing the interior of the room). To indicate the door swing, a curved line can be drawn using Excel's drawing tools. However, for simplicity, a simple arc can be mimicked by carefully shading adjacent cells with a lighter color.
Windows can be represented similarly to doors, but with a different visual cue. Create a gap in the wall outline and fill the cells representing the window with a light color (e.g., light blue or light gray). Add thin vertical lines within the window space to represent the window panes. This visually distinguishes windows from doorways.
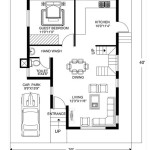
Furniture and fixtures can be represented using cell shading and text labels. For example, a rectangular area can be shaded to represent a bed, with the word "Bed" written within the cells. Similarly, counters, tables, and other objects can be represented using shaded areas and descriptive labels.
For complex shapes, consider using Excel's "Shapes" feature (Insert > Shapes). While this feature is not ideal for precise drawing, it can be used to create basic shapes that can be overlaid on the grid. For example, a circle can represent a round table, or a rectangle can represent a sofa. Adjust the size and position of the shapes to fit within the grid units.
During the drawing process, it is crucial to maintain dimensional accuracy. Refer back to the defined scale and carefully count the grid units to ensure that the elements are drawn to the correct proportions. Use Excel's calculation capabilities to verify dimensions and area. For example, use the `COUNT` function to count the number of cells representing a wall length and multiply that by the scale factor to determine the actual wall length.
Use different colors to differentiate between different elements in the floor plan. For example, walls can be black, doors can be brown, windows can be blue, and furniture can be various shades of gray. A clear color coding scheme enhances the readability of the floor plan.
Maintaining Accuracy and Adding Details
Accuracy is paramount when designing a floor plan, even in Excel. Continuous verification and refinement are essential to ensure that the design is both functional and representative of the intended space. Furthermore, adding dimensions and annotations can significantly enhance the clarity and usability of the Excel-based floor plan.
Regularly verify the dimensions of the floor plan elements. Use Excel's formula capabilities to calculate areas and distances. For example, use the formula `=COUNT(A1:A10)*[Scale]` to calculate the length of a wall represented by cells A1 to A10, where `[Scale]` is the cell containing the scale factor (e.g., 1 foot per unit). Check these calculations against the intended dimensions to identify and correct any errors.
Add dimensions to the floor plan to clearly indicate the size of rooms, walls, and other features. Use Excel's drawing tools (Insert > Shapes) to draw lines representing dimensions. Add text boxes next to the dimension lines to display the actual measurements. Ensure that the dimension lines are clearly labeled and easy to read. Consider using different font sizes and colors to differentiate dimensions from other text labels.
Include annotations to provide additional information about the floor plan. Annotations can be used to label rooms, specify materials, or provide instructions. Use text boxes to add annotations to the floor plan. Position the text boxes strategically to avoid cluttering the design. Use clear and concise language in the annotations.
Consider adding layers to the Excel floor plan. This can be achieved by using multiple worksheets within the Excel workbook. For example, one worksheet can contain the basic floor plan, while another worksheet can contain the furniture layout, and a third worksheet can contain the electrical plan. This allows users to toggle between different layers of information, making the floor plan more manageable and easier to understand. The "Hide" and "Unhide" sheet options can also be utilized to selectively display certain features.
Use conditional formatting to highlight specific areas or features of the floor plan. For example, use conditional formatting to highlight areas that are below a certain size or to highlight areas that do not meet specific requirements. This can help to identify potential problems or areas that need further attention.
Before finalizing the floor plan, perform a thorough review to ensure that all elements are accurately represented and that all dimensions are correctly calculated. Share the floor plan with others for feedback and suggestions. This collaborative approach can help to identify errors or omissions that might have been overlooked.

How To Draw And Create A Floor Plan In Excel Like Cad Part 2 Live Examples With Addin Link

How To Create House Plans Elevations In Microsoft Excel Using Verbal Scale

How To Draw And Create A Floor Plan In Excel Like Cad Part 2 Live Examples With Addin Link

How To Draw And Create A Floor Plan In Excel Like Cad Part 2 Live Examples With Addin Link

Using Excel Worksheet As Gridpaper For Drawing Techtv Articles Mrexcel Publishing

Promo Desk Booking With Interactive Floor Plan Excel Template Seats Highlighting

Floor Plan Templates Free

1 Complete Manual Building Design Using Excel Sheets Basic Introduction And Load Calculation

Emergency Room Layout Free Template

Kitchen Remodel Excel Spreadsheet Excelguider Com