How to Draw a Floor Plan in AutoCAD 2007
AutoCAD 2007 is a computer-aided design (CAD) software program that allows users to create precise and detailed drawings. Floor plans are an essential part of any construction project, and they can be easily created in AutoCAD 2007. Here is a step-by-step guide on how to draw a floor plan in AutoCAD 2007:
1. Create a new drawing
To create a new drawing, click on the "File" menu and then select "New". A new drawing will be created with the default settings. You can change the settings, such as the units of measurement and the drawing scale, by clicking on the "Drawing Setup" button in the "Tools" menu.
2. Draw the walls
The first step to drawing a floor plan is to draw the walls. To draw a wall, click on the "Line" tool in the "Draw" toolbar. Then, click on the starting point of the wall and drag the cursor to the end point. Release the cursor to create the wall.
3. Add doors and windows
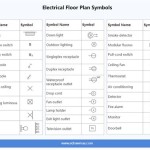
Once you have drawn the walls, you can add doors and windows. To add a door, click on the "Door" tool in the "Insert" toolbar. Then, click on the location where you want to insert the door. A door will be inserted at that location.
4. Add furniture and fixtures
The next step is to add furniture and fixtures to the floor plan. To add furniture, click on the "Insert" menu and then select "Block". A dialog box will appear. In the dialog box, browse to the location of the furniture block that you want to insert. Select the block and click on the "OK" button. The block will be inserted into the drawing.
5. Add dimensions
Dimensions are an important part of any floor plan. They show the size and location of the different elements in the drawing. To add a dimension, click on the "Dimension" tool in the "Annotate" toolbar. Then, click on the first point of the dimension and drag the cursor to the second point. Release the cursor to create the dimension.
6. Save the drawing
Once you have finished drawing the floor plan, you can save it by clicking on the "File" menu and then selecting "Save". A dialog box will appear. In the dialog box, enter a file name for the drawing and click on the "Save" button. The drawing will be saved in the specified location.
7. Print the drawing
To print the drawing, click on the "File" menu and then select "Print". A dialog box will appear. In the dialog box, select the printer that you want to use and click on the "OK" button. The drawing will be printed.

Autocad 2007 Floor Plan Tutorial

Autocad 2007 Tutorial Complete House Plan In 2d

Solved Draw This With Autocad 2007 And Explain Properly The Chegg Com

How To Draw 2d House Map In Autocad 2007 Part 1 Computer Aided Design Practical Week 6

Autocad 2007 Tutorial Complete House Plan In 2d

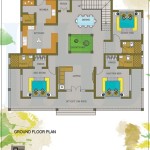
Part 1 Ground Floor Plan Grid In Autocad By Abel M

Auto Cad 2007 How To Draw Simple Plan In

Autocad 2007 Floor Plan Tutorial

How To Draw A Door In Autocad Floor Plan Backstudio Milan

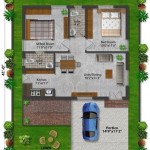
Ground 2 Home Design Complete Autocad Files For Free Editable