How to Draw a Floor Plan of an Existing House
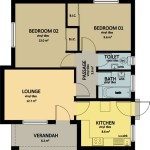
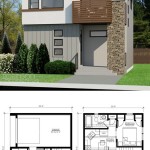
A floor plan is a scaled diagram that depicts the layout of a building, including the placement of walls, doors, windows, and other features. Drawing a floor plan of an existing house can be a helpful tool for various purposes, such as home improvement projects, furniture arrangement, or simply for better understanding the spatial relationships within the house. This article will guide you through the process of creating a floor plan of an existing house, highlighting the key steps and considerations involved.
1. Gather Necessary Tools and Materials
Before you begin drawing your floor plan, it is essential to gather the necessary tools and materials. These include:
- Measuring Tape: A long and accurate measuring tape is crucial for obtaining precise measurements of the house.
- Pencils: Use pencils for sketching the plan and making adjustments.
- Eraser: An eraser is necessary for correcting mistakes and refining the drawing.
- Ruler: A ruler is essential for drawing straight lines and ensuring accurate scaling.
- Graph Paper: Using graph paper can be helpful for maintaining consistent scaling and drawing straight lines.
- Notepad and Pen: Use a notepad and pen to take detailed measurements and notes about the house's features and layout.
- Camera: Taking photographs of the house can be beneficial for capturing details and referencing them later.
- Floor Plan Software (Optional): While not essential, floor plan software can simplify the process and provide more professional-looking results. Popular options include Floorplanner, RoomSketcher, and Sweet Home 3D.
2. Measure the House
The next step is to carefully measure the house. Start by identifying the key features and rooms, then measure the following:
- Overall Dimensions: Measure the length and width of each room, including any alcoves or recesses.
- Door and Window Openings: Measure the height and width of all doors and windows.
- Wall Thicknesses: Determine the thickness of interior and exterior walls. This information is essential for accurately scaling the plan.
- Fixed Features: Measure and note the dimensions of any fixed features, such as built-in cabinets, fireplaces, or staircases.
When taking measurements, be as precise as possible. Record all measurements clearly on your notepad, including the unit of measurement (e.g., feet or inches). Keep track of which room or feature each measurement corresponds to for easier referencing later.
3. Create a Basic Floor Plan
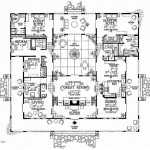
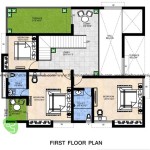
Once you have gathered all the measurements, it's time to create a basic floor plan on graph paper or using floor plan software. Begin by drawing the outline of the house, using your overall dimensions as a guide. Mark the locations of doors and windows, ensuring that they are accurately positioned and scaled. Note any changes in wall thickness or other structural elements. You can choose a scale for your plan, such as 1:10 or 1:20, depending on the size of the house and your desired level of detail.
As you add features to your floor plan, make sure to use appropriate symbols for different elements. For example, you can use rectangles for rooms, squares for windows, and arched shapes for doors. You can find a wide range of symbols and templates online or in architectural design guides.
4. Add Details and Annotations
Once the basic plan is complete, you can start adding more detail and annotations. Include features such as:
- Furniture: If desired, you can sketch in the placement of furniture within each room, using symbols or simple outlines.
- Electrical Outlets and Switches: Mark the locations of electrical outlets, switches, and other fixtures.
- Plumbing Fixtures: Indicate the positions of sinks, bathtubs, toilets, and other plumbing fixtures.
- Heating and Cooling Systems: Mark the location of heating vents, air conditioning units, and other HVAC components.
- Other Features: Include any other relevant features, such as built-in shelves, closets, or fireplaces.
Add annotations to your floor plan as well. This could include room names, dimensions, and notes about materials or specific features. Use a clear and concise style for your annotations to make the plan easy to understand.
5. Review and Refine
After completing the drawing, carefully review your floor plan to ensure accuracy and consistency. Check that all measurements are correct, and that the layout accurately reflects the actual house. Make any necessary adjustments or corrections at this stage.
You can use your completed floor plan for various purposes. For home improvement projects, it can help you visualize changes and determine material needs. For furniture arrangement, it allows you to experiment with different layouts before moving anything, making the process smoother and more efficient. And for simply understanding the layout of your house, a floor plan provides a clear and concise visual representation that can be easily shared with others.

Floor Plans Learn How To Design And Plan

House Plans How To Design Your Home Plan

How To Draw A Floor Plan Live Home 3d

House Plans How To Design Your Home Plan

Draw Floor Plans In Half The Time Cedreo

House Plans How To Design Your Home Plan

Floor Plan Design Tutorial

How To Draw A Floor Plan Live Home 3d

9 Ways To Find Floor Plans Of An Existing House Blueprints Archid

House Plans How To Design Your Home Plan