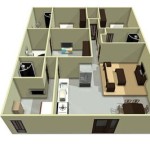
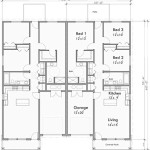
How to Draw a Floor Plan Using AutoCAD 2007
### Introduction AutoCAD 2007 is a powerful computer-aided design (CAD) software program used by architects, engineers, and other professionals to create 2D and 3D drawings. In this article, we will show you how to use AutoCAD 2007 to draw a floor plan. ### Step 1: Open AutoCAD 2007 To open AutoCAD 2007, click on the "Start" button, then click on "All Programs," then click on "Autodesk," and then click on "AutoCAD 2007." ### Step 2: Create a New Drawing To create a new drawing, click on the "File" menu, then click on "New." In the "New Drawing" dialog box, select the "Architectural" template, and then click on the "OK" button. ### Step 3: Set Up the Drawing Before you start drawing, you need to set up the drawing area. To do this, click on the "View" menu, then click on "Zoom," and then click on "All." This will zoom out so that you can see the entire drawing area. ### Step 4: Draw the Walls To draw the walls, click on the "Line" tool on the "Draw" toolbar. Then, click on the starting point of the wall, and then drag the mouse to the endpoint of the wall. Repeat this process until you have drawn all of the walls. ### Step 5: Add Doors and Windows To add doors and windows, click on the "Insert" menu, then click on "Block." In the "Insert Block" dialog box, select the door or window block that you want to insert, and then click on the "OK" button. Then, click on the location where you want to insert the door or window. ### Step 6: Add Furniture To add furniture, click on the "Insert" menu, then click on "Block." In the "Insert Block" dialog box, select the furniture block that you want to insert, and then click on the "OK" button. Then, click on the location where you want to insert the furniture. ### Step 7: Add Dimensions To add dimensions, click on the "Dimension" tool on the "Annotate" toolbar. Then, click on the first point of the dimension, and then drag the mouse to the second point of the dimension. Repeat this process until you have added all of the dimensions. ### Step 8: Save the Drawing To save the drawing, click on the "File" menu, then click on "Save." In the "Save As" dialog box, type a name for the drawing, and then click on the "Save" button. ### Conclusion In this article, we showed you how to use AutoCAD 2007 to draw a floor plan. By following the steps in this article, you can create accurate and professional-looking floor plans.
Autocad 2007 Floor Plan Tutorial

Solved Draw This With Autocad 2007 And Explain Properly The Chegg Com

How To Draw 2d House Map In Autocad 2007 Part 1 Computer Aided Design Practical Week 6

Autocad 2007 Tutorial Floor Plan

Part 1 Ground Floor Plan Grid In Autocad By Abel M

Auto Cad 2007 How To Draw Simple Plan In

How To Draw A Door In Autocad Floor Plan Backstudio Milan

Learn Autocad 2007 Steemit

Autocad Floor Plans By Draftingservices Com

Solved Someone Please Give Me The Dwg File Of This Drawing Chegg Com