Drawing a Floorplan in AutoCAD 2017
AutoCAD 2017 offers robust tools for efficiently creating detailed floorplans. Follow these steps to draw a floorplan with precision and ease:1. Start a New Drawing:
Open AutoCAD 2017 and start a new drawing using the "New" command or by pressing Ctrl+N. Set the drawing units and template according to your project specifications.2. Set Up Grid and Snaps:
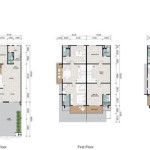
Enable the grid and snap functions to ensure precision while drawing. Adjust the grid spacing and snap settings to suit your desired accuracy.3. Define the Room Layout:
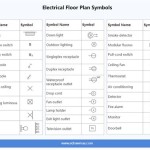
Use the "Line" command (L) to draw the walls of the rooms. Connect the lines to form the floorplan outlines. Use the "Arc" command for curved walls or windows.4. Create Doors and Windows:
Insert doors and windows using the "Door" and "Window" commands. Specify the appropriate sizes and locations within the walls.5. Add Interior Details:
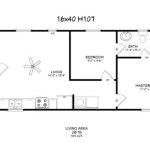
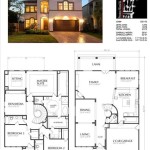
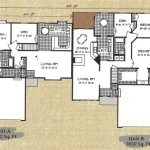
Use the "PolyLine" command (PL) to draw interior elements such as partitions, furniture, and fixtures. Assign different line types and colors for clarity.6. Label the Floorplan:
Annotate the floorplan with room names, dimensions, and other relevant information. Use the "Text" command (TX) to add labels and the "Dimension" command (DIM) to insert dimensions.7. Add Layers:
Organize your drawing using layers. Create separate layers for different elements, such as walls, furniture, and annotations. This makes editing and managing the floorplan easier.8. Adjust Layer Visibility:
Use the Layer Properties Manager to control the visibility of layers. This allows you to focus on specific elements of the floorplan while hiding others.9. Add Materials and Textures:
Enhance the realism of your floorplan by assigning materials and textures to different surfaces. Use the "Material Browser" to apply a wide range of textures, such as wood, carpet, and tile.10. Export the Floorplan:
Once complete, export the floorplan in the desired format. AutoCAD 2017 supports various file formats, including DWG, DXF, and PDF.Tips:
* Use the "Trim" command (TR) to adjust walls and elements as needed. * Enable the "Ortho" mode (F8) for accurate vertical and horizontal drawing. * Utilize keyboard shortcuts to streamline your workflow. * Refer to the AutoCAD Help menu or online resources for additional guidance.
Autocad 2024 Tutorial Making A Simple Floor Plan In 2d Drawing

Basic Floor Plan Drafting In Autocad 7 Steps Instructables

How To Draw Floor Plans In Autocad Edrawmax

Making A Simple Floor Plan In Autocad Part 1 Of 3

How To Draw Autocad Floor Plan Cad Cam Blog

Autocad 2024 Basic 2d Floor Plan For Beginner Complete

Autocad 2024 Basic 2d Floor Plan For Beginner Complete

Autocad 2024 Help File Tab Menu Autodesk

How To Make House Floor Plan In Autocad Fantasticeng

Autocad Lt 2024 Help Plot A Drawing Layout Autodesk