How To Draw A House Floor Plan By Hand
Creating a house floor plan by hand allows for a tangible and immediate design process. This method offers flexibility and requires minimal resources, making it ideal for initial brainstorming and conceptualization. This guide outlines the steps necessary to draft a clear and informative floor plan using traditional drawing tools.
Gathering the Necessary Materials: The first step involves assembling the essential tools. These include drawing paper, preferably graph paper for accurate scaling, pencils for sketching and adjustments, a ruler or architect's scale for precise measurements, an eraser for corrections, and a protractor for incorporating angled walls or features.
Establishing the Scale: Determining the scale is crucial for representing the house's dimensions accurately on paper. Common architectural scales include 1/4 inch equals 1 foot, or 1/8 inch equals 1 foot. Choosing the appropriate scale depends on the size of the house and the paper size. Clearly indicate the chosen scale on the drawing for reference.
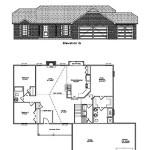
Drawing the Exterior Walls: Begin by drawing the exterior walls, representing the overall footprint of the house. Utilize the ruler or architect's scale to ensure straight lines and accurate lengths based on the chosen scale. Mark the corners precisely for clean and professional results.
Adding Interior Walls: Once the exterior walls are established, add the interior walls to define individual rooms and spaces. Again, maintain accuracy using the ruler and scale. Consider the flow and functionality of the layout during this process.
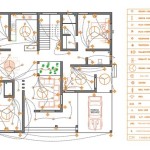
Incorporating Doors and Windows: Represent doors and windows with standard symbols. A thin rectangle extending from a wall typically represents a door, with an arc indicating the swing direction. Windows are commonly depicted as smaller rectangles within the wall lines. Ensure proper placement and sizing relative to the walls.
Representing Fixtures and Appliances: Include standard symbols for fixtures such as toilets, sinks, and bathtubs within the respective rooms. Similarly, represent kitchen appliances like stoves, refrigerators, and dishwashers using appropriate symbols. These symbols contribute to the plan's informativeness and aid visualization.
Adding Stairways: If the house includes stairways, depict them using a series of parallel lines representing the steps, connected by arrowed lines indicating the direction of ascent or descent. Label the stairway for clarity and include any relevant dimensions.
Labeling Rooms and Dimensions: Clearly label each room with its intended function (e.g., bedroom, kitchen, living room). Include accurate dimensions for each room, as well as the overall dimensions of the house. This information is essential for understanding the scale and layout.
Indicating Built-in Features: Include representations of built-in features such as fireplaces, cabinets, and closets. Use standardized symbols or clear, simplified drawings to represent these elements. This adds detail and enhances the plan's usefulness.
Adding North Arrow and Title Block: Orient the plan by including a north arrow to indicate the direction the house faces. Create a title block containing essential project information, such as the project name, date, draftsperson's name, and the scale used. This provides context and professional presentation.
Refining and Revising: Review the completed plan for accuracy and clarity. Make any necessary revisions or adjustments using the eraser and pencil. Ensure all lines are clean and straight, and all symbols are clearly identifiable. Neatness contributes to the overall professionalism of the drawing.
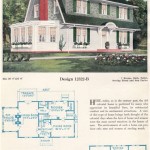
Creating Multiple Views: Consider creating additional views, such as elevation drawings, to provide a more comprehensive representation of the house design. Elevation drawings show the vertical surfaces of the house from different perspectives, offering further detail on the exterior appearance.
Understanding Building Codes and Regulations: While hand-drawing provides a flexible design platform, remember to consult local building codes and regulations throughout the design process. Ensure the planned design meets all necessary requirements before proceeding with construction.
Considering Site Context: When planning the floor plan, consider the surrounding site context, including property lines, setbacks, and any existing landscape features. Integrating the house design with the site context contributes to a more harmonious and functional outcome.
Using Templates and Tracing Paper: Employing templates for standard elements like doors, windows, and fixtures can expedite the drawing process and ensure consistent representation. Tracing paper can be helpful for iterating on designs and making revisions without redrawing the entire plan.
Practicing and Experimenting: Developing proficiency in hand-drawing floor plans requires practice. Experiment with different layouts and design elements to refine techniques and develop a comfortable workflow. Consistent practice will enhance accuracy and efficiency.

How To Draw A Floor Plan The Simple 7 Step Guide For 2024

How To Draw A Floor Plan By Hand Step Guide

How To Draw A Floor Plan The Simple 7 Step Guide For 2024

Floor Plan Design Tutorial

5 Tips On How To Draw A Blueprint By Hand

Floor Plan Design Tutorial

Interactive Floor Plans Are Easy To Setup Even If You Don T Have Plan Graphics Tourvista

Make Your Own Blueprint How To Draw Floor Plans

Floor Plan Design Tutorial

Floor Plan Creator And Designer Free Easy App