How to Draw House Floor Plans
Drawing a house floor plan is a crucial step in the design and construction process. A well-drawn floor plan serves as a roadmap, guiding builders, interior designers, and homeowners in visualizing the layout and spatial relationships within a house. This article outlines the steps involved in creating a clear and accurate floor plan.
Gathering Information and Defining Needs
The initial phase involves gathering crucial information and defining the needs of the project. This includes determining the desired square footage, number of rooms, and their intended functions. Considering lifestyle, family size, and future needs are crucial factors during this stage. Budgetary constraints and site limitations also play a significant role in shaping the initial plan.
Choosing the Right Tools
Several tools can be utilized for drawing floor plans. Traditional methods involve using drafting tools such as pencils, scales, and architectural rulers on graph paper. However, digital tools have become increasingly popular. Computer-aided design (CAD) software offers a wide range of features, including precise measurements, automated dimensioning, and 3D visualization capabilities. Choosing the appropriate tool depends on individual preferences and project requirements.
Starting with the Exterior Walls
The first step in drawing the floor plan is outlining the exterior walls of the house. This establishes the overall shape and dimensions of the structure. Accurate measurements are essential to ensure the plan reflects the intended design. Using a chosen scale (e.g., 1/4 inch = 1 foot) translate real-world dimensions onto the drawing surface.
Adding Interior Walls and Defining Rooms
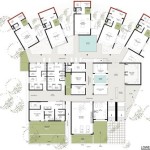
Once the exterior walls are established, interior walls can be added to define individual rooms. Consider the flow of traffic and functionality when placing interior walls. Ensure adequate space for hallways, doorways, and circulation within each room. Label each room according to its intended function (e.g., bedroom, kitchen, living room).
Incorporating Doors and Windows
Doors and windows are essential elements of a floor plan. Indicate the location and swing direction of each door. Similarly, accurately represent the placement and size of windows. Standard symbols are often used to represent doors and windows on floor plans, promoting clarity and consistency.
Adding Fixtures and Appliances
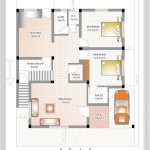
Within each room, incorporate the location of fixtures and appliances. In the kitchen, include the placement of sinks, refrigerators, ovens, and dishwashers. In bathrooms, indicate the placement of toilets, sinks, showers, and bathtubs. Using standard symbols for these fixtures helps maintain a professional and easily understood plan.
Indicating Stairways and Other Vertical Elements
If the house has multiple levels, accurately represent stairways, elevators, or other vertical elements. Indicate the direction and number of steps in stairways. Clearly mark the location of elevator shafts. This information is crucial for understanding the vertical circulation within the house.
Adding Dimensions and Labels
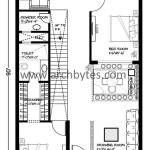
Clear and accurate dimensions are crucial for a functional floor plan. Include dimensions for each room, wall length, and overall house dimensions. Label all rooms and spaces appropriately. This ensures that builders and contractors have the necessary information for accurate construction.
Including Furniture and Other Elements (Optional)
While not always essential, adding furniture and other elements can enhance the visualization of the space. Representing furniture placement can help assess traffic flow and space utilization. However, it's important to keep furniture representations simple and avoid cluttering the floor plan.
Reviewing and Refining the Floor Plan
Thoroughly review the floor plan for accuracy and completeness. Ensure all dimensions are correct and all elements are properly labeled. Consider traffic flow, functionality, and overall design. Refine the plan as needed to address any issues or improve the design.
Creating Multiple Views (Optional)
For complex projects, consider creating multiple views of the floor plan. A reflected ceiling plan can show the placement of lighting fixtures, ceiling fans, and other ceiling-mounted elements. Elevation drawings can depict the vertical surfaces of the house, including wall heights, window placements, and exterior finishes.
Utilizing Templates and Resources
Numerous online resources and templates are available for creating floor plans. These resources can provide pre-drawn elements, symbols, and sample layouts. Utilizing templates can save time and effort, especially for those new to drawing floor plans.
Seeking Professional Assistance
For complex or large-scale projects, consulting with an architect or draftsperson is highly recommended. These professionals possess the expertise and knowledge to create accurate and detailed floor plans that meet building codes and regulations. They can also provide valuable design input and optimize the functionality of the space.

Floor Plan Creator And Designer Free Easy App

How To Draw A Floor Plan The Simple 7 Step Guide For 2024

How To Draw A Floor Plan Live Home 3d

Easy Home Building Floor Plan Cad Pro

Make Your Own Blueprint How To Draw Floor Plans

Floor Plan Creator And Designer Free Easy App

Draw Floor Plans In Half The Time Cedreo

Make Your Own Blueprint How To Draw Floor Plans Drawing House Sketch Plan Blueprints

How To Draw A Floor Plan Live Home 3d

Floor Plan Wikipedia