How to Draw Your Own Floor Plan
Creating a floor plan can be a valuable tool for various purposes, including home renovation, furniture arrangement, and even showcasing property listings. While there are numerous online tools and software options available, drawing your own floor plan can be a rewarding and cost-effective approach. This article will guide you through the steps of drawing your own floor plan effectively, utilizing accessible tools and methods.
Step 1: Gather Necessary Tools and Materials
Before embarking on the drawing process, ensure you have the following tools readily available:
- Measuring Tape: A crucial tool for accurately measuring the dimensions of your space.
- Pencils: Opt for pencils with varying degrees of hardness (e.g., HB, 2B) to create lines of different thicknesses.
- Eraser: Used for correcting mistakes and refining the drawing.
- Ruler: Essential for drawing straight lines and ensuring precise measurements.
- Graph Paper: Provides a grid system that aids in maintaining scale and proportions in your floor plan.
- Protractor: Helpful for measuring and representing angles accurately, particularly when dealing with irregular shapes.
- Drafting Tools: These include templates for standard shapes (e.g., circles, squares, rectangles), compasses for drawing arcs and circles, and T-squares for drawing perpendicular lines. While not strictly necessary, these tools can enhance the accuracy and precision of your drawing.
Additionally, consider using digital tools if you prefer a more convenient approach. Free drawing software like Google Drawings or Microsoft Paint can be helpful for creating basic floor plans.
Step 2: Measure Your Space Accurately
Precise measurements are fundamental to the success of your floor plan. Start by carefully measuring the length and width of each room or area you intend to include in the drawing. Remember to measure along the walls and include any protrusions or built-in features, such as columns, fireplaces, or closets.
When measuring doorways, note both the width and the swing direction of each door. Take note of the location of windows, their dimensions, and any other significant features that define the space, such as electrical outlets or plumbing fixtures.
Step 3: Choose a Suitable Scale
The scale of your floor plan determines the ratio between the actual dimensions of your space and its representation on paper. Selecting an appropriate scale is crucial for creating a clear and readable drawing.
Common scales used for floor plans include:
- 1:10: This means that 1 unit on the drawing represents 10 units in real life. For example, 1 inch on the paper represents 10 inches in the actual space.
- 1:20: This scale represents a more reduced view of the space, with 1 unit on the drawing representing 20 units in real life.
- 1:50: A further reduced scale suitable for larger spaces, where 1 unit on the drawing represents 50 units in real life.
The chosen scale should be appropriate for the size of your space and the level of detail you require. For smaller rooms, a larger scale (e.g., 1:10) might be suitable, while larger spaces might require a more reduced scale (e.g., 1:50).
Step 4: Begin Drawing the Outline
With your measurements and chosen scale in hand, start drawing the outline of your space on your graph paper. Use a pencil to create light lines that you can adjust later if necessary. Begin by outlining the outer walls of each room, ensuring that the dimensions and angles are accurate.
As you draw each room, consider including any built-in features or architectural elements, such as:
- Windows: Represent these as rectangles with appropriate dimensions.
- Doors: Draw these as rectangles with the width and swing direction accurately portrayed.
- Closets: Outline these as rectangular shapes and label them clearly.
- Fireplaces: Depict these as rectangular or curved shapes depending on their design.
- Columns: Represent these as circles or rectangles, depending on their shape.
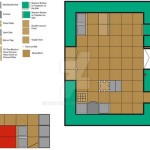
Step 5: Add Furniture and Details
Once you have completed the outline, begin adding furniture and other details to your floor plan. Use standard symbols or simple representations to represent the different furniture items. You can find online resources or templates that provide standard symbols for common furniture pieces.
Remember to scale the furniture dimensions according to the chosen scale of your floor plan. It can be helpful to create a table of furniture symbols and their corresponding dimensions to ensure consistency throughout your drawing.
In addition to furniture, consider including any other details that might be relevant, such as:
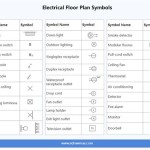
- Lighting fixtures: Use circles or simple shapes to represent light sources.
- Electrical outlets: Mark these with small square or circular symbols.
- Plumbing fixtures: Depict these as appropriate symbols for sinks, toilets, and showers.
Step 6: Enhance the Appearance
To enhance the visual appeal and clarity of your floor plan, consider the following tips:
- Use Different Line Weights: Vary the thickness of lines to differentiate between walls, furniture, and other elements. For example, use thicker lines for exterior walls and thinner lines for furniture.
- Add Colors and Shading: Utilize different colors or shading patterns to represent different areas or materials. For instance, use gray for walls, brown for wood floors, and blue for carpets.
- Use Labels and Legends: Label rooms and furniture items clearly, and include a legend to define symbols used in your floor plan.
- Add Dimension Lines: Indicate the dimensions of key elements, such as rooms, doors, and windows, using lines and text.
By following these steps and incorporating these enhancements, you can create a comprehensive and visually appealing floor plan that accurately represents your space.

Make Your Own Floor Plans

Floor Plans Learn How To Design And Plan

Floor Plans Learn How To Design And Plan

Draw From A Blueprint

Designing My Own House

Can I Draw My Own Plans Fluid Building Approvals

Design Your Own Home House Designing Homes

Floor Plans How To Design The Perfect Layout Cherished Bliss

Important Steps For Designing A 2d Floor Plan Home3ds

Draw Floor Plans