How To Make A Floor Plan In AutoCAD 2007
AutoCAD is a computer-aided design (CAD) software application for 2D and 3D design and drafting, developed and marketed by Autodesk. It is widely used by architects, engineers, and other professionals for creating precise and detailed drawings.
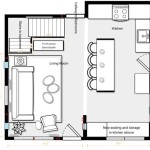
Creating a floor plan in AutoCAD 2007 is a relatively straightforward process, but it does require some basic knowledge of the software and its tools. Here is a step-by-step guide to help you get started:
1. Start a new drawing
Open AutoCAD 2007 and click on the "New" button to create a new drawing. Select the "Architectural" template from the list of templates and click "OK".
2. Set up the drawing units
The default drawing units in AutoCAD are inches. However, you can change the units to feet, meters, or any other unit of measurement that you prefer. To do this, click on the "Format" menu and select "Units". In the "Units" dialog box, select the desired unit of measurement from the "Drawing Units" drop-down menu.
3. Draw the walls
To draw the walls, click on the "Line" tool on the "Draw" toolbar. Then, click on the starting point of the wall and drag the cursor to the end point. Repeat this process to draw all of the walls in the floor plan.
4. Add doors and windows
To add doors and windows, click on the "Insert" menu and select "Block". In the "Block" dialog box, browse to the folder where the door and window blocks are stored. Select the desired block and click "OK".
5. Add furniture and other details
To add furniture and other details to the floor plan, click on the "Insert" menu and select "Block". In the "Block" dialog box, browse to the folder where the furniture blocks are stored. Select the desired block and click "OK".
6. Add dimensions
To add dimensions to the floor plan, click on the "Dimension" toolbar. Then, click on the starting point of the dimension line and drag the cursor to the end point. The dimension will be automatically calculated and displayed.
7. Save the drawing
When you are finished creating the floor plan, click on the "File" menu and select "Save". In the "Save" dialog box, enter a file name for the drawing and click "OK".
Additional Tips
Here are a few additional tips for creating floor plans in AutoCAD 2007:

Autocad 2007 Floor Plan Tutorial

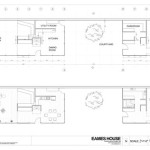
Part 1 Ground Floor Plan Grid In Autocad By Abel M

158503 288 3 Residential Design Using Autocad 2007

Autocad 2007 Tutorial Floor Plan

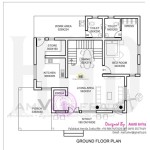
Autocad Tutorial 2007 House Plan Design 3 Bedroom

Autocad Floor Plans By Draftingservices Com

Dwg Drawing Simple Floor Plan Of Bungalow With Internal Section Design Autocad File Cadbull

How To Draw 2d House Map In Autocad 2007 Part 1 Computer Aided Design Practical Week 6

How To Draw A Door In Autocad Floor Plan Backstudio Milan

Autocad Is Instrumental In Developing Floor Plans With Architectural Drawings Tesla Cad