How to Create Professional Floor Plans in 3ds Max
Creating accurate and detailed floor plans is a crucial aspect of architectural design and can be easily achieved using 3ds Max, a powerful 3D modeling and animation software. This guide will walk you through the essential steps to create professional floor plans in 3ds Max, covering both the technical aspects and best practices.
Setting Up the Project
Begin by launching 3ds Max and creating a new project. Set the units to architectural (feet and inches) or metric (meters and centimeters), depending on the project requirements. Create a new layer called "Floor Plan" and name the scene appropriately.
Creating the Walls
To create walls, use the "Create" panel and select "Geometry" > "Extended Primitives" > "Box." Specify the length and width of the wall, and click "OK." Position the wall in the desired location and rotate it if necessary. Repeat this process for all the walls.
Inserting Doors and Windows
For doors and windows, use the "Create" panel and select "Geometry" > "Extended Primitives" > "Architectural" > "Door" or "Window." Choose the appropriate style and size, then position it within the wall. You can adjust the opening direction and other parameters as needed.
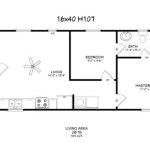
Drawing Room Boundaries
To define room boundaries, use the "Create" panel and select "Splines" > "Rectangle." Draw a rectangular spline around each room area. Extrude the splines to create 2D surfaces that represent the floor of each room.
Adding Furniture and Fixtures
For furniture and fixtures, use either built-in 3ds Max libraries or import models from external sources. Position the furniture accordingly, ensuring it adheres to the scale and proportions of the floor plan.
Applying Materials and Textures
Assign materials to the various surfaces to enhance realism. Select each object and navigate to the Material Editor (M). Choose a material from the library or create a new one. Adjust the texture, color, and other properties as desired.
Creating Lighting and Shadows
Proper lighting can make a floor plan look more realistic. Go to the "Create" panel and select "Lights" > "Target Spot." Position the light source at an appropriate location and adjust the intensity and color to create natural-looking shadows.
Adding Dimensions and Annotations
For clarity and precision, include dimensions and annotations in the floor plan. Use the "Dimension Tool" to add linear dimensions to walls and other elements. Additionally, add text labels to identify rooms and provide additional information.
Exporting the Floor Plan
Once the floor plan is complete, you can export it in various formats for further use. Go to "File" > "Export" and select the desired file type, such as AutoCAD DWG, PDF, or JPEG.
Conclusion
Creating floor plans in 3ds Max is a straightforward process that allows for detailed and accurate representations of architectural designs. By following the steps outlined in this guide, you can efficiently create professional floor plans for your projects.

Create 3d Floor Plan Rendering In 3ds Max Architecture Tutorial

3ds Max Tutorial 3d Cut Plan And Best Vray Setting

3d Cut Floor Plan In Max Vray Part 1

3ds Max Basic 3d Floor Plan Modeling Wall Door Windows Tutorial

3ds Max Basic 3d Floor Plan Modeling Wall Door Windows Tutorial

How To Make 3d Floor Plan 3ds Max Part I

Your Project Virtually With 3ds Max Architectural Floor Plan Rendering

Make 3d Floor Plan In 3ds Max

Design Floor Plan Drawing In Autocad 2d 3d And 3ds Max

Create 3d Floor Plan In 3ds Max