How to Make Floor Plans in AutoCAD
AutoCAD is a powerful computer-aided design (CAD) software used by architects, engineers, and other professionals to create precise and detailed technical drawings. Floor plans are an essential part of any architectural design, and AutoCAD is an excellent tool for creating them. This guide will provide you with a step-by-step overview of how to make floor plans in AutoCAD.
1. Set Up Your Drawing Environment
Before you start creating your floor plan, you need to set up your drawing environment. This includes setting the drawing units, the drawing scale, and the layer structure. The drawing units determine the units of measurement that will be used in your drawing, such as inches, feet, or meters. The drawing scale determines the scale at which your drawing will be printed. The layer structure allows you to organize your drawing into different layers, such as walls, windows, and doors.
2. Draw the Walls
The first step in creating a floor plan is to draw the walls. To do this, you can use the Line tool or the Wall tool. The Line tool allows you to draw individual lines, while the Wall tool automatically creates a series of parallel lines with a specified thickness. When drawing walls, be sure to pay attention to the thickness of the walls and the spacing between them.
3. Add Windows and Doors
Once you have drawn the walls, you can add windows and doors. To do this, you can use the Insert block tool. Blocks are pre-defined symbols that can be inserted into your drawing. AutoCAD comes with a library of standard blocks, including windows and doors. You can also create your own custom blocks.
4. Add Furniture and Fixtures
Once you have added windows and doors, you can start to add furniture and fixtures to your floor plan. To do this, you can use the Insert block tool or the Line tool. Blocks are a great way to add furniture and fixtures quickly and easily. You can also create your own custom blocks.
5. Add Dimensions and Annotations
Once you have added furniture and fixtures, you can add dimensions and annotations to your floor plan. Dimensions show the length and width of walls, windows, and doors. Annotations are used to add notes and labels to your drawing. To add dimensions, use the Dimension tool. To add annotations, use the Text tool.
6. Plot Your Floor Plan
Once you have completed your floor plan, you can plot it to paper. To do this, click on the File menu and select Plot. In the Plot dialog box, select the printer that you want to use and the paper size that you want to plot. You can also specify the plot scale and the orientation of the plot.
Conclusion
Creating floor plans in AutoCAD is a relatively simple process. By following the steps outlined in this guide, you can create accurate and detailed floor plans that meet your needs.

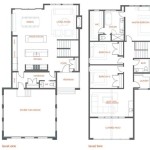
Making A Simple Floor Plan In Autocad Part 1 Of 3

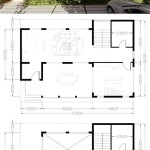
Basic Floor Plan Drafting In Autocad 7 Steps Instructables

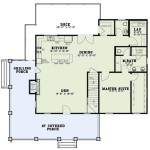
How To Draw Floor Plans In Autocad Edrawmax

How To Draw Autocad Floor Plan Cad Cam Blog

Is Autocad The Best Floor Plan For Estate Agents Elements Property

How To Draw Floor Plans In Autocad Edrawmax

Autocad Drawing And Coohom Design 3d Fast Rendering Blog

Autocad 2d Bathroom Floor Plans Graphic Design Courses

Autocad 2d Basics Tutorial To Draw A Simple Floor Plan Fast And Efective Part 1

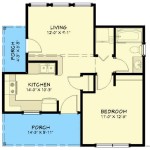
First Floor Plan Of Residence Detail Presented In This Autocad Drawing File 2d Auto Cad Ca Layout