How to Create a Home Plan in AutoCAD
AutoCAD, a powerful computer-aided design (CAD) software, is widely used in architecture for creating precise and detailed home plans. If you're an architect, interior designer, or homeowner planning a home renovation, mastering the art of creating home plans in AutoCAD is essential. Here's a comprehensive guide to help you get started:
1. Setting Up the Workspace
Launch AutoCAD and select the "Architectural" template to create a new drawing. Configure the drawing units, precision settings, and layers according to your project requirements. Using layers helps organize different elements of the plan, such as walls, doors, windows, and furniture, for better clarity and editing.
2. Drawing Exterior Walls
Begin by drawing the exterior walls of your home using the "Line" tool. Create a closed loop to form the perimeter of the building. Ensure that the wall thickness matches the specifications of your design. Use "Chamfer" or "Fillet" commands to add corners and curves as needed.
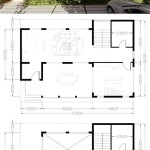
3. Creating Rooms and Spaces
Divide the interior space into individual rooms by drawing walls within the exterior walls. Label each room clearly for easier navigation. Use "Copy" and "Paste" commands to duplicate similar rooms to save time.
4. Inserting Doors and Windows
Add doors and windows to the plan using the "Block" or "Insert" commands. Select appropriate blocks from the AutoCAD library or create your custom blocks if necessary. Position the doors and windows accurately on the walls, considering their dimensions and placement.
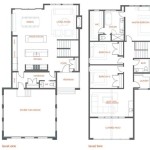
5. Drawing Architectural Features
Incorporate architectural features such as fireplaces, stairs, and built-in cabinetry by drawing them to scale. Use the "Polyline" and "Hatch" commands to create complex shapes and patterns. Add text annotations to specify materials, finishes, and dimensions.
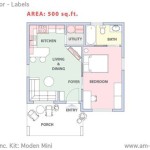
6. Adding Furniture and Appliances
Bring your home plan to life by adding furniture and appliances. Import 2D blocks or create your own symbols to represent each item. Position and arrange them within the rooms as per your design concept. Label the furniture with their names or descriptions for clarity.
7. Adding Annotations and Dimensions
Add annotations such as room labels, dimensions, notes, and legends to provide additional information. Use the "Text" and "Dimension" commands to create clear and concise annotations. Dimensioning the plan ensures it meets building codes and construction requirements.
8. Finalizing the Plan
Once all the elements are in place, review the plan thoroughly for accuracy and completeness. Check for any errors or inconsistencies in dimensions, annotations, or symbols. Make necessary adjustments and polish the presentation of the plan.
Conclusion
Creating a home plan in AutoCAD involves careful planning, precision, and attention to detail. By following these steps and utilizing the powerful features of AutoCAD, you can create professional and accurate home plans that will serve as the blueprint for your dream home.

Making A Simple Floor Plan In Autocad Part 1 Of 3

Basic Floor Plan Drafting In Autocad 7 Steps Instructables

How To Draw Floor Plans In Autocad Edrawmax

Autocad Simple Floor Plan For Beginners 1 Of 5

Autocad Drawing And Coohom Design 3d Fast Rendering Blog

Making A Simple Floor Plan In Autocad Part 1 Of 3

Autocad 2024 Making A Simple Floor Plan In Part 1 Of 3 2d Drawing 2025

How To Draw Floor Plans In Autocad Edrawmax

Making A Simple Floor Plan In Autocad 1bhk 2d

Autodesk Autocad Masterclass The Ultimate Guide To Ozgur Gorgun Skillshare