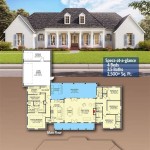
How To Make House Plans 3d

By Admin | October 25, 2023

How to Make House Plans 3D: A Step-by-Step Guide

Creating 3D house plans can be a daunting task, but with the right tools and a little bit of practice, anyone can learn how to do it. Whether you're a professional architect or a DIY enthusiast, this guide will walk you through the process of creating 3D house plans from start to finish.

Step 1: Gather Your Materials

- Computer with CAD software installed - CAD software (such as AutoCAD, SketchUp, or Revit) - Printer - Paper - Ruler - Pencil - Eraser

Step 2: Choose Your CAD Software

Several different CAD software programs are available, each with its strengths and weaknesses. For beginners, SketchUp is a good option because it's easy to learn and use. However, if you're looking for a more powerful program, AutoCAD or Revit might be a better choice.

Step 3: Create a New Project

Once you have chosen your CAD software, open it up and create a new project. You will need to specify the units of measurement (inches, feet, etc.) and the paper size.

Step 4: Draw the Floor Plan

The first step in creating your 3D house plans is to draw the floor plan. This is a 2D representation of the layout of your house. To draw the floor plan, you will use the CAD software's drawing tools to create lines and shapes.

Step 5: Add Walls and Doors

Once you have drawn the floor plan, you can start adding walls and doors. To do this, you will use the CAD software's wall and door tools. These tools will allow you to specify the width and height of the walls and doors and place them in the correct location.

Step 6: Add Windows

Next, you can add windows to your house. To do this, you will use the CAD software's window tool. This tool will allow you to specify the size and shape of the windows and place them in the correct location.

Step 7: Add a Roof

Once you have added the walls and windows, you can add a roof to your house. To do this, you will use the CAD software's roof tool. This tool will allow you to specify the type of roof (gable, hip, etc.) and the pitch of the roof.

Step 8: Add Details

Now that you have the basic structure of your house, you can start adding details. This includes things like furniture, appliances, and landscaping. To add details, you will use the CAD software's various drawing tools.

Step 9: Create a 3D Model

Once you have finished adding details to your house, you can create a 3D model. To do this, you will use the CAD software's 3D modeling tools. These tools will allow you to extrude the walls and roof, creating a 3D representation of your house.

Step 10: Save Your Project

Once you have created your 3D house plans, you must save your project. To do this, you will use the CAD software's save command. You can save your project as a file on your computer or save it to the cloud.

Step 11: Print Your Plans

If you want to print your house plans, you can do so using the CAD software's print command. You can print your plans to scale or print them at a reduced size.

Step 12: Share Your Plans

Once you have printed your house plans, you can share them with others. You can share your plans by email, by uploading them to a website, or by printing them out and mailing them.


3d Floor Plans

3d Floor Plans

How Do You Make A 3d Floor Plan

How Do You Make A 3d Floor Plan

How Much Do 3d House Plans Cost Faqs

How Much Do 3d House Plans Cost Faqs Answered Cedreo
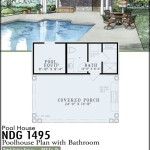
3d Floor Plans

3d Floor Plans

3d Floor Plans

3d Floor Plans

Design 3d Floor Plans

How Architectural Companies Design 3d Floor Plans For Residential Home Cad Crowd
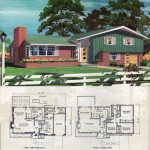
3d Floor Plans

3d Floor Plans

3d Floor Plans Renderings

3d Floor Plans Renderings Visualizations Fast Delivery

3d House Design

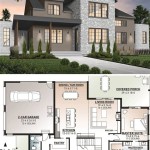
1000 3d Floor Plans And Home Design Ideas To Build Free Plan House Imagination Shaper

Sweet Home 3d Draw Floor Plans And

Sweet Home 3d Draw Floor Plans And Arrange Furniture Freely


Leave a Reply

Your email address will not be published. Required fields are marked *