How to Make a Floor Plan in AutoCAD: A Step-by-Step Guide for Beginners
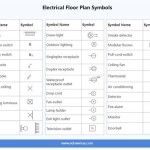
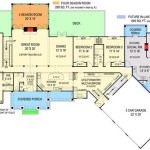
AutoCAD is a powerful software program used by architects, engineers, and construction professionals to create technical drawings. One of the most common tasks performed in AutoCAD is creating floor plans. A floor plan is a 2D drawing that shows the layout of a building, including the walls, doors, windows, and other features. In this article, we will provide a step-by-step guide on how to create a floor plan in AutoCAD. We will cover all the essential aspects of floor plan creation, from setting up the drawing to adding furniture and fixtures. ### Step 1: Create a New Drawing The first step is to create a new drawing in AutoCAD. To do this, click on the "File" menu and select "New". This will open a new drawing window. ### Step 2: Set Up the Drawing Units The next step is to set up the drawing units. The drawing units determine the size of the objects in the drawing. To set the drawing units, click on the "Format" menu and select "Units". In the Units dialog box, select the desired units from the drop-down list. ### Step 3: Draw the Walls The next step is to draw the walls of the building. To draw a wall, use the "Line" command. To start the Line command, type "L" in the command bar and press Enter. Then, click on the point where you want to start the wall and drag your cursor to the point where you want to end the wall. ### Step 4: Add Doors and Windows Once you have drawn the walls, you can add doors and windows. To add a door, use the "Insert" menu and select "Block". This will open the Block Editor. In the Block Editor, select the door block that you want to insert. Then, click on the point where you want to insert the door and press Enter. To add a window, use the same procedure as for adding a door. However, be sure to select a window block instead of a door block. ### Step 5: Add Furniture and Fixtures The next step is to add furniture and fixtures to the floor plan. To add furniture, use the "Insert" menu and select "Block". This will open the Block Editor. In the Block Editor, select the furniture block that you want to insert. Then, click on the point where you want to insert the furniture and press Enter. To add fixtures, such as sinks, toilets, and appliances, use the same procedure as for adding furniture. However, be sure to select a fixture block instead of a furniture block. ### Step 6: Dimension the Floor Plan Once you have added all of the furniture and fixtures, you need to dimension the floor plan. Dimensioning is the process of adding measurements to the drawing. To dimension the floor plan, use the "Dimension" command. To start the Dimension command, type "D" in the command bar and press Enter. Then, click on the two points that you want to dimension and press Enter. ### Step 7: Save the Floor Plan Once you have finished the floor plan, you need to save it. To save the floor plan, click on the "File" menu and select "Save". This will open the Save As dialog box. In the Save As dialog box, enter a name for the file and click on the "Save" button. ## Conclusion Creating a floor plan in AutoCAD is a relatively simple process. By following the steps outlined in this article, you can create a floor plan that is accurate and professional.
How To Draw Floor Plans In Autocad Edrawmax

Autocad Simple Floor Plan For Beginners 1 Of 5

How To Draw Floor Plans In Autocad Edrawmax

Making A Simple Floor Plan In Autocad Part 1 Of 3

Making A Simple Floor Plan In Autocad Fantasticeng

Simple Floor Plan Design Autocad File Free Cadbull

How To Make House Floor Plan In Autocad Fantasticeng

How To Draw Autocad Floor Plan Cad Cam Blog

Making A Simple Floor Plan In Autocad Part 3 Of

How To Draw Floor Plans In Autocad Edrawmax