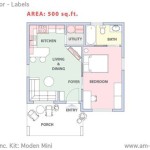
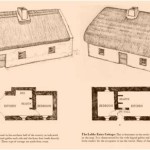
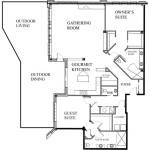
How To Make Your Own Floor Plans
Floor plans are essential tools for anyone involved in home design, renovation, or real estate. They provide a visual representation of a space, outlining the layout of rooms, walls, doors, windows, and other features. While professional floor plan creation often requires specialized software and expertise, creating basic floor plans for personal use is feasible and enjoyable, even for beginners. This article will guide you through the process of making your own floor plans using readily available tools and techniques.
1. Gathering Essential Information
Before embarking on the actual drawing, it's crucial to gather accurate information about the space you intend to depict. This information will serve as the foundation of your floor plan and ensure its accuracy and practicality.
Start by taking precise measurements of all rooms, including their length, width, and any irregularities in their shape. Measure the positions of doors, windows, walls, and any built-in features such as fireplaces, cabinets, and staircases. Note the dimensions of these elements as well. Use a tape measure for accurate results and record your measurements in a notebook or spreadsheet for easy reference.
If you're working with an existing house, consult blueprints or plans if available. These documents can provide valuable insights into the building's structure, including wall thicknesses, room sizes, and the locations of electrical outlets and plumbing fixtures. If these plans are not accessible, carefully examine the existing layout of the space, paying attention to the placement of doors, windows, and structural elements.
Consider the purpose of your floor plan. Are you planning a home renovation, designing a new layout, or simply documenting your existing space? The level of detail you include will depend on the intended use of the plan. For simple layouts, focusing on basic features like room dimensions, door and window placement, and major furniture positions might suffice. For more comprehensive plans, incorporating information about electrical outlets, plumbing lines, and other utilities can be essential.
2. Selecting the Right Tools
Once you have amassed your measurements and data, it's time to choose the tools that best suit your skill level and the complexity of your project. Several options are available, ranging from free online tools to professional software applications.
For simple floor plans, free online tools like RoomSketcher, Planner 5D, and Floorplanner offer user-friendly interfaces and intuitive features. These platforms typically guide you through the process step by step, allowing you to draw walls, add doors and windows, and place furniture. Some even offer 3D views of your floor plan, providing a more realistic representation of the space. These tools are ideal for beginners or for creating straightforward layouts for personal use.
For more advanced projects or when greater control over details is desired, professional software applications like AutoCAD, Chief Architect, and Revit provide a wider range of features and customization options. These programs allow for intricate details, precise drawing tools, and advanced functionalities like object layering and material specification. While these applications require a learning curve, they offer unparalleled precision and flexibility for creating complex floor plans.
If you prefer traditional methods, you can opt for drawing your floor plan by hand using graph paper or drawing software on a computer. While this approach requires more time and effort, it allows for greater creative freedom and can be a rewarding process. Tools like rulers, compasses, and templates can aid in achieving accurate measurements and consistent lines.
3. Creating the Floor Plan
With your information and tools in hand, you can now begin creating your floor plan. Start by drawing the perimeter walls of the space, accurately representing their lengths and angles. If your space has any irregularities, such as curved walls or angled corners, carefully measure and depict them.
Next, add the doors and windows. Draw their approximate sizes and locations, ensuring they align with your measurements. Include any other built-in features, such as fireplaces, cabinets, or stairwells, using the same method. Use a consistent scale for all elements to maintain accuracy and visual consistency.
As you progress, utilize symbols and annotations to convey additional information. For example, use different colors or patterns to distinguish different materials, such as carpet, tile, or hardwood flooring. Add symbols for electrical outlets, plumbing fixtures, and other utilities. You can also use arrows to indicate the direction of doors and windows.
Remember, your floor plan is a visual representation of a space. Aim for clarity, accuracy, and a visually appealing design. Use a consistent font and scale, and make sure all elements are clearly labeled. Consider using color to highlight different areas or features, adding depth and visual interest.
Once you have completed your basic floor plan, you can begin adding furniture and fixtures. Use scaled furniture representations or create your own custom shapes. Experiment with different arrangements to find the most functional and aesthetically pleasing layout.
Creating your own floor plans empowers you to visualize your space and make informed decisions about design, layout, and functionality. With the right tools and techniques, even beginners can create effective and visually appealing floor plans for personal use.

Make Your Own Blueprint How To Draw Floor Plans

Make Your Own Floor Plans

How To Draw A Floor Plan Live Home 3d

House Plans How To Design Your Home Plan

Make Your Own Blueprint How To Draw Floor Plans

Floor Plan Creator And Designer Free Easy App

Design Your Own Home House Designing Homes

Be Your Own Floorplanner How To Draw House Plans Drawing Building A

From Sketch To Reality How Design A House You Ll Love

Floor Plans Solution Conceptdraw Com