How To Put Measurements In A Floor Plan
Accurate measurements are crucial for any floor plan. They provide the foundation for construction, interior design, furniture placement, and accurate cost estimations. This article outlines the essential steps and best practices for incorporating measurements into a floor plan, ensuring clarity and avoiding potential issues down the line.
Establish a Consistent Scale
Before beginning any measurements, establish a consistent scale for the floor plan. Common scales include 1/4 inch = 1 foot, 1/8 inch = 1 foot, and 1:50 or 1:100 for metric systems. The chosen scale should allow the entire floor plan to fit comfortably on the chosen paper or digital canvas while still providing sufficient detail. Clearly indicate the chosen scale on the floor plan to eliminate ambiguity.
Measure Each Room Individually
Begin by measuring each room individually. Measure the length and width of each room at its longest points, accounting for any recesses or projections. Record these measurements directly on a sketch or within dedicated software. For more complex shapes, break down the room into smaller, measurable rectangles or squares and then sum the individual measurements.
Include Wall Thicknesses
Wall thicknesses significantly impact the overall dimensions of a space. Measure the thickness of all interior and exterior walls and represent these accurately on the floor plan. This is particularly important for accurate calculations of room sizes and overall square footage. Indicate wall thickness using a distinct line weight or pattern to differentiate it from the room boundaries.
Document Door and Window Openings
Doors and windows are integral parts of any floor plan. Measure the width and height of each opening and its distance from the nearest wall. Accurately represent these measurements on the floor plan, including the swing direction of doors. This information is essential for furniture placement, accessibility considerations, and window treatment planning.
Indicate Fixed Installations
Fixed installations such as fireplaces, built-in cabinets, and plumbing fixtures should be included in the floor plan. Measure their dimensions and their location relative to the walls. Clearly mark these features on the plan, using appropriate symbols or labels. This ensures accurate space planning and avoids conflicts during construction or renovation.
Use Clear and Consistent Units
Consistency in units is paramount for avoiding confusion. Choose either feet and inches or metric units (meters and centimeters) and adhere to that system throughout the entire floor plan. Clearly label each measurement with its corresponding unit to avoid any misinterpretations. Avoid mixing units within the same floor plan.
Employ Digital Tools for Accuracy
While hand-drawn floor plans can be useful for initial conceptualization, using digital tools offers greater accuracy and flexibility. Computer-aided design (CAD) software or specialized floor plan software allows for precise measurements, easy scaling, and efficient modifications. These tools often include features for automatic dimensioning, ensuring consistency and reducing the risk of human error.
Double-Check all Measurements
Before finalizing the floor plan, thoroughly double-check all measurements. Re-measure critical dimensions to ensure accuracy. Discrepancies, even small ones, can lead to significant issues during construction or furniture placement. A careful review process is essential for preventing costly mistakes.
Provide Overall Dimensions
Include overall dimensions for the entire floor plan, including the exterior walls. This provides a comprehensive view of the building's footprint and is crucial for site planning and permit applications. Clearly label these overall dimensions to distinguish them from individual room measurements.
Use Dimension Lines and Text
Utilize clear dimension lines and text to represent measurements on the floor plan. Dimension lines should be thin and extend slightly beyond the measured area, with arrowheads at each end. Place the numerical measurement above the dimension line, using a legible font size. Maintain consistency in the placement and style of dimension lines and text throughout the plan.
Consider Accessibility Requirements
If accessibility is a concern, ensure the floor plan reflects necessary clearances and dimensions. Include measurements for doorways, hallways, and turning radii to ensure compliance with accessibility guidelines. This is crucial for creating inclusive spaces that accommodate individuals with mobility challenges.

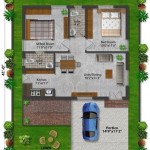
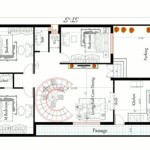
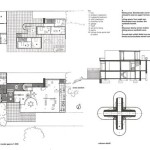
12 Examples Of Floor Plans With Dimensions

Add Measurements

How To Read A Floor Plan With Dimensions Houseplans Blog Com

Floor Plans With Dimensions Including Examples Cedreo

Adding Dimensions To Your Floor Plan

How To Properly Read Floor Plans And What Details Look For

How To Read A Floor Plan With Dimensions Houseplans Blog Com

Overview Measurements On Floor Plans Roomsketcher Help Center

Display Outside Wall Measurements On 2d Floor Plans Roomsketcher Help Center

How To Read Floor Plans